In today's digital age, music streaming platforms like YouTube Music offer access to millions of songs at your fingertips. However, if you're a music enthusiast with a personal collection of rare, custom, or locally produced tracks, you might not always find them available in the streaming library. That's where YouTube Music's music upload feature comes in handy. Whether you're looking to consolidate your favorite tracks or enjoy your unique collection across devices, the platform offers a convenient upload feature, allowing you to create your personal mix of tunes that suits your preference and vibe. Once uploaded, your tracks integrate seamlessly into YouTube Music's interface, giving you the freedom to create playlists, play them offline, or enjoy music without ads—all within the same app.
This guide will walk you through how to upload music to YouTube Music, including the extra tips to download the uploads or the streaming YouTube music. Before we dive into the exact steps to upload music, let's look at some questions asked by most people.
Part 1. FAQs About Uploading Songs to YouTube Music
# Can I upload music on YouTube Music using my phone?
Unfortunately, at this time, the ability to upload music to YouTube Music is only available on desktop browsers. However, once the music is uploaded via your computer, you can listen to it seamlessly across your devices, including your phone.
# Do I need to subscribe to YouTube Music Premium for uploading?
No, uploading personal music to YouTube Music is available to all users, regardless of whether they are free or Premium subscribers. However, a Premium subscription does provide additional perks, such as ad-free streaming and offline playback for the broader YouTube Music library.
# Can other YouTube Music users listen to my uploaded music?
No, uploaded tracks are private and are only accessible to the account holder who uploaded them. This makes YouTube Music a great tool for organizing and enjoying your personal music collection without sharing it publicly.
Part 2. How to Upload Music to YouTube Music
As is mentioned above, the uploading feature is unavailable on your mobile phone. As for computer, there are two ways for you to upload your own local music files to YouTube Music.
- Go to the official YouTube Music web player and log in with your account.
- Open File Explorer on your computer and drag and drop the music file you want to upload to the any surface of YouTube Music web player.
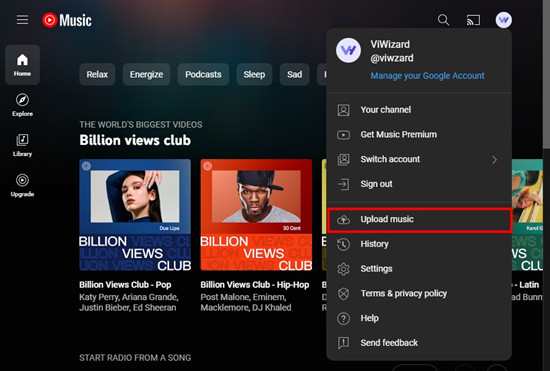
- Or you can click on your profile icon and select Upload music, which will automatically open File Explorer for you.
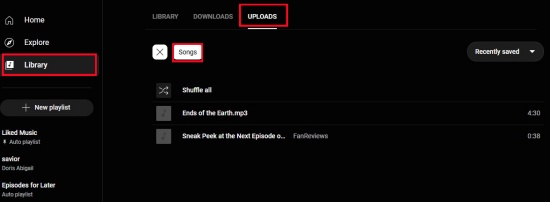
- Once you uploaded the songs you want, you can go to Library > UPLOADS > Songs to view and manage your uploads.
Things You Need to Know:
- YouTube Music only support music files in MP3, M4A, FLAC, OGG and WMA.
- You can upload up to 100000 songs to your YouTube Music library.
- All YouTube Music users can create playlists combining uploaded tracks with songs from the YouTube Music library.
- Your uploaded music will not affect your recommendations on YouTube Music.
- Only you can access and play the music you upload; other YouTube Music users cannot see or play your uploads.
- If you share a playlist containing uploaded songs, others won't be able to play those specific tracks, even members of your Google or YouTube family plan.
- Uploaded songs can be played in the background, ad-free, and offline, even without a YouTube Music Premium subscription.
- Premium members can also cast their uploaded music or play it through smart speakers like Alexa and Sonos.
- Only audio files, along with their metadata and album art, can be uploaded. Files like videos, PDFs, or other formats are not supported.
- You may be informed the failure of uploading a certain song, if you have uploaded the same song before.
Extra Tip: How to Download Uploaded/Streaming YouTube Music [Free]
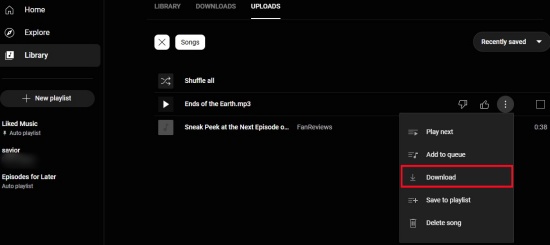
If you are in the area of weak connection of internet, or you just want to listen to your uploads offline, you can download your uploads within the YouTube Music by clicking on the three-dots besides the uploaded music. Then click on Download.
Still, there are some users want to download streaming YouTube music for offline listening, we are here to provide you with a method to download the streaming songs within YouTube Music without a subscription—ViWizard YouTube Music Converter.
ViWizard YouTube Music Converter aims to save and download your favorite YouTube track to your computer as local files with its original sound quality. No matter you are a Premium subscriber or not, you can get YouTube music just by playing and recording them. Equipped with a built-in audio and ID3 tag edition feature, you are able to personalize the recorded music in various formats (like MP3, M4A, WAV and more) and the choose the cover as you like. Besides, not limited to YouTube Music, ViWizard extends its capabilities to capture audio from music or video content from other platforms, like TikTok and Facebook. Whether it's a song, playlist, or video you wish to save, ViWizard has you covered.
Key Features of ViWizard YouTube Music Converter
Free Trial Free Trial* Security verified. 5, 481,347 people have downloaded it.
- Convert YouTube Music to MP3, WAV, FLAC, AAC, and more
- Record songs, albums, playlists, podcasts from YouTube Music
- Support splitting, merging, cutting, and editing YouTube Music
- Detect ID3 tags automatically and allow manual editing of ID3 tags
How to Get YouTube Music Downloads with ViWizard
Step 1Launch ViWizard YouTube Music Downloader
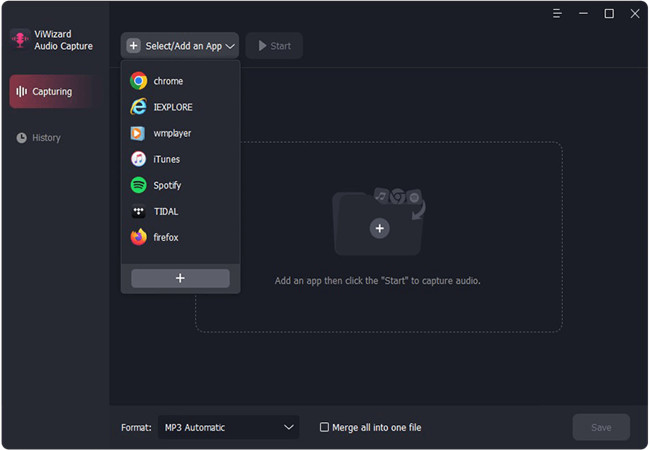
Start by launching ViWizard YouTube Music Downloader on your computer. Make sure the program's built-in web browser is selected, and use it to navigate to music.youtube.com.
Step 2Adjust the Download Settings
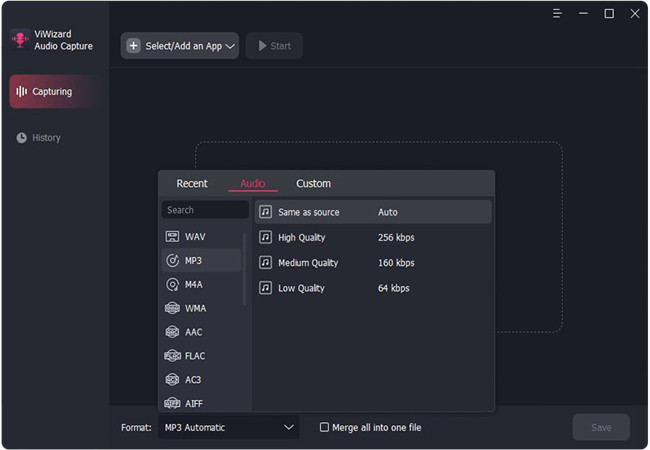
In the ViWizard downloader, locate the "Settings" or "Format" button, typically found in the bottom-right corner of the interface. Here, you can configure your download preferences, such as the audio format, codec, sample rate, bit rate, and audio channels. Once your settings are customized to your liking, click "OK" to save them.
Step 3Begin Downloading Streaming YouTube Music
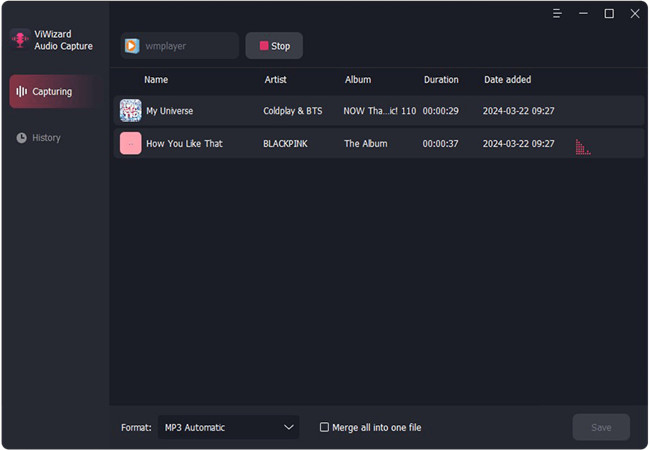
Return to the built-in browser within ViWizard and log in to your YouTube Music account. Find and play the tracks you want to download. ViWizard will automatically detect and capture the audio in the background, with any noise even if you talk to someone.
Step 4Edit Downloaded Tracks (Optional)
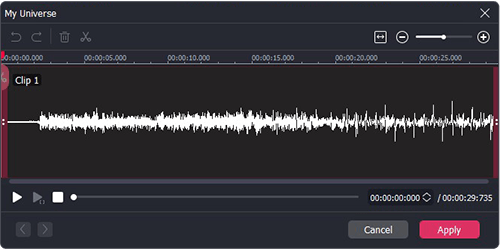
Once your music is captured, you can further refine the downloaded tracks. Use the "Edit" button for individual tracks to split, merge, or combine multiple songs into a single file. You can also edit the ID3 tags to organize your library and add metadata for better management.
Step 5Save and Access Your Downloaded Music
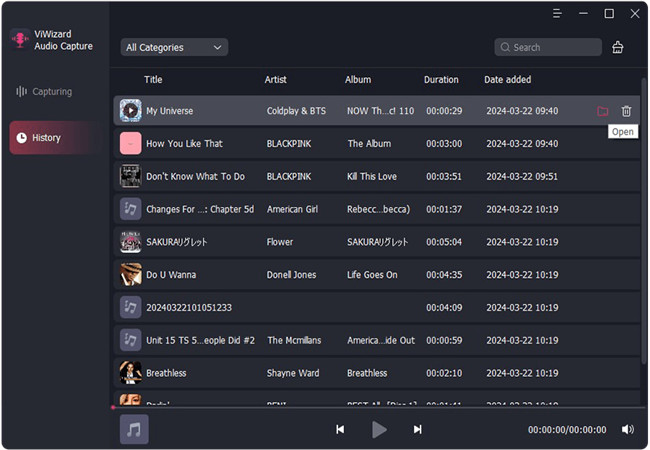
Click "Save" to export the recorded tracks to a folder of your choice on your computer. You can easily locate these tracks later using the "Search" function in the History section at the bottom of the ViWizard window. With your ad-free YouTube Music files saved on your device, you can now transfer them to your mobile phone or other devices, like MP3 player for seamless offline listening anytime, anywhere.
Conclusion
YouTube Music offers a seamless way to upload and enjoy your personal music collection alongside a vast streaming library. With easy steps for uploading on desktop and advanced tools like ViWizard Audio Capture, you can customize your music experience to suit your needs. Whether you're a casual listener or a music enthusiast, YouTube Music ensures you never miss a beat.



Leave a Comment (0)