An increasing number of Tidal users have reported that the app consumes a significant amount of storage space, even when no content has been downloaded. If you are experiencing similar issues, such as app crashes, this guide is for you. Here, we will provide detailed instructions on how to clear the Tidal cache on various devices, including iPhone, Android, Mac, and Windows. Additionally, we will introduce a powerful tool to help you resolve this issue once and for all. Let's dive into the details and discover useful tips to free up the Tidal cache and optimize external storage.

Part 1. Why Does Tidal Require Excessive Storage?
Cache files are temporary data stored on your devices by default. Every time you open the app and stream music, it automatically stores cache files. This is beneficial when you want to access previously played tracks without incurring additional loading time, as they have already been cached from the last playback.
However, it is widely recognized that Tidal offers high-fidelity music with multiple audio formats, such as Tidal Dolby Atmos, MQA, and Sony 360 Reality Audio. These formats require a large bit rate and sample rate to maintain high-quality playback. Consequently, Tidal requires more storage space and generates more cache files to access and utilize its documents and data more efficiently. Particularly, music enthusiasts who frequently listen to Tidal Hi-Res audio, which consumes more data than standard lossless audio, may encounter issues like buffering, pausing, crashing, or other related problems when there is insufficient storage space.
Encountering with Tidal app keeps crashing issue on your mobile and desktop? Check this out to get 8 solutions!
Therefore, it is essential to periodically clean up Tidal cache files to ensure a smooth user experience. Before proceeding with clearing the cache on Tidal, let's identify where the Tidal cache is located on different devices.
For iPhone: The caching system of Tidal on iPhone is intrinsic to the app's infrastructure, concealed from direct user access. Nonetheless, the app provides an in-built mechanism to purge these cache files within its settings.
For Android: Navigate to 'File Manager' > 'Music' > 'Tidal', or tap on the 'Android' folder from the file management app to locate the relevant files.
For Windows: The Tidal cache is typically saved in a folder named 'AppData' in the user's directory.
For Mac: The repository for Tidal's musical cache can be traced to the 'Library' folder, which resides in the user's home directory.
Part 2. Clear Tidal Cache on iPhone/Android
Having grasped the reasons behind Tidal's substantial storage consumption and pinpointed the cache locations, we proceed to dissect the process of clearing Tidal's cache. In this segment, we provide a comprehensive guide to clearing the Tidal cache on both iPhone and Android devices. You may now engage with the following instructions tailored for your device to commence the cleanup.
On iPhone:
-
Way 1:
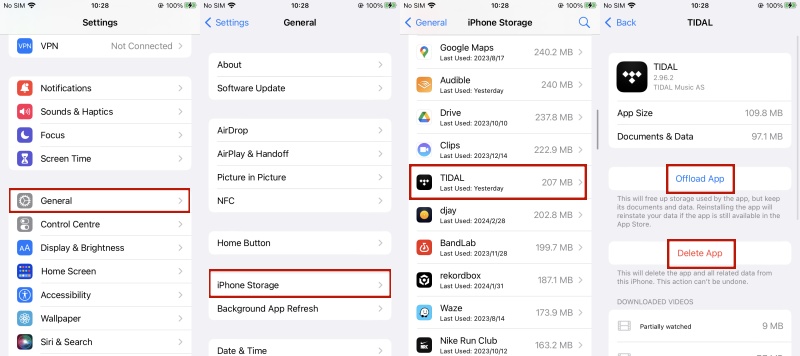
- From the iPhone's home screen, tap to open 'Settings'.
- Navigate to 'General' > 'iPhone Storage'.
- Identify and select the 'Tidal' app.
- Opt for either 'Offload App' or 'Delete App' to eliminate Tidal's cache on your iPhone.
NoteSelecting 'Offload App' will liberate the storage occupied by the Tidal app while retaining its documents and data; reinstalling the Tidal app will restore your data if the app remains available in the App Store. Choosing 'Delete App' will remove the app and all associated Tidal data from the iPhone.
-
Way 2:
- On the iPhone's home screen, launch 'Settings'.
- Scroll down to locate and tap on the 'Tidal' app.
- Within the 'Storage' section, toggle on the 'Reset Cache on Next Launch' option to release Tidal's storage space.
- Relaunch the Tidal app. Subsequently, you will have successfully cleared the Tidal cache on your iPhone.
On Android:
-
Way 1:
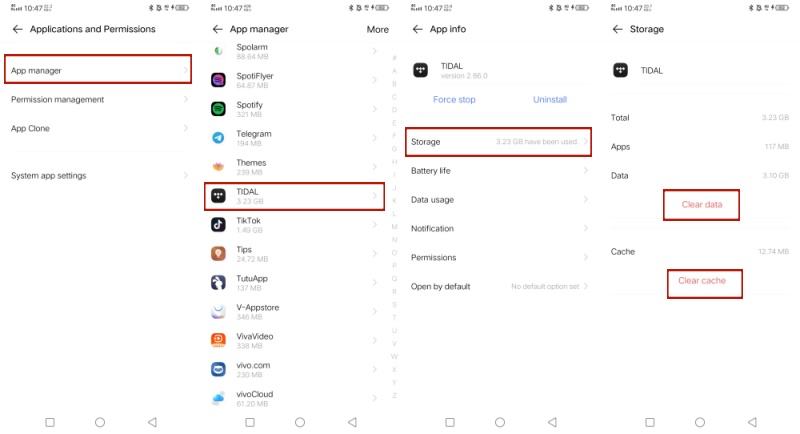
- Access 'Settings' on your Android device.
- Locate and tap 'Applications and Permissions'.
- Select 'App Manager'.
- Scroll to find and tap the Tidal app.
- Tap 'Storage', then choose between 'Clear data' or 'Clear cache'. Completion of these steps signifies a successful clearance of the Tidal cache on your Android device.
-
Way 2:
- Long-press the 'Tidal' icon on the Android screen until the context menu emerges.
- Tap on 'App Info', indicated by an exclamation mark icon.
- Within the appearing window, navigate to 'Storage & cache' > 'Clear cache'.
- Upon completion, you will have effectively cleared the Tidal cache on your Android device.
Part 3. Clear Tidal Cache on Mac/Windows
In this section, we elucidate how to clear the Tidal cache on both Mac and Windows platforms. Contrary to their mobile counterparts, desktop app users enjoy the convenience of direct cache clearance within the Tidal desktop application. The subsequent guidelines are provided for liberating storage space on your computer.
On Mac:
- Activate the Tidal application on your Mac.
- From the top menu bar, navigate and click on 'Preferences'.
- Proceed by selecting the 'Cache' option from the list.
- Identify and choose the 'Clear Cache' tab. Affirm your choice by clicking 'Clear' when prompted with a confirmation dialog.
On Windows:
-
Way 1:
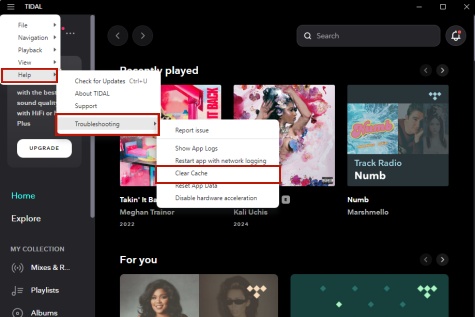
- Initiate the Tidal application on your PC.
- Locate and click the Three Horizontal Lines icon in the upper-left corner.
- From the descending menu, navigate to Help > Troubleshooting > Clear Cache to execute the Tidal cache removal.
-
Way 2:
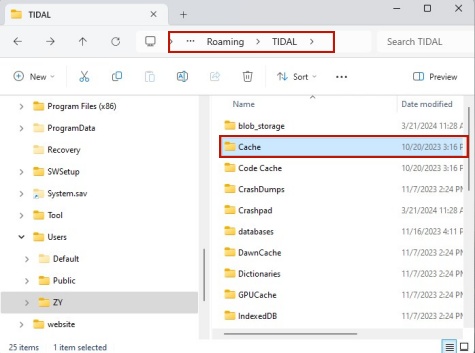
- Open the File Explorer on your PC.
- Navigate to the directory '
C:\Users\[Users' Name]\AppData\Roaming\TIDAL'. - Locate and select the Cache folder.
- Right-click and choose to Delete the contents. Completion of these steps indicates a successful cache purge within the Tidal application on your Windows device.
Part 4. Clear Tidal Cache for All Devices
The aforementioned techniques for clearing Tidal's cache do not offer permanent solutions. In actuality, the cache can swiftly replenish itself with regular use of the Tidal platform. Regardless of whether you're streaming Tidal songs, curating playlists, or merely marking tracks as favorites, Tidal will inevitably accumulate a significant amount of data. Encountering technical hitches with Tidal, such as unexpected pauses or general service unavailability, is also a possibility.
Fortunately, the ViWizard Tidal Music Converter offers a robust solution to this persistent issue. This user-friendly yet powerful converter is designed for all Tidal subscribers, facilitating the conversion of Tidal's music into MP3 and other widely supported audio formats like WAV, AAC, and FLAC, among others. During the conversion process, ViWizard efficiently strips away Tidal's DRM protection. Even if you're utilizing a Tidal free account, ViWizard remains capable of assisting in the song download process. Moreover, the downloaded Tidal files can be conveniently stored on an SD card or USB drive, both offering substantially more storage compared to the Tidal app.
ViWizard Tidal Music Converter further empowers you to download and convert entire batches of Tidal tracks simultaneously, cutting down on wait times with its cutting-edge technology that accelerates the conversion by fivefold. The tool also enables users to tailor their audio settings to suit personal preferences, including adjustments to the bit rate and sample rate. With ViWizard at your disposal, you're granted the freedom to play your downloaded Tidal tracks on any device you prefer, all while circumventing the need for cumbersome cache management.
Key Features of ViWizard Tidal Music Converter
Free Trial Free Trial* Security verified. 5, 481,347 people have downloaded it.
- Download full songs, albums, playlists, and artists from Tidal without ads offline
- Convert Tidal tracks in bulk at up to 35x faster speed
- Export Tidal music to MP3, FLAC, WAV, AIFF, M4A, and M4B
- Support various quality options up to a maximum of 24-bit, 192 kHz
Upon installing ViWizard Tidal Music Converter, simply follow the accompanying instructional guide to transfer Tidal music tracks directly to your SD card or USB device, bypassing the need for cached files altogether.
Step 1Select and Add Tidal Tracks

Begin by initiating the ViWizard Tidal Music Converter on your computer. Subsequently, the ViWizard application will identify the Tidal Music desktop client, initiating or restarting it to facilitate an uninterrupted conversion process. Proceed to peruse the Tidal music repository, handpicking the tracks you desire to download. You have the flexibility to add them to the main interface via two convenient methods: a straightforward drag-and-drop action or pasting the track's shared URL into the search bar followed by clicking the 'Plus' icon.
Step 2Adjust the Output Parameters
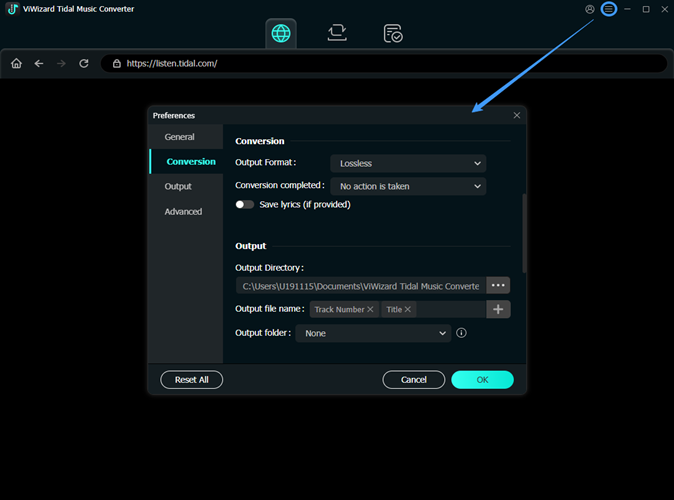
Advance to the 'Menu' section located in the upper-right quadrant and click on 'Preferences' followed by 'Convert'. This dialog box allows you to specify the output format and adjust various audio parameters such as sample rate, bit rate, audio channels, and codec. For archiving your Tidal tracks with a minimal storage footprint, we endorse the MP3 format. Conclude this step by clicking 'OK' to preserve all adjustments made.
Step 3Download and Convert Tidal Music
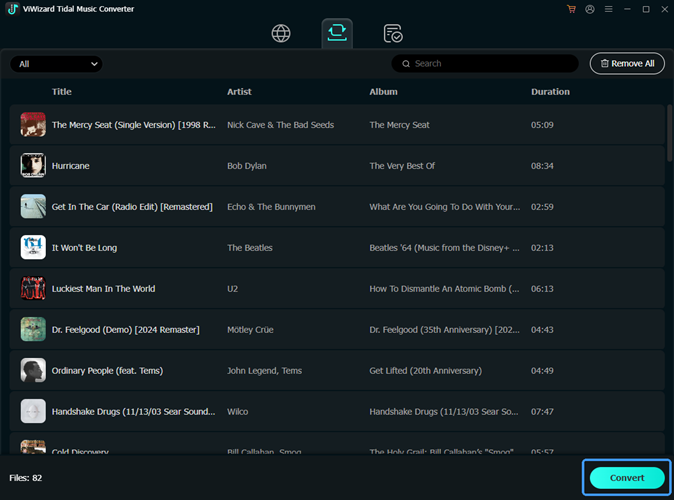
Activate the 'Convert' button to kickstart the process, which swiftly concludes within a matter of moments at an accelerated 5x speed (Windows) or standard 1x speed (Mac). Post-conversion, you can navigate to the 'Converted' section to locate and review your freshly acquired Tidal tracks.
Step 4Transfer Tidal Downloads to SD Card/USB Drive
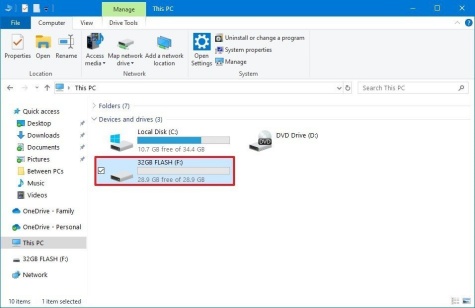
As a subsequent step, exporting or transferring your Tidal music onto an SD card for secure backup is effortless. Begin by inserting your SD card into the corresponding reader or ensuring your USB drive is ready. Next, connect the reader or USB drive to the computer's USB port. Locate the directory containing your converted Tidal songs, and with ease, transfer these files directly onto the SD card or USB drive. Once the transfer is complete, you can seamlessly connect the SD card or USB drive to compatible devices such as speakers or TVs for enjoyment. And you reduce the Tidal cache once and for all.
Part 5. FAQs about Clearing Tidal Cache
Q1.How can I delete downloads from Tidal?
A1.To eliminate downloads on Tidal, adhere to these guidelines:
- Navigate to the 'My Collection' tab within the Tidal app, accessible from the bottom navigational bar.
- Seek the 'Downloaded' category and select the downloads slated for deletion.
- Swipe left on the desired item and tap the 'Delete' button to purge it from Tidal.
Q2.How can I prevent Tidal from occupying excessive storage on my device?
A2.You might consider clearing the Tidal cache by implementing the procedures outlined in Part 1. Alternatively, you could adopt the following strategies:
- Excise downloaded Tidal tracks
- Modify Tidal music quality prior to song downloads
- Uninstall and re-install the Tidal app
Begin within the Tidal mobile app by accessing your profile. Pinpoint any specific track, playlist, or album you wish to eradicate. Subsequently, click on the 'three-dots' icon and opt for 'Remove from My Collection' followed by 'Remove'. Additionally, you may venture into the Settings of your Tidal mobile app, proceeding to 'My Content' and then selecting 'Delete Download Content'.
Venture into the Settings area of your Tidal mobile app. From there, opt for 'Quality' and then 'Download'. Next, adjust the download audio quality to 'Normal' under the 'Audio' section. Finally, choose 'Audio Only'.
You have the option to uninstall and subsequently re-install the Tidal app on your mobile or desktop unit to clear the Tidal cache.
Q3.Why does Tidal experience frequent glitches?
A3.As previously mentioned, an abundance of cached files can consume Tidal's storage space, hindering smooth operation until cache files are cleared. Additionally, glitches may be attributed to other factors such as network connectivity issues, server errors, or device-specific challenges. For troubleshooting, you might attempt restarting the app or your device, scrutinizing your internet connection, or seeking support from Tidal's customer service team. If immediate and effective resolution is necessary, it is highly recommended to utilize the ViWizard Tidal Music Converter for downloading Tidal tracks directly onto the computer's hard drive.
Conclusion
Throughout this tutorial, we have delved into both conventional and sophisticated strategies for clearing the Tidal cache across various platforms, including iPhone, Android, Windows, and Mac. Upon comparative analysis, it is highly suggested that you explore the capabilities of ViWizard Tidal Music Converter. This robust tool negates the constant need to reset the Tidal cache and adeptly addresses numerous Tidal malfunctions. Once you've transferred Tidal downloads to your computer, you gain the flexibility to enjoy Tidal's music library on a multitude of devices independent of the Tidal app, thereby enabling a significant reduction in Tidal cache accumulation.

Leave a Comment (0)