Spotify is perfect for streaming music, but what if you want to listen offline or store your favorite tracks on a USB drive?
It sounds like an easy solution, but the process isn't as simple as it seems. Since Spotify is a streaming service, downloading music directly to a USB isn't something it offers by default.
So, does that mean you're stuck streaming everything from the app and can't enjoy your music without an internet connection?
Thankfully, that's not the case. You can transfer Spotify music to a USB, though the process varies depending on whether you're a Premium or Free user. For Premium users, it's relatively easy, but there are restrictions for both Premium and Free users, and a few extra steps are needed to get your music onto a USB.
The key thing to know is that since Spotify doesn't natively support saving music to USB, the process involves a bit of a workaround using the ViWizard Spotify Music Converter. Let me show you exactly how this works in the real world, along with what you need to get started.
Part 1. How to Download Music from Spotify to USB (Premium Users Only)
Make Use of Premium Tier on Desktop: You can use your USB drive as a storage option for Spotify offline music. This feature is only available to Premium users, and it helps free up space on your computer while still allowing you to access music offline, as well as in places that support USB Media Players, like your car, or as a simple backup in case anything happens to your music library.
The Premium version (the app version where you're signed in with a Premium account) on desktop devices like your PC or Mac comes with offline listening features and the ability to manage your downloaded content. However, finding the files and transferring them to your USB drive can feel like an impossible task because these files are protected.
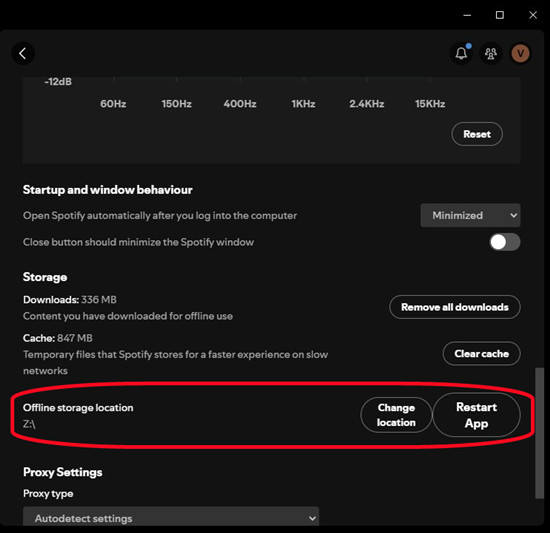
To make things easier, connect your USB drive to your computer. Then, open the app and go to the Settings menu. Under the Offline Storage Location section, select your USB drive.
Once set up, Spotify will store all future offline music downloads—including playlists, albums, podcasts, and audiobooks—on the USB drive. These files will be accessible even without an internet connection, acting like cached files. However, as mentioned earlier, they won't be in a common format like MP3, which is supported on other devices without the official Spotify app.
If this limitation is an issue, you can use ViWizard to convert your Spotify music into a more accessible format. Head to Part 2 for more details on how this tool works.
What You'll Need:
- Eligible subscription: Ensure you have a subscription account for offline downloads.
- USB Drive: If necessary, prepare a USB drive formatted and ready for use.
- Computer with the Spotify app: Most popular computers like Windows and Mac are compatible with Spotify.
- Plug your USB drive into your computer. If it's not formatted correctly, follow on-screen instructions to format it as required.
- Open the Spotify app on your desktop.
- Navigate to Settings > Storage.
- Scroll down to Offline storage location.
- Click on "Change location" and select your USB drive as the new storage location.
- Find the music, podcasts, or audiobooks you want to download.
- Next to each item, click the download button to save them to your USB drive.
- Once downloaded, your content will be stored on your USB drive and accessible offline.
If you plan to play downloaded music on other devices such as smart TVs, vehicles, or game consoles, keep in mind that DRM (Digital Rights Management) may restrict access beyond the Spotify app. Additional tools may be required to convert or transfer files for broader use.
Part 2. How to Download and Transfer Music from Spotify to USB Without Premium
Take Advantage of ViWizard on Desktop: While this isn't exactly the same method as for Premium subscribers in Part 1, it's also a great option we recommend for both Premium and free users, as it helps achieve the core goal of using a USB drive for Spotify music storage. The downloaded music files are encrypted and cached within the app due to DRM (Digital Rights Management), meaning they're not accessible outside of Spotify. Plus, they won't be in a flexible format like MP3.
To make these files usable on other devices, you'll need a tool like ViWizard Spotify Music Converter. This software allows both Premium and free users to convert Spotify songs into MP3 format. Once converted, you can transfer the MP3 files to your USB drive and use them on any device that supports MP3 playback. The ability to convert Spotify music easily makes this one of the best solutions for music storage. You should definitely give it a try!
Note: The converted tracks should be used strictly for personal enjoyment and in accordance with Spotify's terms of service.
Key Features of ViWizard Spotify Music Converter
Free Trial Free Trial* Security verified. 5, 481,347 people have downloaded it.
- Download Spotify songs, playlists, podcasts, and audiobooks extremely fast at up to 15x speed
- Convert Spotify into MP3, FLAC, WAV, AIFF, M4A, and M4B losslessly
- Lets you play Spotify tracks offline on any device without restrictions
- Works seamlessly on Windows and macOS, supporting the built-in Spotify Web Player
Step 1Download and Install ViWizard Spotify Music Converter
To get started, first download ViWizard Spotify Music Converter to your computer. Once the download is complete, run the installer and follow the prompts to set up the software. After installation, open the ViWizard program, and log in to your Spotify account. Whether you're using a free or Premium account, you can access Spotify's Web Player directly within ViWizard.
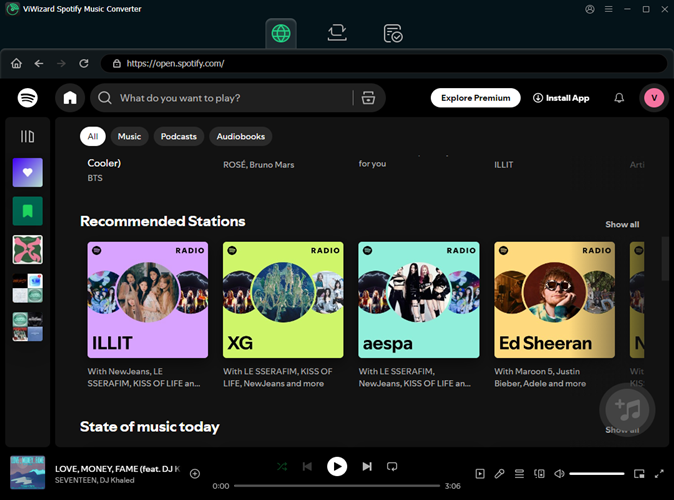
Step 2Add Spotify Music to ViWizard
Once logged in, you can easily add music to ViWizard. You can either drag and drop individual songs, albums, or playlists from Spotify directly into ViWizard, or simply paste the URL of the content you want to convert into the search bar. The tracks you select will automatically populate in the conversion list, ready for the next step.
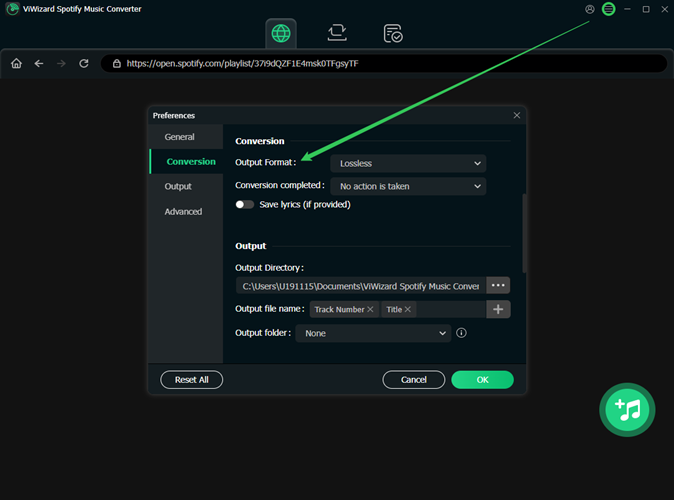
Step 3Customize Output Audio Settings
Before starting the conversion, you'll want to adjust the output settings to match the format that works best for your USB drive. Click the Menu icon in the top-right corner of ViWizard and choose Preferences. Here, you can select from various audio formats like MP3, M4A, WAV, FLAC, AIFF, or M4B. Additionally, you can tweak the bitrate and sample rate to control the quality of your music. After making your choices, click OK to save the settings.
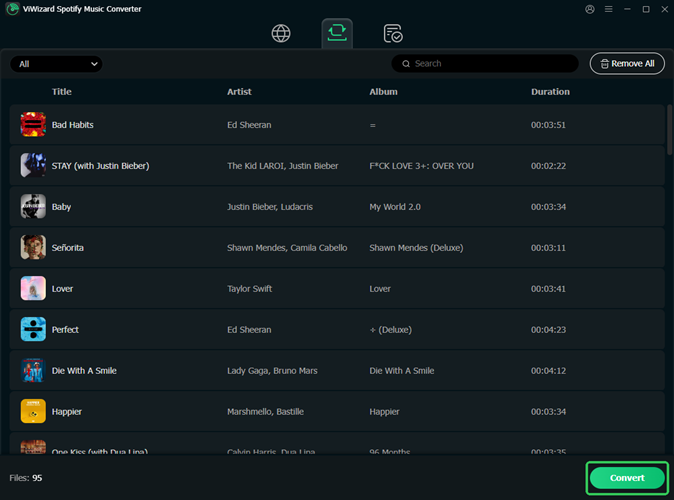
Step 4Select Music for Conversion
Now that your settings are ready, it's time to choose the music you want to convert. Whether you've selected individual tracks, albums, or playlists, click on the items in your list. ViWizard also lets you convert podcasts or audiobooks, and you can organize your music by title, artist, or album to make it easier to navigate.
Step 5Convert and Save to USB
Once your music is selected, click the Convert button to begin the conversion process. ViWizard will convert the tracks to the format you've selected. Once completed, the converted music files will be saved in the output folder you chose earlier. To find your newly converted music, simply click the Open Folder icon. Now, you can transfer these MP3 (or other formats) files to your USB drive, ready to be used on any device that supports MP3 playback.
For Windows PC Users:

- Insert your USB drive into your PC's USB port. It should be recognized automatically.
- Click the folder icon on your taskbar or press the Windows key + E to open File Explorer.
- Look for your USB drive under "This PC" in the left sidebar of File Explorer.
- Navigate to where you saved your MP3 music files on your PC.
- Select the files and folders you want to copy (Ctrl+A to select all). Right-click, choose "Copy," or press Ctrl+C.
- Return to your USB drive in File Explorer. Right-click in the USB drive window and choose "Paste" (Ctrl+V).
- Wait for the copying to finish. Right-click on your USB drive in File Explorer and select "Eject." You can now safely remove your USB drive.
For Mac Users:
- Insert your USB drive into a USB port on your Mac.
- Click the smiley face icon in your dock to open Finder.
- In the left sidebar, find your USB drive listed under "Devices."
- Navigate to where your MP3 files are stored on your Mac.
- Select the music files and folders you want to copy. Drag them over to your USB drive in the Finder sidebar.
- In the Finder sidebar, right-click on your USB drive and select "Eject." You can now safely remove your USB drive.
Part 3. How to Play Spotify Music from USB
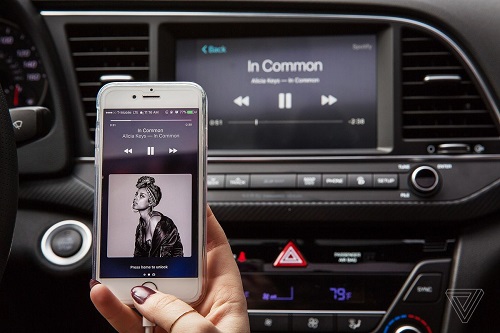
You've got your Spotify music on a USB drive, and now it's time to enjoy it in your car. Here's how to do it, using a Tesla Model 3 as an example:
- Insert the USB drive into one of the USB ports in your Tesla Model 3. You'll typically find these ports in the center console.
- While sitting in your car, tap the "Media" icon on the Tesla Model 3's touchscreen. This opens the media control interface.
- In the media interface, choose your USB drive as the music source. It should be listed among the available media sources.
- Now, you can navigate through your music folders or playlists using the touchscreen. Tap on the folder or playlist you want to listen to and select a specific song to start playing.
- You're all set to enjoy your Spotify music through your Tesla Model 3's audio system. Adjust the volume, skip tracks, and manage playback using the touchscreen controls or the steering wheel buttons as you drive.
This post provides the 6 most popular and easiest ways for you to play Spotify music songs in your car via a cable, Bluetooth, Android Auto, CarPlay, or external drive/CD.
Part 4. FAQs about Downloading Spotify Music to USB
Can I download Spotify music directly to a USB drive?
Spotify allows Premium users to download music for offline listening, but the files are encrypted and can only be played in the Spotify app. You can't save them directly to a USB drive for use on other devices.
Can I convert Spotify music to MP3 and transfer it to a USB drive?
Yes, you can. With a tool like ViWizard Spotify Music Converter, you can convert Spotify music to MP3 files and transfer them to a USB drive. You can then use those MP3 files on any device that supports MP3 playback. But these converted files are for personal use only, as per Spotify's terms of service.
Can I play Spotify music on my car's USB port?
Spotify's encrypted music files won't work on a USB port in your car. However, you can still play Spotify in your car by connecting through Bluetooth, using an aux cable, or by transferring MP3 files (converted from Spotify) to a USB drive.
How do I back up my Spotify playlists to a USB drive?
You can't back up Spotify playlists directly to a USB drive due to encryption. However, you can convert your playlists into MP3 files and then transfer them to the USB drive so as to keep a backup for offline use.
Are there any legal issues when transferring Spotify music to a USB drive?
Yes, it's important to follow Spotify's terms of service. Converting and transferring Spotify music should be for personal use only. Sharing or distributing the files is against Spotify's rules.
Conclusion
Now you have successfully transferred your Spotify songs to a USB drive. You can then insert it into any device with a USB port for playing. In fact, ViWizard Spotify Music Converter is the best Spotify solution to download music from Spotify to MP3, AAC, and other formats. You can then listen to Spotify music on any player or device anytime. It's a perfect tool, so why not give a try?
You May Be Interested


Adam Gorden, the digital media specialist at ViWizard, is dedicated to providing the best solutions for digital media management, including audio and video conversion, file optimization, and media workflow enhancements.
Leave a Comment (0)