Do you love listening to music on Spotify, but wish you could use it freely on any device or for projects that need the audio files? Maybe you've been trying to figure out where your music is downloaded on your device, but end up dealing with cached files instead of the MP3s you want. Whatever the reason, Audacity is a free audio editor that lets you record sound playing on your computer, including from online music streaming services like Spotify. After recording, you can save your tracks in MP3, WAV, or other formats and play them anywhere you like, even if you're no longer tied to the app.
In this guide, we'll walk you through how to record music from Spotify with Audacity, so you can use it for playback, editing, or more—whether you're a free user or a Premium subscriber. But since ads can be irritating during the recording process, we'll also introduce a powerful yet simple alternative: ViWizard Spotify Music Converter, which offers more flexibility by converting the tracks directly to your device.
No matter for Spotify free or premium, ViWizard Spotify Ripper is able to help you rip music from Spotify as MP3 for offline playing on any device. More Spotify rippers are also introduced here.
Part 1. Can I Use Audacity to Record from Spotify?
What Is Audacity?
Audacity is a free, open-source digital audio workstation (DAW) that allows you to record, edit, and manipulate audio files. It's a powerful tool for anyone looking to work with sound, packed with features like multi-track editing, a wide range of audio effects, and support for exporting in formats such as MP3 and WAV. If you're serious about sound editing, Audacity is a tool that's well worth your attention.
Why Can I Use Audacity with Spotify?
Audacity is capable of capturing audio playing through your computer. However, because Spotify tracks are protected by DRM, you can't download or import the songs directly into Audacity. Instead, Audacity records the audio that's playing through your speakers, similar to recording on a tape player while the music is playing. This is exactly what Audacity excels at.
While this method doesn't technically bypass DRM by downloading the music, it's a workaround that allows many users to capture Spotify music for personal use.
- If you're planning to use this method purely for personal purposes and don't mind some legal gray areas, recording with Audacity could be a reasonable option.
- If you're okay with the quality not matching the original track due to potential system limitations, Audacity could still work for you.
- If you're not bothered by occasional background noise or audio interruptions during the recording, Audacity could still be a good choice.
- If you don't mind the manual process of recording each song individually and can tolerate interruptions like ads, Audacity might be worth trying out.
Before you decide if using Audacity to record Spotify is worth it, here's what you should consider:
Best Alternative to Avoid Any Troubles Caused by Audacity
If you want a smoother, more reliable solution without the headaches, it might be worth checking out an alternative like ViWizard. This tool offers both a Spotify Music Downloader (ViWizard Spotify Music Converter) and an audio recording tool (ViWizard Audio Capture). The beauty of ViWizard is that it works directly with Spotify, so you don't have to worry about ads or any loss in audio quality. It saves you time by automating the process and ensuring you're staying within legal boundaries. It's a practical, hassle-free solution if you're looking to save music from Spotify without the complexities of recording it manually through Audacity.
A multifunctional audio recording tool that captures any sound playing on your computer, including streaming music, live radio, game sounds, background music, and online meetings, with built-in auto-splitting and advanced editing features to save recordings in MP3, WAV, and other formats while maintaining the highest quality and embedding track details.
| Feature | ViWizard Music Converter | Audacity Record |
|---|---|---|
| Audio Quality | 100% lossless | Lossy (depends on recording settings) |
| Download Method | Convert and download audio files. | Record and export audio files in real-time. |
| Cross-Platform | Windows and macOS | Windows, macOS, and Linux |
| Audio Format | MP3, M4A, M4B, WAV, AAC, and FLAC | MP3, WAV, FLAC, AIFF, AU, Ogg Vorbis |
| Download Speed | 5x or 1x | 1x (real-time recording) |
| Additional Features | Batch download; preserves metadata and artwork. | Allows editing and trimming of recordings. |
Part 2. How to Record Spotify Music with Audacity
- No extra software needed for basic recording—just adjust your computer settings.
- Free to use, but Mac users may need tools like Soundflower or BlackHole.
- Be aware: Recording from Spotify may break their terms of service.
- Audio quality depends on your system and settings.
- You'll need to play the music in real-time for recording to work.
By configuring Audacity appropriately, you can record Spotify music played on your computer and save it in formats like MP3, WAV, or Ogg Vorbis. Here's how you can record music from Spotify to Audacity:
Step 1 Install Audacity
Visit the official Audacity website and download the latest version compatible with your operating system (Windows, macOS, or Linux). Follow the installation prompts to complete the setup.
Step 2 Configure Audacity
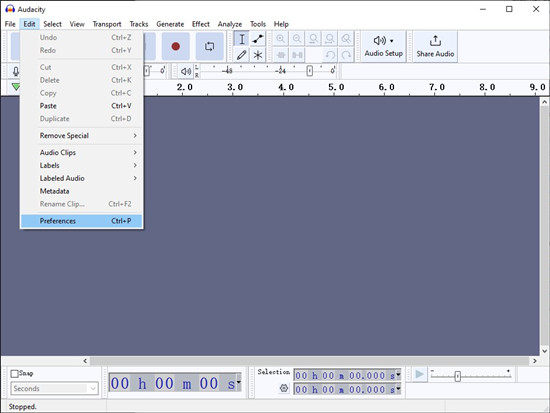
- Launch the Audacity application on your computer.
- Navigate to the toolbar and click on "Edit."
- Select "Preferences" from the dropdown menu.
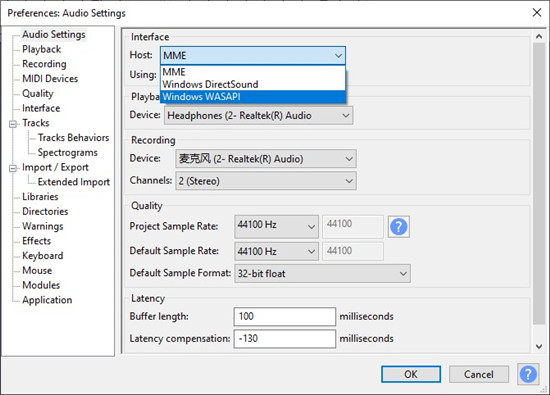
- In the Preferences window, click on "Devices" in the left-hand sidebar.
- Under the "Playback" and "Recording" sections, set the "Host" to "Windows WASAPI" (recommended for better performance).
- For both Playback and Recording, select your computer's speakers or headphones.
- For Recording, choose the loopback input option (e.g., "Speakers (loopback)") to capture the audio from your playback device.
- Click "OK" to save your preferences.
Step 3 Start Recording Spotify Music
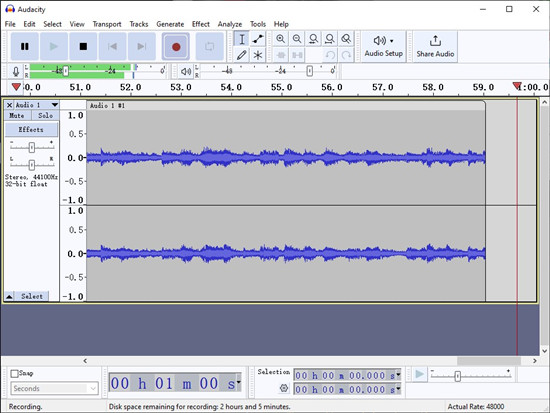
- Open Spotify and play the track or playlist you wish to record.
- In Audacity, click the red
 "Record" button in the toolbar to start recording.
 - Record as long as needed, but keep an eye on the "disk space remaining" message in the Status bar to avoid running out of space.
- Once you're finished recording, pause the audio in Spotify by clicking "Pause" in the Spotify app.
- In Audacity, click the
 "Stop" button to finish the recording.
Step 4 Edit the Recording
Once you've finished recording, it's time to clean up and enhance your audio. Here are some key editing tips:
Use Keyboard Shortcuts: Save time by using shortcuts like Ctrl + X to cut, Ctrl + C to copy, and Ctrl + V to paste.
Fade In and Fade Out: Make the start and end of your audio smoother by using the Fade In and Fade Out effects. Simply select the part you want to change and apply the effect.
Remove Background Noise: If there's unwanted noise, select a section with just the noise, use the Noise Reduction tool to clean it up, and apply it to the whole recording.
Remove Silences: If your recording has long pauses, use the Truncate Silence feature to automatically remove them.
Reduce Low Sounds: Use a High-Pass Filter to get rid of low rumbling sounds. Go to Effect > Equalization > High Pass Filter, and adjust it to remove the bass.
Make Audio Volume Even: Keep the volume level consistent by using the Normalize effect. Go to Effect > Normalize, and apply it to smooth out the volume.
Label Sections for Easy Editing: Use Label Tracks to mark sections in your audio. Press Ctrl + B, and name the label to help you navigate your edits.
Save Your Work Often: Save your project regularly with different names like 'Project_v1', 'Project_v2' to keep versions and avoid losing progress.
Related Stories:
- Resource 1: How to Cut Music from Spotify
- Resource 2: How to Edit Songs and Playlists on Spotify
- Resource 3: How to Make Spotify Sound Louder
- Resource 4: How to Change Playback Speed on Spotify
Step 5 Export the Recording
- Go to "File" > "Export" > "Export Audio..." to open the Export Audio window.
- Select your desired file format (e.g., MP3 or WAV).
- Specify the location on your computer where you want to save the file.
- Click "Save" and, if prompted, adjust any additional settings before finalizing the export.
Part 3. Best Way to Import Songs from Spotify to Audacity
The truth is, recording Spotify music in Audacity can work for some people, but it may not be ideal for everyone. Whether it's the right choice for you depends on a few factors, like your audio quality expectations, how much time you're willing to invest, and whether you're okay with real-time recording.
Why ViWizard?
If you're comfortable with manually recording audio in real-time and don't mind a slight drop in quality, Audacity could be sufficient for your needs. If you want to save time and ensure the highest audio quality, and remove ads, then ViWizard Spotify Music Converter is worth considering. With ViWizard, you can convert Spotify music directly to various formats like MP3, WAV, or FLAC, all without losing quality.
If you're someone who frequently downloads music, playlists, or podcasts from Spotify and values efficiency, ViWizard makes the process faster and simpler. For those looking to quickly capture content without worrying about recording interruptions or audio degradation, ViWizard offers a more professional and convenient solution.
Key Features of ViWizard Spotify Music Converter
Free Trial Free Trial* Security verified. 5, 481,347 people have downloaded it.
- Download Spotify songs, playlists, podcasts, and audiobooks extremely fast at up to 15x speed
- Convert Spotify into MP3, FLAC, WAV, AIFF, M4A, and M4B losslessly
- Lets you play Spotify tracks offline on any device without restrictions
- Works seamlessly on Windows and macOS, supporting the built-in Spotify Web Player
Step 1Download and Install ViWizard Spotify Music Converter
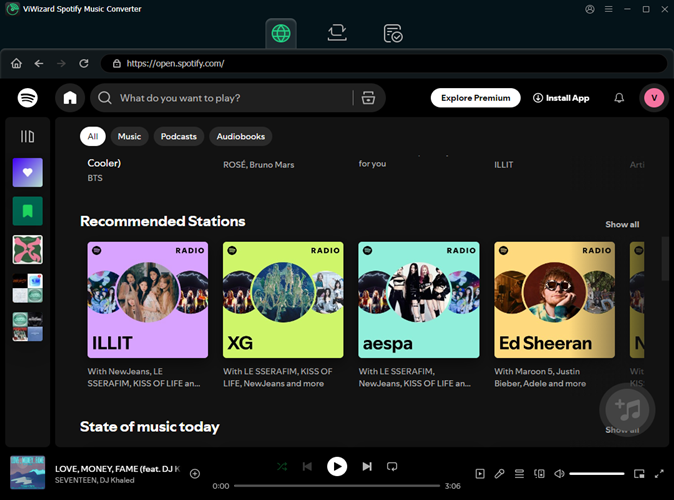
Start by downloading the ViWizard Spotify Music Converter for your computer. Make sure you choose the correct version for your operating system (Windows or Mac). Once the download is complete, run the installer and follow the on-screen instructions. After installation, launch ViWizard to begin converting your Spotify tracks into editable files for further editing in your preferred software, like Audacity.
Step 2Add Spotify Tracks for Conversion
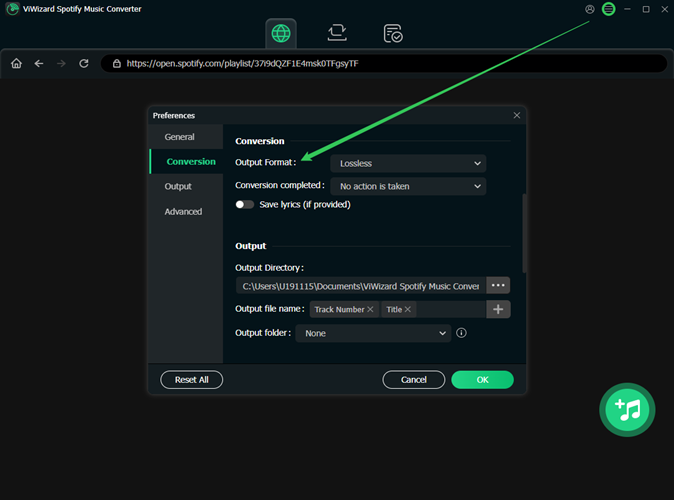
When ViWizard opens, log in to your Spotify account within the software to access your music library. Browse through your playlists, albums, or favorite tracks, and select the ones you wish to convert. Click the "+" icon at the bottom-right corner of the app, which will turn green. Once clicked, ViWizard will automatically load the selected tracks, preparing them for conversion.
Step 3Choose Output Format and Settings
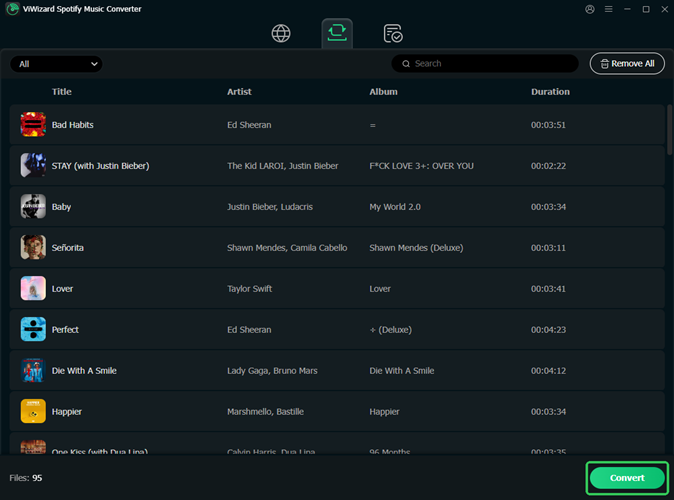
To ensure your converted files are easy to edit, click the three horizontal lines in the top-right corner to open the Preferences menu. Go to Preferences > Conversion, and choose a format that works well with audio editing software, such as MP3, WAV, or FLAC. For the best sound quality, set the bitrate to 320kbps. You can also adjust other settings like sample rate and channels according to your preference for the highest quality.
Step 4Convert and Download Spotify Music
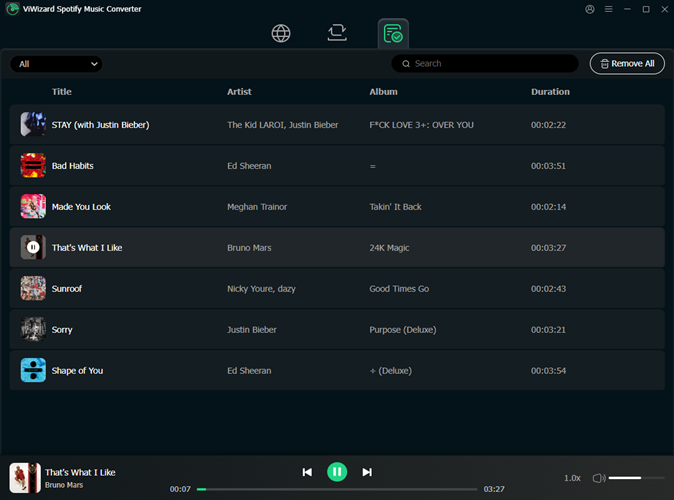
Once your settings are chosen, click the Convert button to start the conversion process. ViWizard will convert your selected tracks at up to 15x faster than standard conversion tools. You can monitor the progress as each track is processed. After the conversion is complete, navigate to the output folder where your newly converted tracks are saved in the format you selected.
Part 4. How to Import Music from Spotify to Audacity
Now that you've converted your Spotify music into an editable format, it's time to bring it into Audacity for further editing.
Step 1 Import Your Converted Spotify Track into Audacity
- Launch Audacity on your computer.
- Locate the converted Spotify file on your system.
- You can import the file in two ways:
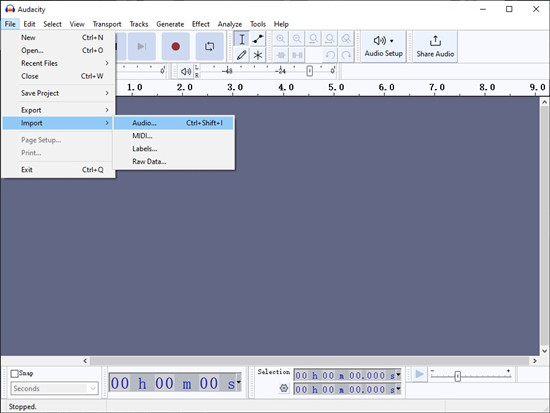
- Click File > Import > Audio, then browse and select the file.
- Or drag and drop the file directly into the Audacity window.
- Your track will appear as a waveform in the workspace.
Step 2 Edit Your Track Using Audacity's Tools

Selection Tool: Click on the Selection Tool to highlight a section of the track. Once selected, press the Delete key to remove the section or cut it for later use.
Envelope Tool: Select the Envelope Tool to adjust the volume levels within your track. Click and drag to change the volume, and add envelope points to create fade-ins and fade-outs.
Draw Tool: Use the Draw Tool for detailed adjustments. Zoom in on the waveform and manipulate individual audio samples for precise editing.
Multi-Tool: Switch to the Multi-Tool, which allows you to use the Selection, Envelope, and Draw Tools all at once for more complex edits.
Step 3 Save Your Edited Track
- Once you're done editing, save your work.
- To keep your project for future edits, save it in Audacity's project format (
.aup). - If you're finished, export the final track in your desired format, such as MP3 or WAV.
The Bottom Line
Of course, you can't go wrong with the free Audacity software to record Spotify music, but if you're a rookie to professional audio editor and recorder, you could probably go wrong though. While the ViWizard Spotify Music Converter provides an ultra-fast method to help you complete downloading music from Spotify, just go and give it a try, you'll find the best way for yourself.



Leave a Comment (0)