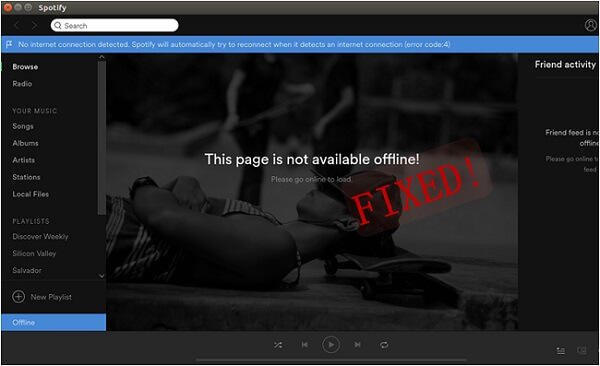
Many Spotify users have met the same problem – Spotify Error Code 4 when using Spotify to listen to music. It typically appears if there's something wrong with the internet connection. But most of the time, the error occurs even when the internet connection works just perfectly. If you unfortunately get stuck with this error on Spotify, simply try these popular solutions introduced in this post. Let's get it fixed quickly now.
Part 1. What Is Error Code 4 on Spotify?
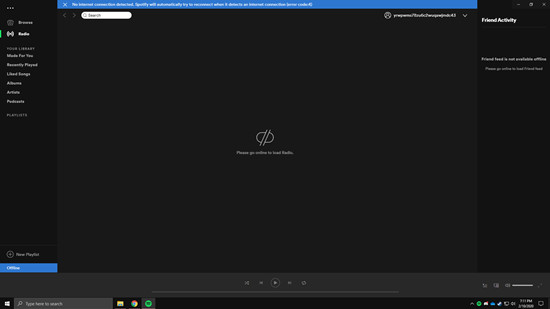
If you've ever been met with the frustrating message "No internet connection detected. Spotify will automatically try to reconnect when it detects an internet connection." or "The page is not available offline," chances are you've encountered Error Code 4 on Spotify. This error is one that often leaves users puzzled, wondering what exactly went wrong with their internet connection and the music streaming service.
What Is Error Code 4 on Spotify?
Error Code 4 on Spotify is a straightforward message indicating that the app is unable to establish a connection to the internet. When Error Code 4 appears on your screen, it's essentially Spotify's way of saying, "Hey, we can't connect to the internet right now, so we can't play your music." It's not that the app itself is malfunctioning; rather, it's struggling to find the digital highway it needs to bring your music to your ears.
What Causes Error Code 4 on Spotify?
There are a few common culprits behind the occurrence of Error Code 4. The primary reason is often a shaky or unreliable internet connection. When your device struggles to maintain a stable connection, Spotify can't retrieve the data it needs, resulting in the error message.
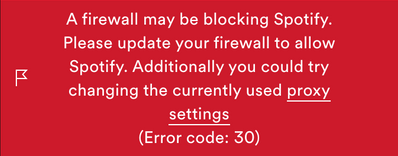
While the error code is most likely to be caused due to a shaky or unreliable internet connection, another potential cause of Error Code 4 lies within the settings of your firewall or antivirus software. These security measures, while crucial for your device's protection, can sometimes be a bit too zealous. They might block Spotify from communicating with its servers, mistakenly flagging it as a potential threat.
Part 2. How to Fix Spotify Error Code 4
Encountering Spotify Error Code 4 can be frustrating, but fear not! There are several steps you can take to troubleshoot and resolve this issue. Let's start with the first solution:
1. Run Windows in Safe Mode with Networking
For Windows users, running your device in Safe Mode with Networking can help diagnose whether the issue is related to other software or settings conflicting with Spotify. Here's how to do it:
- Press the
Windows key + Ron your keyboard to open the Run dialog. - Type "msconfig" and hit Enter to open the System Configuration window.
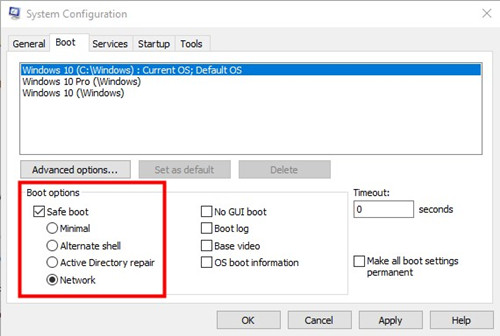
- In the System Configuration window, navigate to the Boot tab.
- Check the box for Safe boot and select Network.
- Click Apply and then OK.
- Restart your computer.
- Once your computer restarts in Safe Mode with Networking, launch the Spotify app.
- See if Spotify functions without encountering Error Code 4. If it works smoothly, this suggests that the issue might be related to third-party software or settings.
If Spotify works fine in this mode, you can then proceed with the following steps to pinpoint and resolve the issue:
- Switch Networks: Try connecting to a different Wi-Fi network or switch to mobile data (if applicable). This helps determine if the problem is specific to your current network.
- Restart Your Router: Sometimes, a simple restart of your router can resolve connectivity issues. Turn it off, wait for a few minutes, and then turn it back on.
- Create a Personal Hotspot: If you're using a mobile device, consider creating a personal hotspot and connecting your computer to it. This bypasses your regular network and helps identify if the issue is with your ISP or router.
2. Allow Spotify through Firewall/Antivirus Apps
Another common reason for Spotify Error Code 4 is when your firewall or antivirus software blocks Spotify from accessing the internet. Here's how you can allow Spotify through these settings:
For Windows Firewall:
- Press the Windows key + S on your keyboard to open the search bar.
- Type "Firewall" and select Windows Defender Firewall from the search results.
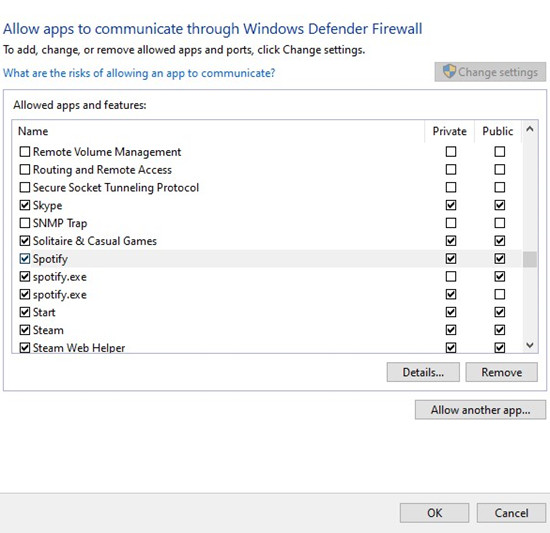
- Click on Allow an app or feature through Windows Defender Firewall on the left panel.
- Click Change settings and then Allow another app.
- Navigate to the Spotify installation directory (usually located in
C:\Users\YourUsername\AppData\Roaming\Spotify). - Select Spotify.exe and click Add.
- Ensure both Private and Public are checked for Spotify.
- Click OK to save the changes.
For Mac Firewall:
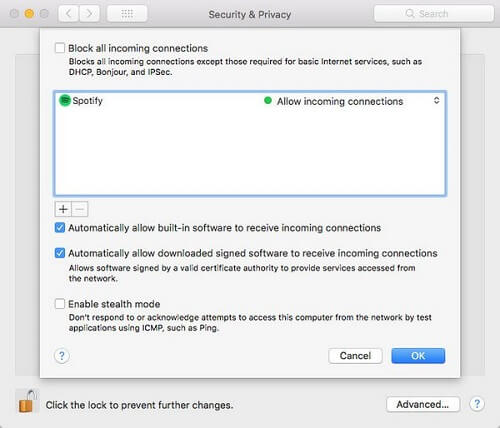
- Navigate to System Preferences and click Security & Privacy.
- Choose the Firewall tab and click the lock icon at the bottom left. Enter your administrator password to unlock it for making changes.
- Click Firewall Options... and then click the + button.
- You'll be directed to the Applications folder where you can select the Spotify app.
- Click Add to allow incoming connections from Spotify on your Mac.
- Click OK to apply the changes.
For Third-Party Antivirus:
- Open your antivirus software.
- Look for options related to Firewall, Network Protection, or Program Permissions.
- Add Spotify to the list of allowed applications.
- Save the changes and restart your computer.
Example for NOD32 Antivirus:
If you are using antivirus software like NOD32 and encounter Error Code 4 when starting Spotify, follow these steps to add Spotify to the exception list:
- Open ESET Smart Security or ESET NOD32 Antivirus.
- Activate the "Advanced Setup" window and click "Antivirus and antispyware" > "Exclusions" > "Add...".
- Browse to
C:\Users(Your Username)\AppData\Roaming\Spotifyand select "Spotify.exe". - Click "OK" to save the changes.
4. Remove Windows Hosts File
In certain cases, Spotify Error Code 4 may arise due to conflicts in the Windows Hosts file. Here's how you can modify this file to potentially resolve the issue:
For Windows:
- Press the Windows key on your keyboard.
- Type "Notepad" into the search bar.
- Right-click on the Notepad app in the search results.
- Select "Run as administrator".
- If prompted by User Account Control, click "Yes".
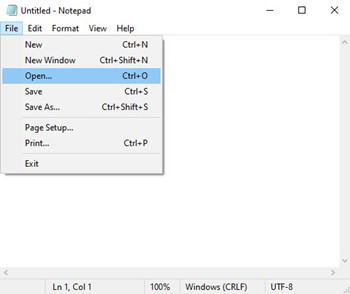
- In Notepad, go to File > Open.
- Navigate to the following location:
C:\Windows\System32\drivers\etc - Change the file type from "Text Documents" to "All Files" to see the hosts file.
- Select the file named "hosts" and click "Open".
- The hosts file will open with a block of text, each line preceded by a '#'.
- Look for any lines with entries related to Spotify or Fastly. They may look like this:
0.0.0.0 weblb-wg.gslb.spotify.com - If you find any lines related to Spotify or Fastly, you can:
- Delete the Line: Select the line and press the Delete key.
- Comment Out the Line: Add a '
#' at the beginning of the line. This turns the line into a comment and disables it.
- After editing, go to File > Save to save the changes to the hosts file.
- Close Notepad and restart your computer to apply the changes.
For Mac:
- Press Command + Space to open Spotlight Search.
- Type "Terminal" and press Enter to launch the Terminal app.
- In the Terminal window, type the following command and press
Enter:sudo nano /private/etc/hosts - Enter your administrator password when prompted.
- The hosts file will open in the Nano text editor.
- Look for any lines containing entries related to Spotify or Fastly. They may look like this:
0.0.0.0 weblb-wg.gslb.spotify.com - If you find any such lines, you can:
- Delete the Line: Use the arrow keys to navigate to the line and press Delete.
- Comment Out the Line: Add a
#at the beginning of the line to turn it into a comment.
- After editing, press
Control + Oto save the file. - Press
Enterto confirm the filename. - Press
Control + Xto exit Nano. - Close the Terminal window.
- Restart your Mac to apply the changes to the hosts file.
5. Adjust Registry Editor
Modifying a specific registry setting in Windows, particularly the enableactiveprobing value, can sometimes resolve Spotify Error Code 4. Follow these steps carefully:
- Press the Windows key + R on your keyboard to open the Run dialog.
- Type "regedit" and press Enter to open the Registry Editor.
- If prompted by User Account Control, click Yes to allow the app to make changes.
- In the Registry Editor, navigate to the following path:
HKEY_LOCAL_MACHINE\SYSTEM\CurrentControlSet\Services\NlaSvc\Parameters\Internet - On the right-hand side, locate the EnableActiveProbing entry.
- Right-click on EnableActiveProbing to modify its value.
- In the Value data field, change the value from 0 to 1.
- Click OK to save the changes.
- Close the Registry Editor.
- Restart your computer to apply the changes.
- After your computer restarts, launch Spotify.
Verify if Spotify Error Code 4 is resolved. You should now be able to stream music without any issues.
6. Change Proxy Settings
If you're using a proxy server, adjusting the proxy type settings in the Spotify app might resolve Error Code 4. Here's how you can do it:
- Launch the Spotify app on your computer.
- Click on your username in the top-right corner of the Spotify window.
- Select "Settings" from the drop-down menu.
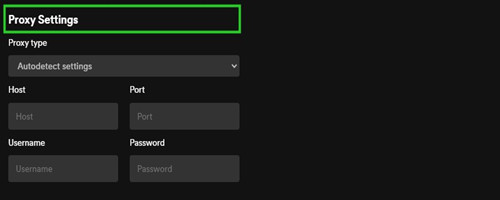
- Scroll down to the Proxy section in the Settings menu.
- If the Proxy Type is set to "Autodetect settings" or "No Proxy", try switching it to "HTTP".
- Close and relaunch the Spotify app to apply the new proxy settings.
7. Uninstall Ad-Blocker Apps
Ad-blocker apps, while helpful for blocking advertisements, can sometimes interfere with the proper functioning of Spotify and lead to Error Code 4. Follow these steps to uninstall or disable ad-blocker apps:
For Windows:
- Press the
Windows key + Ron your keyboard to open the Run dialog. - Type "Control Panel" and click OK to open it.
- In the Control Panel, navigate to "Programs" and then "Programs and Features".
- Scroll through the list of installed programs to find your ad-blocker app (e.g., AdBlock, uBlock Origin, AdGuard).
- Click on the ad-blocker app to select it, then click on the "Uninstall" button.
- Follow the on-screen instructions to uninstall the ad-blocker app.
- Restart your computer to complete the uninstallation process.
For Mac:
- Click on the Apple menu in the top-left corner of your screen and choose "System Preferences".
- Select "Profiles & Device Management" or "Profiles" (depending on your macOS version).
- Look for any profiles related to ad-blocker apps or VPN services that might include ad blocking.
- Select the profile and click on the "-" (minus) button to remove it.
- Confirm the removal of the profile.
- If there are no profiles, proceed to the next step.
- Open Finder, then go to "Applications".
- Find the ad-blocker app (e.g., AdBlock, AdGuard) and drag it to the Trash icon in the Dock.
- Right-click on the Trash icon and choose "Empty Trash".
- Restart your Mac to complete the process.
8. Clean Uninstall Spotify App
Performing a clean uninstall of the Spotify app can help ensure that all remnants of the app are removed, potentially resolving Error Code 4. Here's how you can do it:
For Windows:
- Make sure Spotify is not running.
- Press the Windows key on your keyboard.
- Type "Control Panel" and open the Control Panel app.
- Go to Programs > Programs and Features.
- Scroll down to find Spotify in the list of installed programs.
- Click on Spotify and select Uninstall.
- Follow the on-screen instructions to complete the uninstallation process.
- Press
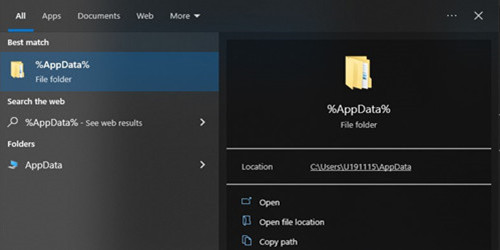
Windows key + Rto open the Run dialog. - Type
%AppData%and pressEnter. - Delete any Spotify folders in the Roaming and Local directories:
AppData\Roaming\Spotify
AppData\Local\Spotify
For Mac:
- Ensure Spotify is closed.
- Open Finder on your Mac.
- Go to Applications.
- Find Spotify in the list of applications.
- Drag Spotify to the Trash icon in the Dock.
- Right-click on the Trash icon and select Empty Trash.
- Open Finder.
- Click on Go in the menu bar and select Go to Folder.
- Enter the following paths one by one and delete any Spotify folders:
~/Library/Caches/com.spotify.client~/Library/ApplicationSupport/Spotify
Part 3. How to Use Spotify without Error Messages
Normally, the issue of Spotify Error Code 4 could be fixed with the above methods. However, this is very frustrating after you've tried the aforementioned solutions to no avail. If they all failed to resolve the error, you have to give the last try, that is, to use a Spotify music downloader called ViWizard Spotify Music Converter.
When Spotify is download, users can still listen to their offline songs in the music library. But this only allows those Premium users to download music or playlists then they can continue to playing Spotify music by way of utilizing their downloads. So, in this case, ViWizard Spotify Music Converter could be a good helper to enable you to play offline music libraries.
With ViWizard Spotify Music Converter, all Spotify users can download and convert Spotify music to unprotected audio formats like MP3, AAC, and more. It can keep the lossless audio quality, as well as, ID3 tags including title, artist, album, artwork, and more. Thanks to this smart tool, you'll be able to ultimately fix Spotify offline error code 4 on Windows and Mac.
Key Features of ViWizard Spotify Music Converter
Free Trial Free Trial* Security verified. 5, 481,347 people have downloaded it.
- Download Spotify songs, playlists, podcasts, and audiobooks extremely fast at up to 15x speed
- Convert Spotify into MP3, FLAC, WAV, AIFF, M4A, and M4B losslessly
- Lets you play Spotify tracks offline on any device without restrictions
- Works seamlessly on Windows and macOS, supporting the built-in Spotify Web Player
Final Words:
All the above solutions are supposed to fix Spotify Error Code 4 effectively. With the help of ViWizard Spotify Music Converter, you are able to solve the offline problem once and for all. Does any of them work for you? Or do you have a better solution that is missing from this post? Just leave your answer in the comments and we'd like to hear your thoughts below.


Leave a Comment (0)