Spotify doubles up as a form of social media and a music streaming app as well. It has even taken a higher notch, with the integration of Facebook. You can now share hot hits with friends and also see what they are listening to. But you need to be a Premium user to connect Spotify to Facebook. This then leaves many users out of the party.
Likewise, you may experience Spotify account not connecting to Facebook issues along the line. Many reasons may cause this. You are lucky to would have stumbled on this article if you are facing any issues connecting Spotify to Facebook. But first, let's peruse how to get your fav-hits from Spotify to Facebook.
Part 1. How to Connect Spotify to Facebook
Spotify facilitates a seamless connection, allowing you to integrate your account with Facebook effortlessly, whether you're on your desktop or mobile device. By connecting with friends, exploring their listening activities, and sharing your favorite tunes, you create a musical community within your social circle.
Option 1: Connect with Facebook Using Friends Activity
-
For Desktop:
- Launch the Spotify application on your desktop and log in to your account.
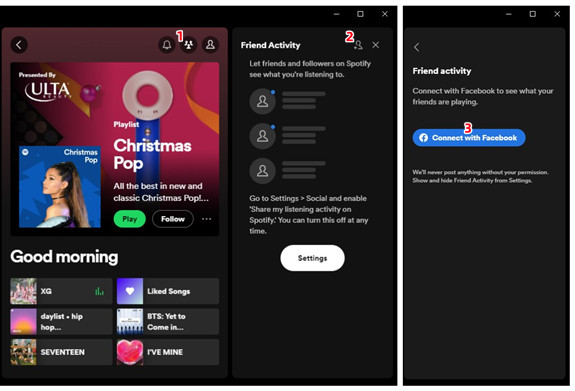
- Click on the "Friends Activity" button, typically located in the top-right corner. This opens the Friends Activity section.
- Within the Friends Activity section, click "Add Friends" and then select "Connect with Facebook." If prompted, log in to your Facebook account using your email or phone number and password.
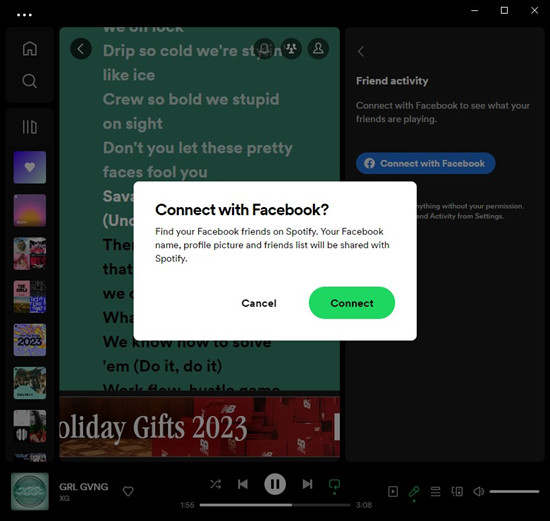
- Spotify will request authorization to link with your Facebook account (e.g. your name and profile picture and friends list). Grant the necessary permissions, and once connected, your friends' Spotify activities become visible, allowing easy sharing of your own.
Option 2: Connect with Facebook Using Settings
-
For Desktop:
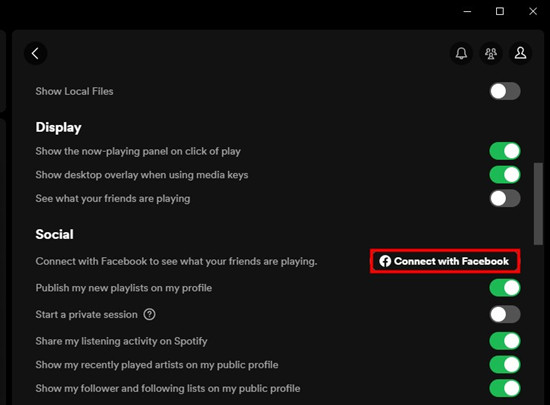
- Launch the Spotify app and tap on the profile icon located at the top-right.
- Choose the "Settings" option from the drop-down menu.
- In the Settings menu, scroll down to find either "Connect with Facebook to see what your friends are playing" or simply "Connect to Facebook."
- Select "Connect to Facebook" and, when prompted, log in to your Facebook account. Authorize the connection to seamlessly share and integrate your Spotify and Facebook activities.
-
For Mobile:
- Open the Spotify app on your mobile device and tap on the gear icon (Settings) at the top-right, or your profile name at the top-left, then choose "Settings and privacy."
- In the Settings menu, tap on your profile name at the top, which opens your profile.
- Tap the three dots (More) button.
- Select the "Find friends" option.
- Within the "Find friends" section, locate "Connect to Facebook" if not already connected. Alternatively, if your accounts are linked, you'll find your friends and followers listed.
- To proceed, log in to your Facebook account and authorize the connection.
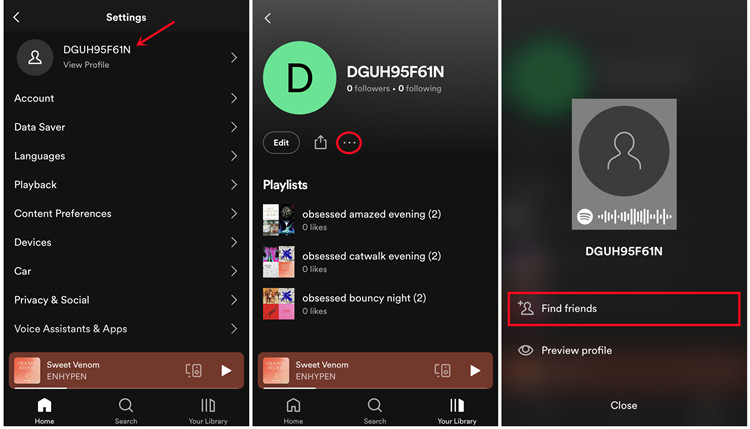
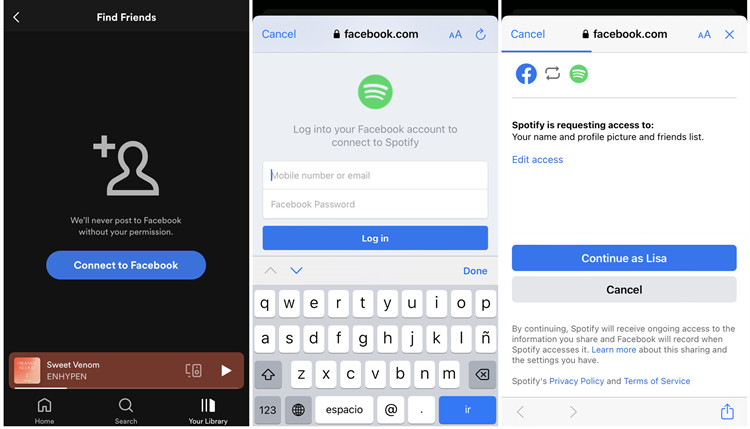
By following either of these options, you'll successfully link your Spotify and Facebook accounts, seamlessly adding your Facebook friends to your Spotify community.
Part 2. How to Disconnect Spotify from Facebook
Sometimes, you may wish to sever the link between your Spotify and Facebook accounts. Whether for privacy reasons or a change in preferences, here are two simple options to disconnect Spotify from Facebook.
Option 1: Disconnect from Facebook Using Settings
-
For Desktop:
- Launch the Spotify app and tap on the profile icon at the top-right.
- Choose the "Settings" option from the drop-down menu.
- Scroll through the Settings menu to find the section related to Facebook integration. Look for an option that says "Disconnect from Facebook."
- Click on the option to disconnect, and follow any additional prompts to confirm your decision.
Even after disconnecting from Facebook, Spotify users can continue adding friends on the platform by following them directly on Spotify along with the Friends Activity section, without the need for Facebook integration. This provides an alternative way to build your music community within the Spotify environment:
'Follow Friends' makes it easy to find and add friends on Spotify even without Facebook account. Check out this guide to see how to add Spotify friends and share you loved songs with them.
Part 3. How to Remove Facebook from Spotify [Login Methods]
If you've decided to detach Facebook from your Spotify login methods, here are two straightforward options catering to both desktop and mobile users:
Option 1: Remove Spotify from Facebook Using Account Settings
-
For Desktop & Mobile:
- Open your preferred web browser and visit the Spotify Account Page (https://www.spotify.com/account/).
- If not logged in, enter your Spotify credentials to access your account.
- Once logged in, go to the "Security and privacy" section.
- Look for "Edit login methods."
- Under "Current login methods," locate "Facebook." Click "Remove" next to it, and confirm your decision by selecting "Yes, remove."
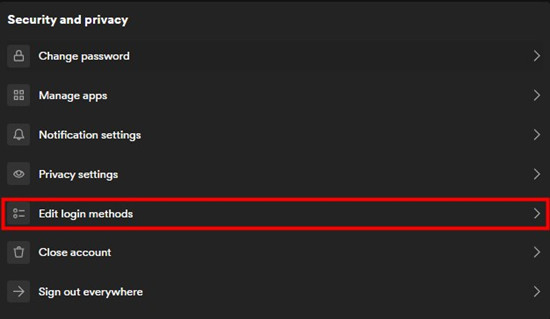
If you wish to explore more options to activate or reactivate Facebook as your Spotify login methods, please check another post in Spotify Community: "I want to disconnect Facebook from my Spotify."
Part 4. How to Fix Spotify Not Connecting to Facebook
Encountering issues with Spotify not connecting to Facebook can be frustrating, but fear not - here are steps to troubleshoot and resolve the problem.
-
For Desktop & Mobile:
- Open your web browser and go to facebook.com. Log in to your Facebook account.
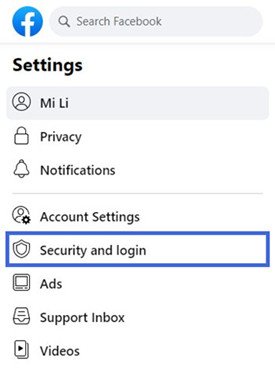
- Click your profile picture in the top right, then choose "Settings & Privacy" and then "Settings."
- On the left-side menu, select "Security and login."
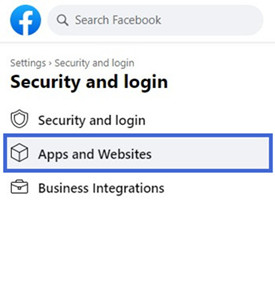
- Under "Security and login," click "Apps and Websites" to view connected apps.
- Scroll down the list to find and select "Spotify."
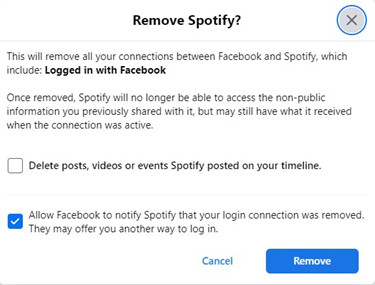
- Click the "Remove" button next to Spotify.
- In the pop-up, choose preservation settings (e.g., "Delete posts, videos, or events Spotify posted on your timeline"). Optionally, permit Facebook to notify Spotify about the removal. Click "Remove" to confirm.

Bonus Tip: How to Share Spotify Playlists with Facebook Friends
Sharing your favorite Spotify playlists with friends on Facebook can be a delightful way to discover and enjoy music together. However, what if you want to share specific tracks as MP3 files directly? Meet ViWizard Spotify Music Converter, a tool that allows you to convert and share your Spotify tunes seamlessly.
While Spotify enables you to share playlists on Facebook, sometimes you might want to send individual tracks directly as MP3 files to your friends. This is where the ViWizard Spotify Music Converter comes into play. By using this powerful tool, you can convert Spotify audio files to MP3 format and share them beyond the confines of the Spotify platform.
Key Features of ViWizard Spotify Music Converter
Free Trial Free Trial* Security verified. 5, 481,347 people have downloaded it.
- Download Spotify songs, playlists, podcasts, and audiobooks extremely fast at up to 15x speed
- Convert Spotify into MP3, FLAC, WAV, AIFF, M4A, and M4B losslessly
- Lets you play Spotify tracks offline on any device without restrictions
- Works seamlessly on Windows and macOS, supporting the built-in Spotify Web Player
Step 1Add Spotify playlists to ViWizard
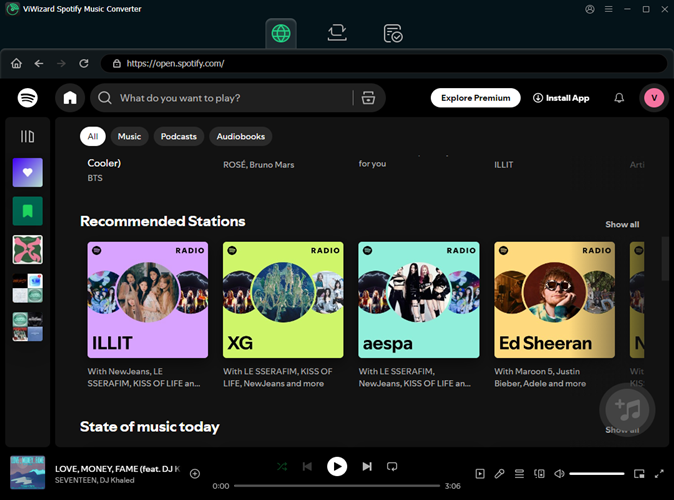
Once you download and install ViWizard Spotify Music Converter on your computer, launch it and the Spotify app will automatically open. Then start to add your favorite Spotify songs. You can drag and drop the songs onto the conversion screen of ViWizard. You can also choose to paste the link of the Spotify songs or playlist to the search bar of the Converter and let the tracks be loaded.
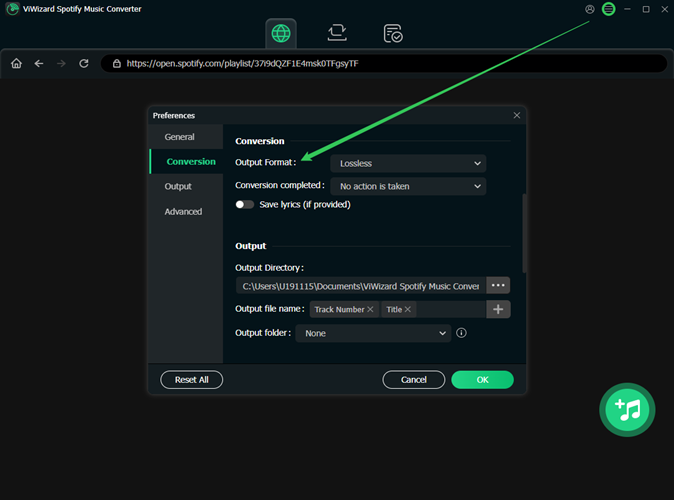
Step 2Set output format
Customize the output format and other parameters. Go to the "Menu" bar and choose the "Preferences" option. Next, click on the "Convert" button and start to set the output settings manually. You can adjust the sample rate, bit rate, channel, etc. Likewise, you can let the converted songs be classified by albums or artists from the "Archive output tracks by" option.
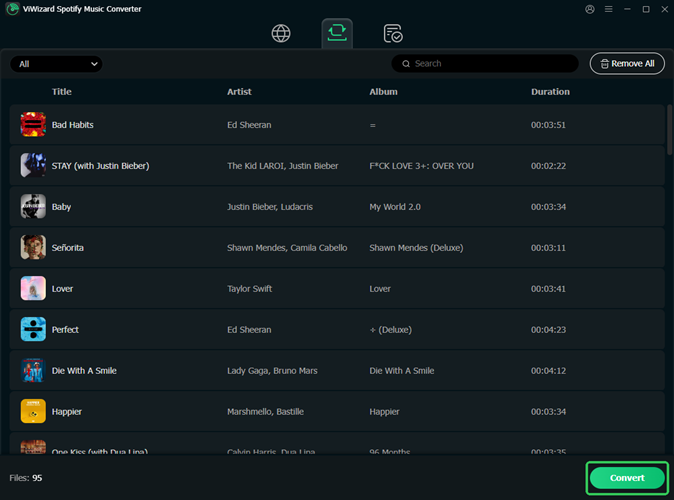
Step 3Convert and save Spotify playlists
Finally, click the "Convert" button and let the program convert your Spotify music to the set format and preferences.
Step 4Send Spotify playlists to Facebook friends
Once the conversion is complete, you can now share the MP3 files with your Facebook friends by sending them directly or using other messaging platforms. Launch Facebook Messenger on your computer or mobile device. Click on the "New Message" button or navigate to an existing conversation with the friend you want to share the music with. To send the files, follow these steps:
-
For Desktop:
- Click on the paperclip icon or the "+" sign in the message box.
- Select "Choose Files" to open your file explorer.
- Locate and select the converted MP3 files you want to share.
- Click "Open" to attach the files.
- Click "Send" to share the attached MP3 files.
-
For Mobile:
- Tap the "+" icon next to the message box.
- Choose "Photos & Videos" or "File."
- Navigate to the folder where the MP3 files are stored.
- Select the files you want to share.
- Tap the send icon (usually an arrow) to send the files.
Let your friend know that you've sent them some music files through Facebook Messenger.
Conclusion
Despite being able to easily connect Spotify to Facebook, you can still face some connection challenges. You can clear Spotify on Facebook or use Spotify device passwords as quick fixes. Likewise, you can convert your music to common formats with ViWizard Spotify Music Converter and connect the converted Spotify songs to Facebook without output format limitation.


Leave a Comment (0)