
Kodi is an open-source media player that lets you organize and play all kinds of media, from music to movies, on pretty much any device, including Windows, macOS, Linux, and Android. While it’s great for managing local files, Kodi can do much more with add-ons, allowing you to stream from online services like Spotify.
Part 1. Can I Get Spotify on Kodi?
Unfortunately, Spotify doesn’t have an official add-on for Kodi. This means you can’t connect Spotify to Kodi as easily as you would with a dedicated app. But don’t worry - there are still ways to stream Spotify through Kodi using third-party add-ons or casting methods. While these workarounds aren’t perfect, they let you enjoy your favorite Spotify tracks and playlists directly within Kodi.
The real advantage of using Spotify on Kodi is the convenience of controlling all your media from one place. Imagine streaming your music, movies, and TV shows all through one interface - it’s a smooth experience, especially for home setups. However, some things will be missing, like advanced playlist management or lyrics, which you would get with the full Spotify app.
That said, if you mainly want to stream your favorite songs, albums, or playlists through Kodi, it’s totally possible. You can still benefit from Kodi’s flexibility and customizable interface, even if the integration isn’t perfect. Let's dive in!
Part 2. How to Get Spotify on Kodi
Even though Spotify doesn’t have an official Kodi add-on, you can still stream your music on Kodi using third-party add-ons. One of the best ways to do this is by using the Marcelveldt Repository. Here’s how to set it up and start streaming Spotify on Kodi:
- Go to the Marcelveldt Repository page on GitHub through your web browser and download the latest .zip file to your device.
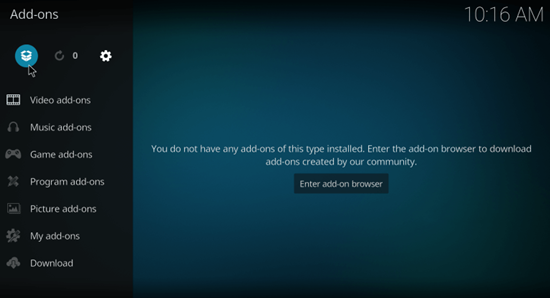
- Launch Kodi and head to the Add-ons section. Click the Installer icon (an open box) at the top left of the screen.
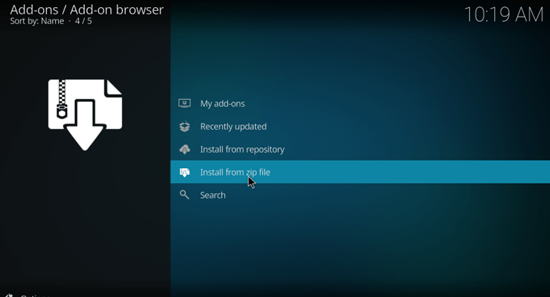
- Select Install from Zip File and find the .zip file you downloaded earlier. Click to install the repository.
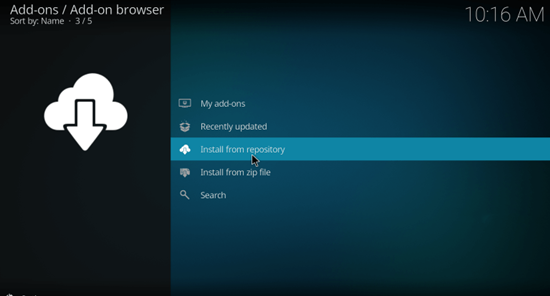
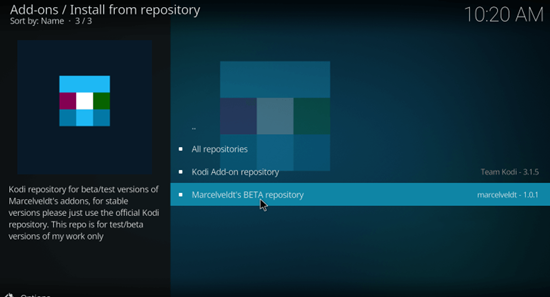
- After installation, you’ll see a notification confirming it. Now, go to Install from Repository and select Marcelveldt's BETA Repository from the list.
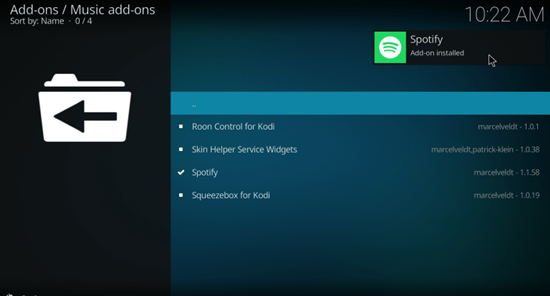
- Navigate to Music Add-ons, find Spotify Add-on, and click Install. Kodi will install it and notify you once it’s ready.
- After installation, open the Spotify Add-on and enter your Spotify login details when prompted. This will sync your account with Kodi.
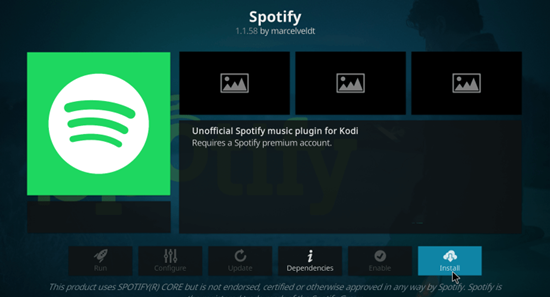
Once set up, you’ll be able to stream your Spotify playlists and music through Kodi even without official support, but the experience may lack certain features like full playlist management.
If you want to enjoy Spotify on Kodi without the hassle of ads and don’t have a Spotify Premium subscription, there’s a practical solution: ViWizard Spotify Music Converter. This tool allows you to download your favorite Spotify songs in formats like MP3, completely ad-free. Still, it's a simple way to listen to your favorite music while using Kodi.
Part 3. How to Get Ad-Free Spotify on Kodi
The add-ons available for Spotify on Kodi won’t block ads for free users, but with ViWizard, you can download your entire Spotify library ahead of time and play it seamlessly on Kodi. No need to worry about internet connections or whether the Spotify add-on will work perfectly - your music will be ready for you, offline and hassle-free.
ViWizard Spotify Music Converter is incredibly easy to use and a game-changer for anyone who wants more control over their music. It removes DRM from Spotify tracks, so you can download songs, albums, and playlists in high-quality formats like MP3 or AAC. Once your music is saved locally, you can transfer it to Kodi or any device and play it whenever you want, without ads or interruptions.
This method gives you complete flexibility - no need for a Premium subscription, no reliance on internet connectivity, and no ads! It’s the perfect way to enjoy Spotify and Kodi together, exactly how you want.
With ViWizard Spotify Music Converter, you get the best of both worlds: ad-free Spotify music and the convenience of Kodi. It’s a highly recommended tool to enhance your experience and give you total freedom over your music.
Key Features of ViWizard Spotify Music Converter
Free Trial Free Trial* Security verified. 5, 481,347 people have downloaded it.
- Download Spotify songs, playlists, podcasts, and audiobooks extremely fast at up to 15x speed
- Convert Spotify into MP3, FLAC, WAV, AIFF, M4A, and M4B losslessly
- Lets you play Spotify tracks offline on any device without restrictions
- Works seamlessly on Windows and macOS, supporting the built-in Spotify Web Player
Step 1Transfer Spotify music to ViWizard Spotify Music by dragging
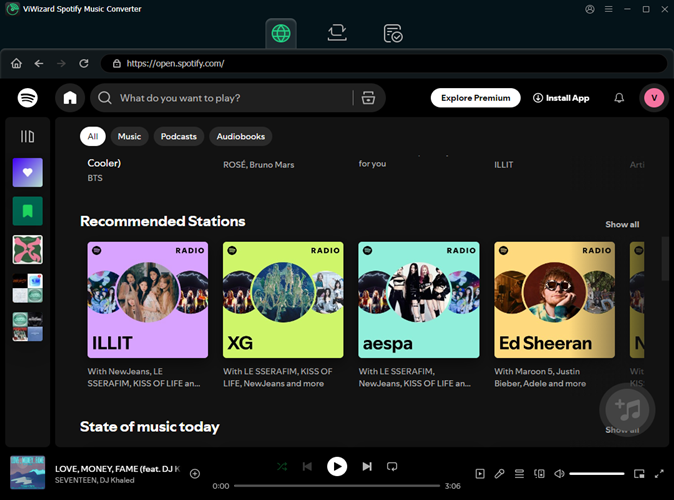
You should have ViWizard Spotify Music Converter installed on your personal computer, and then open the tool. After launching the converter, Spotify will be automatically started automatically, and make sure you have logged in with your account on Spotify. Select songs or playlists you want to get on Spotify and drag them to the converter directly.
Step 2Configure a few settings depending on your personal need
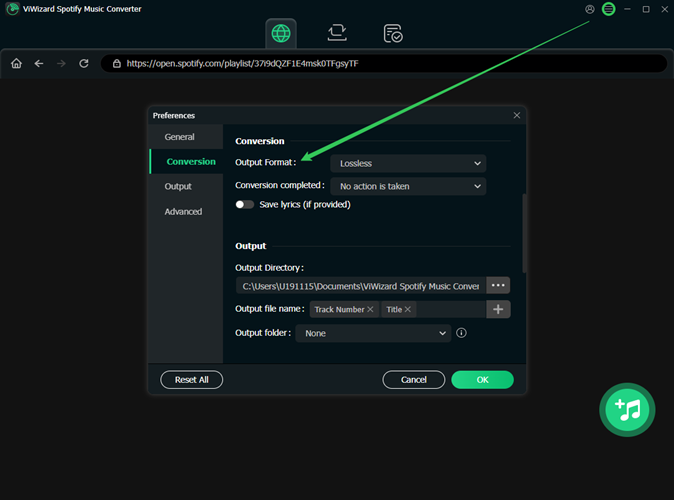
Through dragging them, all songs or playlists will be uploaded from Spotify to the converter. Tap the menu bar and choose the "Preference" option. Then you can configure the audio format, bit rate, channel, sample rate and more according to your personal need. By the way, if you want to download in a more stable mode, keep the default conversion speed; if not, set it as 5× speed.
Step 3Begin to download music from Spotify to mp3 with a click
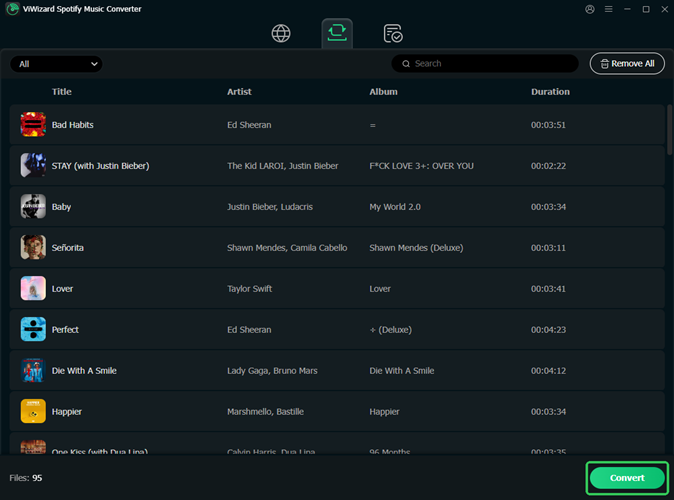
After you have set the audio parameter, you can click on the "Convert" button to start downloading your songs or playlists saved on Spotify. It will take some time for your selected Spotify music to download, but once it's done all your Spotify music will be on your personal computer for remaining forever.
Step 4Add the downloaded Spotify music to Kodi
Now, all Spotify music you want are converted to unprotected audio files and saved in the format of mp3 or other plain formats to your local drive on your personal computer. You can launch Kodi and start adding the converted Spotify music to Kodi for playing.
- Start Kodi on your device. From the main menu, navigate to the Music section.
- Click on Music to access the music settings and features within Kodi.
- Select Files or Add Music to begin the process of adding a new music source.
- You’ll need to specify the folder where your converted Spotify tracks are stored. You can do this by selecting Add Source. Click Browse to navigate to the folder on your computer that contains your converted music files.
- Navigate to the folder where you saved your converted ad-free Spotify music files. Select this folder. You will be asked to name the music source – choose a name like “Spotify Music” for easy identification and click OK.
- After naming the folder, click OK again to confirm. Kodi will then add this folder to its music library.
- Go back to the Music section on Kodi’s main menu. You should see the newly added music source listed there.
- Select the newly added music source to view all your converted Spotify tracks. You can browse through your music library, select songs, and start playing them directly within Kodi.


Leave a Comment (0)