As a full-fledged marketplace for almost all kinds of digital entertainment, including music, movies, TV shows, podcasts, and audiobooks, iTunes has already grown into one of the most popular online media stories in the world. To prevent unlicensed sharing in iTunes, Apple has added a license system with Digital Rights Management, which only allows users to play purchases or rentals on up to five computers at a time by authorizing their iTunes-linked Apple ID.
In this case, for Apple users who have multiple computers, it would be difficult in managing iTunes authorization at the same time. Thankfully, there are some useful tips to authorize iTunes on PC or Apple Music on Mac, as well as, deauthorize iTunes on PC or Apple Music on Mac. Now go to know the details from the following article.
Part 1. How to Authorize Computer for Apple Music/iTunes
Before you authorize computer for Apple Music or iTunes, you should know that you're giving it permission to access movies, TV shows, audiobooks, podcasts, music, and other content downloaded from iTunes. Otherwise, it won't allow you to play rentals and purchases properly if you don't authorize your computer with your account.
1.1 How to Authorize a Computer on iTunes
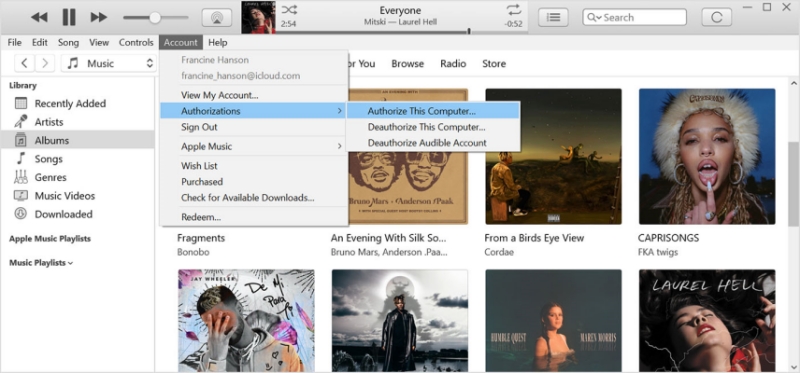
Step 1. Download the latest version of iTunes that's appropriate for your Windows PC.
Step 2. Open iTunes and click Account at the top of the iTunes windows.
Step 3. Then Choose Authorizations and click Authorize This Computer.
Step 4. Full in the prompt windows with your Apple ID and password, then click Authorize.
1.2 How to Authorize Apple Music on Macbook
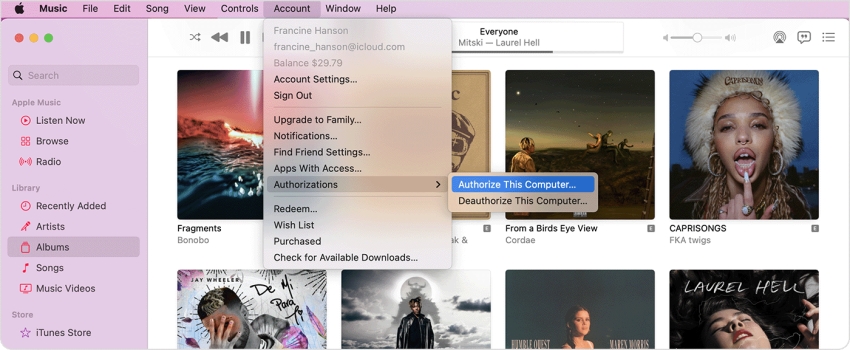
Step 1. Open the Apple Music app or Apple TV app on your Mac.
Step 2. Navigate to Account > Account Settings and select Authorize This Computer.
Step 3. In the pop-up window, enter your Apple ID and password.
Step 4. After entering the details of Apple ID, click Authorize.
If iTunes asks you to authorize your computer again next time, it won't use a new authorization but the same authorization for the same computer.
Part 2. How to Deauthorize Computer in iTunes/Apple Music
In most other cases, you may also need to deauthorize iTunes on your Mac or PC before you sell it, give it away, send it in for service, or make major hardware upgrades in order to prevent others from accessing your purchased content and media. Here's how to deauthorize iTunes on a computer or all computers.
2.1 How to Deauthorize iTunes on One Computer
You must deauthorize one of your computers when you ran out of five authorized computers in order to authorize iTunes on another computer. Follow the below steps to deauthorize a computer for iTunes.
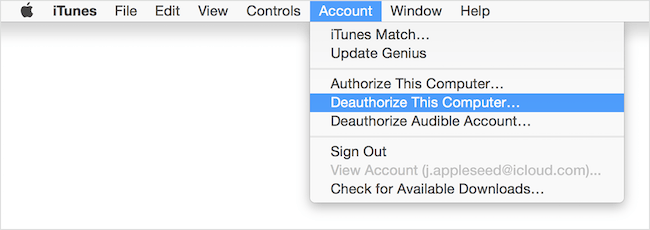
Step 1. Open iTunes or the Music app, then click Account > Authorizations.
Step 2. Click Deauthorize This Computer and enter your Apple ID password in the prompt window.
Step 3. After entering your Apple ID details, click Deauthorize to deauthorize a computer for iTunes.
2.2 How to Deauthorize iTunes on All Computers
There may also be a time when you exceed the limit of five authorized computers but those old computers are dead or sold before deauthorizating them. In this situation, you're not stuck with one of your authorization being used on a non-functional computer. iTunes provides you with a way to deauthorize iTunes on all computers.
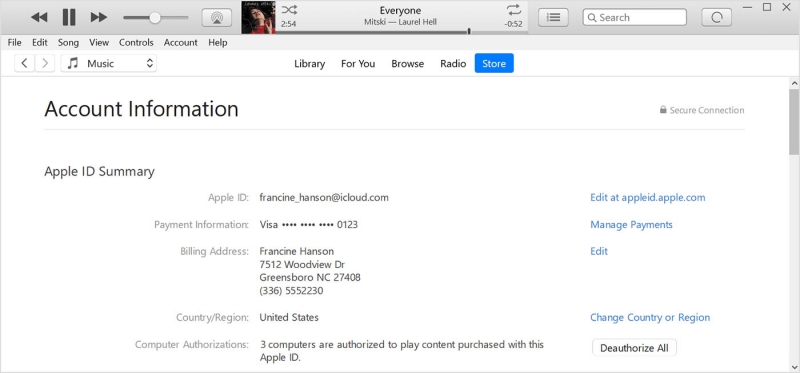
Step 1. Launch iTunes or the Music app, then click Account > View My Account.
Step 2. Enter your Apple ID and password to sign in as required.
Step 3. Next to Computer Authorizations, you can see all the authorized computers.
Step 4. Click Deauthorize All to deauthorize all your authorized computers at once.
Part 3. More Tips to Transfer iTunes Contents to Another Apple ID
Since one single Apple ID is permitted to be associated with no more than 5 computers, many users would have created several Apple ID accounts for different purchasing purposes. However, the problem is that Apple doesn't support merging iTunes accounts with others. What if we don't need to so many accounts someday? What to do with those purchased content in different iTunes accounts then?
Don't worry! It would be easily resolved if you turn to ViWizard Audio Converter, an ultimate solution to help you bypass DRM protection from iTunes songs and audiobooks for good. For the complete guide on how to transfer iTunes Music to another Apple ID, you can visit the source page as below.
Have no idea on how to transfer music from one apple ID to another? Check out this article, you'll learn the best way to transfer music to new apple ID. And you might as well want to stream Apple Music songs offline without a subscription.
Part 4. FAQs about Authorizing iTunes/Apple Music on PC/Mac
Q1. How to see how many computers are authorized?
A: Sometimes, you may wonder how many computers you've already authorized. The following steps will lead you to the answer.
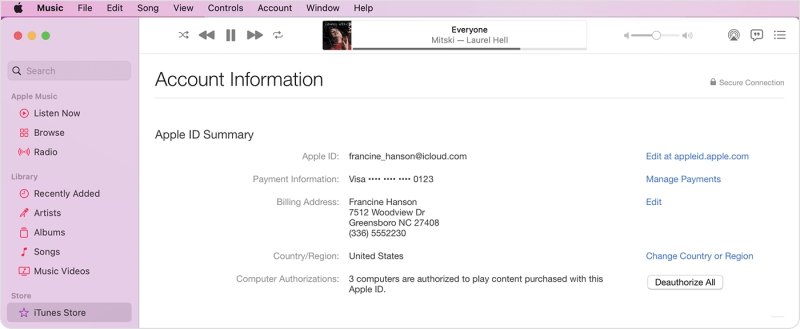
Step 1. Simply click Account > View My Account in iTunes or the Music app.
Step 2. Then sign in with your Apple ID and password.
Step 3. Finally, you can see how many computers are authorized next to Computer Authorizations.
Q2. How to remove your devices associated to iTunes?
A: You can manage the list of devices that can download and play items that you bought with your Apple ID. If you want to remove your devices that are associated with Apple ID purchases.
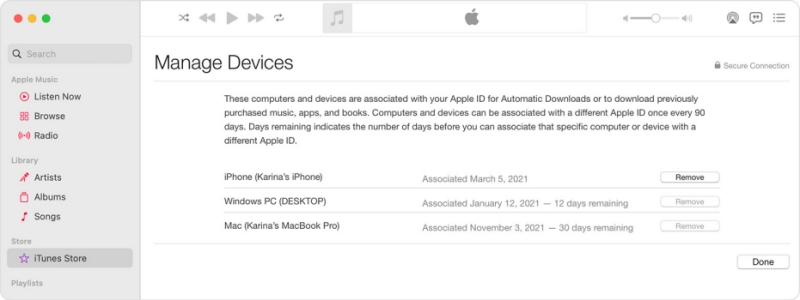
Step 1. In iTunes or the Music app, head to Account > View My Account.
Step 2. Click Manage Devices, then you'll find your associated devices.
Step 3. If you want to remove a device, click Remove.
Part 5. Final Words
And voila! That's all! If you are looking to authorize or deauthorize a computer or all computers for iTunes. But to transfer your purchased iTunes audios, you need the help of ViWizard Audio Converter. Just go to have a try of ViWizard Audio Converter, then you can play your purchases anywhere and anytime.

Leave a Comment (0)