Apple Music may seem like just another streaming service, but it's so much more than that. It's a mix of a vast digital music library and your personal collection, allowing you to download songs for offline listening and carry your favorite tracks on compact devices like the Apple Watch, iPhone, iPad, iPod, and other Apple Music-supported devices. But once you've downloaded music, it can be tricky to find it when you need it. Knowing where to locate those tracks on your device is important, whether you're just looking to play them offline or want to use the files elsewhere.
In this post, we'll break down exactly where to find your downloaded Apple Music, whether it's on your phone, computer, or even across different devices. It's simpler than you might think—and by the end, you'll know exactly where to look for your offline music, no matter where you're using it.
Let's start with the basics:
Part 1. Where to Find Your Downloaded Apple Music
Apple Music is available on your iPhone, iPad, Mac, and other Apple devices. If you've downloaded music for offline listening, you can easily access those tracks within the Apple Music app. The key is knowing exactly where to look.
When you open the Apple Music app, it takes you to the Library section by default, where you'll find your downloaded music. If you're using the app for the first time, it should display your playlists, albums, and any songs you've saved. Along the bottom of the screen on the mobile app, you'll see tabs for Home (previously Listen Now), Browse, Radio, Library, and Search. To view your downloaded music, tap Library and head into the Downloaded section.
From there, you can browse by albums, songs, or playlists. If you're looking for something specific, use the search bar at the top of the screen. Just type in the name of the song, album, or artist, and it should appear right away in the results.
If you're using Apple Music on a PC or Mac, your downloaded music lives in the Music (or iTunes) app. The process is similar: open the app, go to the Library tab, and check the Downloaded section. You'll find all your offline tracks right there.
Still need a step-by-step guide? Keep reading:
Part 2. Download and Access Apple Music (Within the App)
Once you've downloaded music from Apple Music, finding it again is simple—if you know where to look. Whether you're using a phone, tablet, or computer, the Apple Music app gives you direct access to everything you've saved for offline listening.
Here's how to view your downloaded music across different devices:
For Mobile Devices (iPhone/Android)
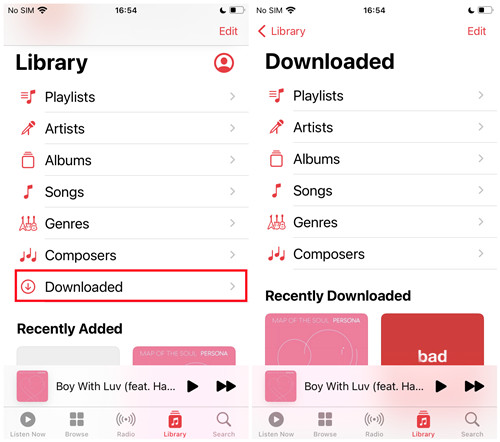
- Open the Music app on your iPhone or iPad, or the Apple Music app if you're using an Android phone.
- Tap the Library tab at the bottom of the screen.
- Scroll down and look for the Downloaded section. If you don't see it, that means you haven't downloaded anything yet.
- Tap Downloaded to view your offline songs, albums, and playlists.
- From here, you can listen without an internet connection, or manage your downloads by removing tracks or adding them to playlists.
For Desktop (Mac/PC)
- If you're using a Mac, open the Music app. On a Windows PC, open iTunes or the Apple Music Preview app (if you're on Windows 11).
- On a Mac, click Songs from the sidebar. On Windows, select Music from the dropdown in the left-hand menu.
- On a Mac, go to the top menu bar and click View, then choose Only Downloaded Music.
- On Windows, just head to the Downloaded section under Library.
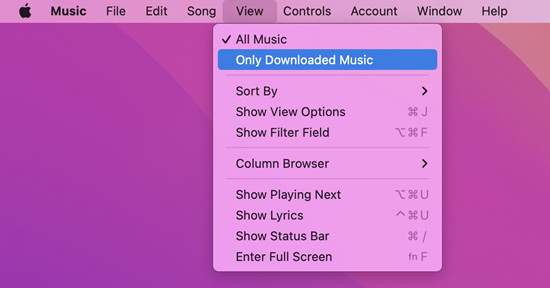
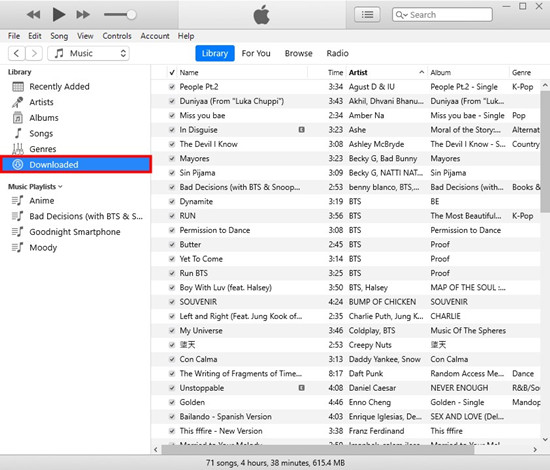
That's it. You'll now see everything you've downloaded for offline listening.
Apple Music Downloads Basics
Apple Music downloads are tied to your subscription. If you cancel, the songs you've downloaded for offline listening won't work anymore. They're locked to the Apple ecosystem, and you can't play them in other apps or move them around like standard files. On the other hand, music purchased directly from the iTunes Store is DRM-free. These songs download as standard audio files, and you can transfer them to other devices or apps.
However, if you downloaded the music through Apple Music, it may still be DRM-protected.
Apple uses two file types: .m4p for protected downloads and .m4a for DRM-free purchases. These details matter if you want to move or back up your music. For more flexibility, you'll need a tool called ViWizard Apple Music Downloader to remove DRM and convert the files.
A full-featured Apple Music converter that easily converts Apple Music songs, albums, playlists—including iCloud Music Library content, personalized recommendations, and curated playlists—into MP3, M4A, M4B, WAV, AIFF, and FLAC so you can keep your Apple Music forever or transfer it to any device without restrictions.
How do you remove DRM from iTunes music? Here are 5 most popular methods introduced in this post, and have a try now.
Part 3. Download and Locate Apple Music on Your iPhone/Android Smartphones
Once you've downloaded music in the Apple Music app, it's ready to play offline—but what if you want to know where it actually lives on your phone? You won't find a "Music Downloads" folder sitting around, but here's how it works behind the scenes.
On iPhone
On an iPhone or iPad, Apple keeps your downloaded music tucked away inside the Music app itself. You won't see the individual music files in the Files app or anywhere in your storage. And even if you could access them, they're still protected—these files aren't in MP3 or AAC format unless you've purchased them from iTunes and downloaded them separately.
If you're looking for a way to directly download Apple Music songs to a specific folder, including formats you can transfer or use elsewhere, a tool like ViWizard Apple Music Downloader can help. It allows you to convert and save Apple Music files to your computer first, and then you can transfer them to your iPhone or other devices however you like.
On Android
On Android, it's a little different. Apple Music still handles your downloads within the app, but if you're curious about where the files are stored, you can take a look using your device's file manager.
Just follow this path:
Internal Storage > Android > data > com.apple.android.music > files > Media
Here's how to find it:
- Open your File Manager app.
- Navigate through internal storage to:
Android > data > com.apple.android.music > files > Media
Inside the Media folder, you'll see the music files downloaded by the app. Just like on iPhone, these files are only playable within the Apple Music app. So while you can see them, you won't be able to open or move them elsewhere for regular use unless you try ViWizard Apple Music Converter.
Part 4. Download and Locate Apple Music on Your PC/Mac
If you're downloading Apple Music tracks to your computer—whether on a Windows PC or a Mac—those files are saved locally. Apple organizes them in a specific location tied to the Music or iTunes app. Here's how to find where everything is stored, including digital downloads and iTunes purchases:
On Mac
- Open the Music app on your Mac.
- From the top menu bar, click Music, then choose Preferences.
- In the Preferences window, go to the Files tab.
- Here, you'll see the current folder where your downloaded Apple Music files are stored.
- If you'd like to change this location, click Change and select a different folder.
- To access the files directly using Finder, follow this path:
/Users/[Your username]/Music/Music/Media/Music/
Note: Most digital downloads from Apple Music are stored in .m4p format, which means they're DRM-protected and won't open easily like purchased AAC files.
On Windows
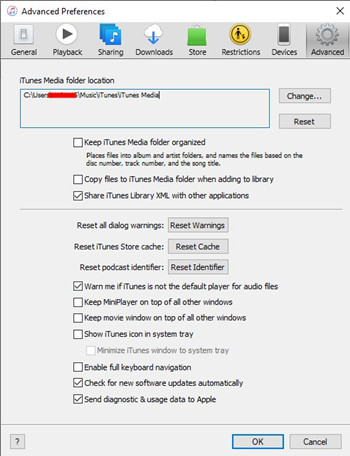
- Open iTunes on your PC.
- From the top menu, click Edit, then select Preferences.
- Go to the Advanced tab in the Preferences window.
- You'll see the folder location listed under iTunes Media folder location.
- To change the location, click Change, then choose a new folder.
- To view the files using File Explorer, go to:
C:\Users\[Your username]\Music\iTunes\iTunes Media\
Note: Again, most downloaded tracks are in .m4p format, which means they're tied to Apple's ecosystem and can't be played outside the Apple Music or iTunes apps.
Part 5. Download, Convert, and Locate Apple Music on Your PC/Mac
ViWizard Apple Music Converter is a powerful tool for both Windows and Mac users. It allows you to download Apple Music directly to your computer in formats like MP3, M4A, M4B, WAV, AIFF, or FLAC, so you can listen to your music on any device—even if you're no longer subscribed to Apple Music.
One of the best features of ViWizard is its ability to remove DRM protection. This means you can keep and play your Apple Music tracks without being tied to the Apple Music app. You can download any songs, albums, or playlists. Another great feature is batch downloading, which lets you download multiple tracks at once, saving you time.
ViWizard is perfect for those who want to store their entire Apple Music library offline, even if they're facing issues with the app. It also preserves lossless audio (or other options based on account settings) and maintains ID3 tags (like artist, album, and track info), so your music stays organized. ViWizard is definitely the ideal solution for anyone looking to take their Apple Music downloads beyond the app.
Key Features of ViWizard Apple Music Converter
Free Trial Free Trial* Security verified. 5, 481,347 people have downloaded it.
- Convert Apple Music songs, albums, playlists, and artists into MP3 for easy access
- Preserve lossless audio, high-resolution lossless, and Dolby Atmos quality
- Strip DRM from Apple Music for unrestricted offline listening
- Save converted audio files while retaining full ID3 tag details
Step 1Download and Install ViWizard Apple Music Converter
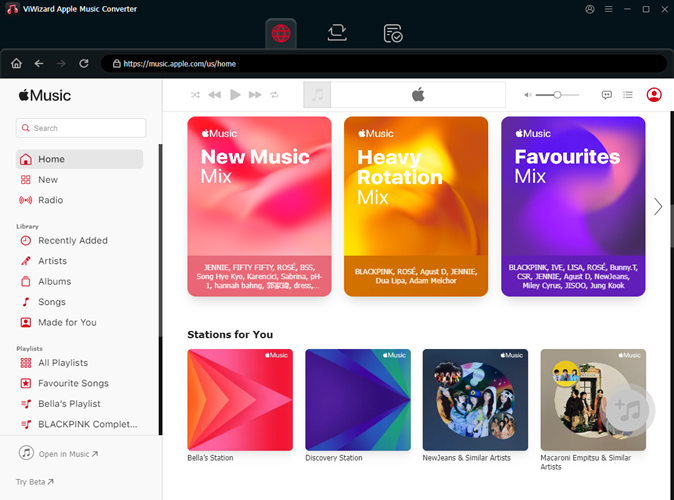
Start by visiting the ViWizard website and downloading the Apple Music Converter for your computer (available for both Windows and Mac). After the installation finishes, open the app and log in with your Apple Music account. This will give you access to all your music, including playlists, albums, and songs.
Step 2Select MP3 as the Output Format
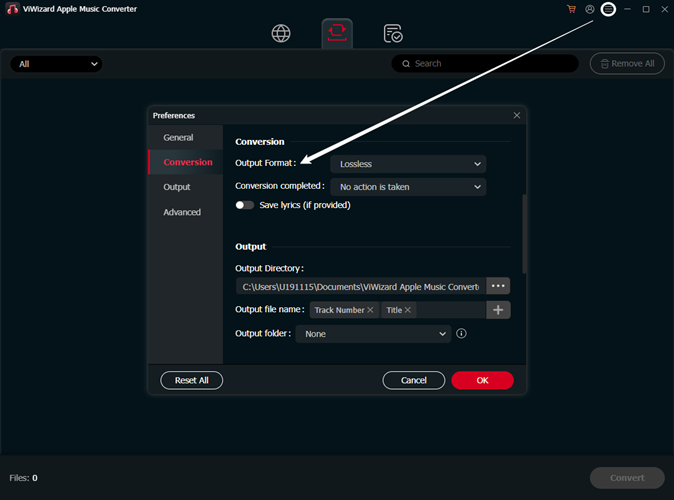
Next, choose the format for your converted music files. For the best compatibility with most devices, including Samsung phones, MP3 is a great choice. Click the gear icon in the top-right corner to adjust settings like sample rate, bit rate, and audio channels. This step helps you balance sound quality with file size. Once you're happy with the settings, hit "OK" to save them.
Step 3Add Music and Start Conversion
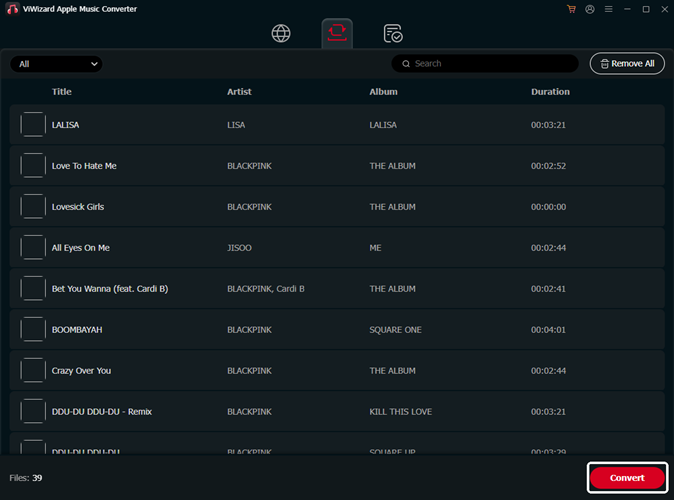
Browse your Apple Music library and pick the songs, albums, or playlists you want to convert. Click the "+" button to add the tracks to the conversion list. Once you've selected your music, click "Add to Conversion List". To start the conversion, click the "Convert" button. The process will take just a few minutes, depending on how many files you're converting and your computer's speed.
Step 4Access Your Converted Music
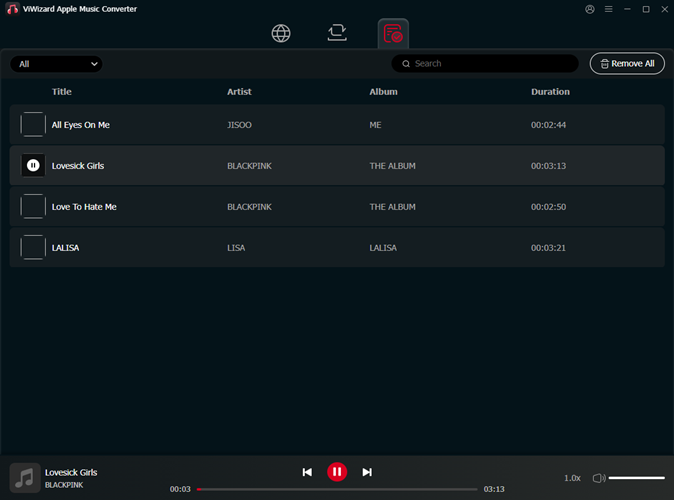
Once the conversion is done, click the "History" button to view your converted files. To access the folder with your music, click the folder icon. From there, you can transfer the MP3 files to your desired device, like an Android phone or iPhone, and keep them forever.
Part 6. Find and Transfer Downloaded Apple Music to Your iPhone/Android Smartphones
Your Apple Music downloads stored on the hard disk of your computer can be transferred manually to a device, such as iPhone, iPad, or Android smartphone. Of course, you can upload the downloaded music to a preferred cloud storage service, such as iCloud or Google Drive, or an external storage device, such as a USB. Ensure the music files are downloaded in a compatible file format with the platform and devices.
For Android
- Connect an Android smartphone to the computer via a portable USB cable. Mac users should have downloaded and installed an app called Android File Transfer to ensure the transfer.
- On Windows PC, open the File Explorer and head over to the device's storage. On Mac, open the Android File Transfer app and select the device's storage under Use USB for.
- Head over to the folder that contains all the downloaded music files.
- To transfer the music files to the Android device, drag and drop them to the desired position where the files will be added to.
- Once done, open the Files Manager app and navigate to the position and browse for the music files.
On iPhone, iPad, iPod Touch:
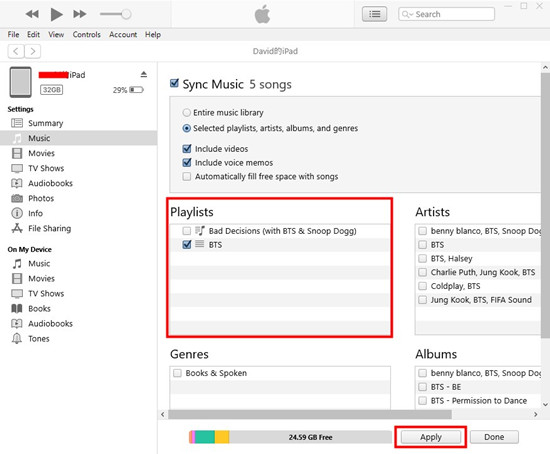
- Ensure to upload the downloaded Apple Music files to the iTunes app. In iTunes, use File > Upload File/Folder to Library. In Music app, use File > Import Music.
- Connect an iOS device to the computer via a portable USB cable.
- Select your device in the sidebar, and head over to the Music section.
- To sync the downloaded music files, use Sync Music > Entire music library > Apply, and wait for the syncing to finish.
- Once done, open the Music app and navigate to the Downloaded section and browse for the downloaded music.
Bonus: Managing Downloaded Apple Music (App Settings)
Managing your downloaded Apple Music is essential for keeping your device organized and freeing up storage space. You can either manually remove specific downloads or set your device to manage them automatically. Here's how to do it:
Option 1: Manually Remove Downloads
-
For Mobile (iOS/Android):
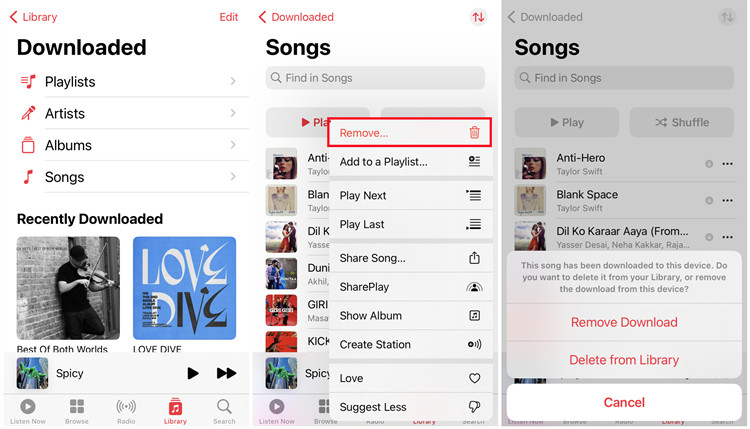
- Launch the app on your iPhone, iPad, or Android device.
- Tap on the "Library" tab and then navigate to the "Downloaded" section.
- Browse through sections like "Playlists," "Artists," "Albums," or "Songs" to locate what you want to remove.
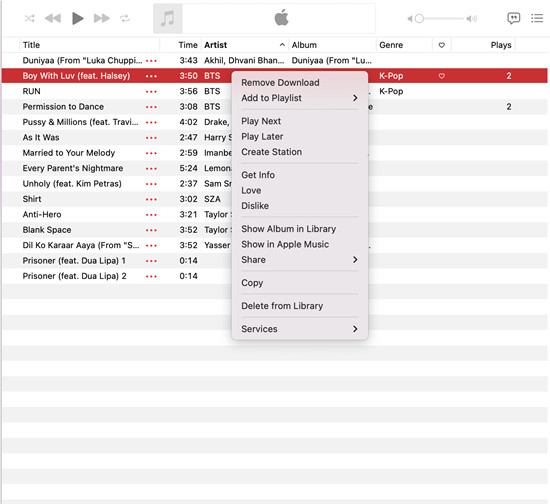
- Tap the "More" button (three dots) or swipe left on the item. Select "Remove Download" to delete it from your device, or choose "Remove from Library" to delete it from both your device and your Apple Music library.
-
For Desktop (PC/Mac):
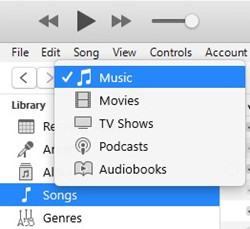
- Launch iTunes on Windows or the Music app on a Mac.
- Go to the "Library" section and select "Songs" or another category to view your collection.
- Select the items you want to delete (Ctrl + A on Windows, Command + A on Mac). Right-click and choose "Delete from Library" to remove them from both your library and device.
Option 2: Automatically Remove Downloads (iOS Only)
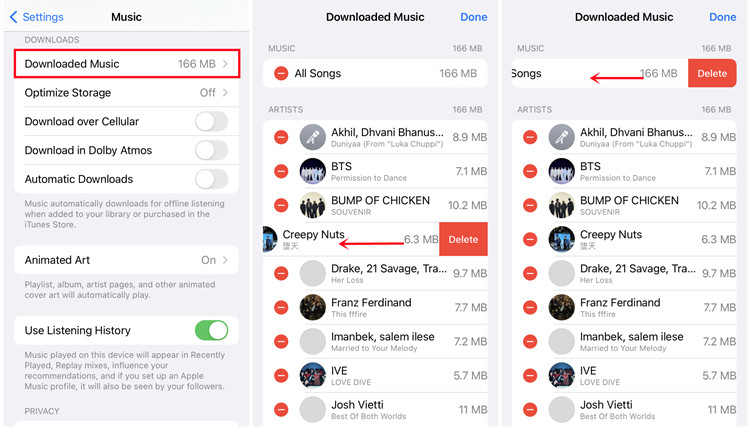
- On your iPhone or iPad, open the "Settings" app.
- Scroll down and tap on "Music."
- Tap "Downloaded Music" to view your downloads. Swipe left on individual songs or "All Songs" and tap "Delete" to remove them.
- In "Music" settings, enable "Optimize Storage" to allow your device to automatically remove old, unwanted downloads when storage is low.
The Bottom Line
After reading this article, you may know where the Apple Music downloads stored. You can choose the suitable guides above for your device to view the location of Apple Music. If you want to play Apple Music on other devices or apps, don't miss out ViWizard Audio Converter. It can download and convert Apple Music to an open format as your need. If you want to know more about ViWizard, you can download the trial version below.

Leave a Comment (0)