When you switch to a new computer, transferring your iTunes library is a must to keep all your music, playlists, and settings. But it’s not as simple as copying files; there are specific steps to make sure everything comes along. To do this, you'll need two key files: the .itl (iTunes Library) and the .xml (iTunes Music Library) files. These hold the essential data iTunes uses to organize your collection.
While this may sound a bit technical, it’s manageable once you know the steps. In this guide, we’ll walk you through syncing your iTunes library to a new computer, and also share an alternative method that can ensure a 100% reliable transfer. Plus, we’ll explain how MP3 files can make the process even smoother.
Although the transfer process can seem tricky, with the right steps, you’ll have your iTunes library fully set up on your new computer, with all your songs and playlists intact.
If you wish to transfer your music to a new Apple ID, check another post:
Have no idea on how to transfer music from one apple ID to another? Check out this article, you'll learn the best way to transfer music to new apple ID. And you might as well want to stream Apple Music songs offline without a subscription.
Part 1. How to Back Up iTunes Library to New Computer
When moving to a new computer, properly backing up your iTunes library is essential to retain all your music, playlists, and settings. This process involves more than just copying your media files. You also need to transfer the .itl (iTunes Library) and .xml (iTunes Music Library) files, which store important metadata like ratings, playlists, and play counts. Failing to transfer these files can result in losing all the organization you've set up in iTunes.
Many users encounter problems because they try to transfer only media files or don’t copy the entire iTunes folder. To avoid this, make sure to include both the media and the necessary library files. Here’s how to do it:
- Launch iTunes if you're using Windows or macOS Mojave or earlier.
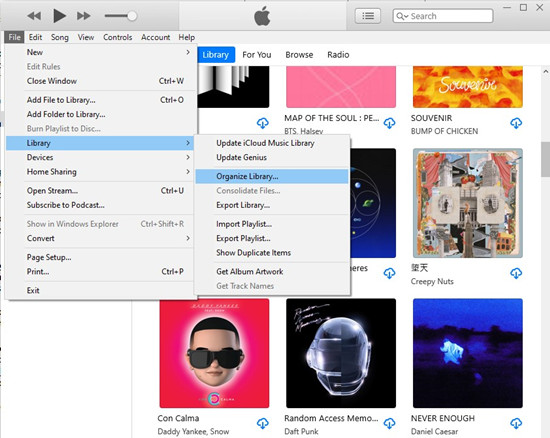
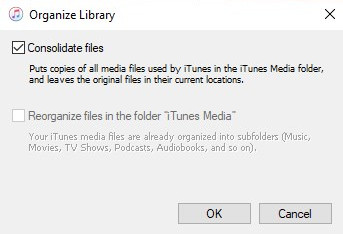
- In iTunes, go to File > Library > Organize Library, then check the box next to Consolidate files. This ensures all your media files are copied into the iTunes Media folder.
- Click OK, and iTunes will move all your media into the iTunes Media folder.
- Find your iTunes Media folder in these locations:
- On macOS:
/Users/YourUsername/Music/iTunes/iTunes Media - On Windows:
C:\Users\YourUsername\Music\iTunes\iTunes Media
- On macOS:
- Look for the following files in the iTunes Media folder:
iTunes Library.itliTunes Music Library.xml(optional but useful)
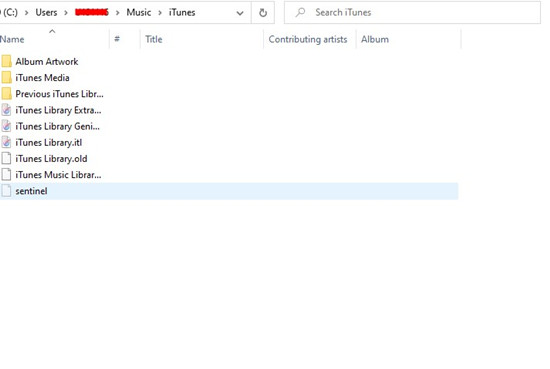
- Copy the
iTunes Library.itl,iTunes Music Library.xml, and the iTunes Media folder to an external drive, USB, or network location. - Make sure iTunes is installed on your new computer, either by downloading it from the Apple website or the Microsoft Store.
- On your new computer, navigate to the iTunes folder (same location as before) and transfer the copied library files and iTunes Media folder.
- Open iTunes, and it should recognize the transferred library, displaying all your music and playlists.
- Finally, go to Account > Authorization > Authorize This Computer, enter your Apple ID and password, and click Authorize.
If you notice missing ratings or playlists after the transfer, it’s often because the .itl and .xml files weren’t transferred properly. If this happens, users often recommend re-importing the .xml file after moving the media files to restore any missing metadata like playlists or ratings.
Part 2. How to Transfer iTunes Library to New Computer
Backing up your iTunes library is important, but just transferring the .itl and .xml files won’t guarantee full access to your music. If you're using Apple Music or iTunes purchases, your library may be removed if your subscription lapses, and without a backup of the actual music files, you can’t recover it. Even with the library files, DRM restrictions can still limit your access.
To truly free your music from these limitations, you can convert your iTunes library into DRM-free files. ViWizard Apple Music Converter is a great tool for this. It lets you download your iTunes library—including Apple Music, iTunes purchases, podcasts, and audiobooks—into MP3, AAC, or M4A formats. This removes the need for a subscription and ensures your music is accessible anytime.
ViWizard also preserves metadata like song titles, artist names, and album artwork, and keeps your audio in lossless quality. After converting your music, simply transfer it to your new computer and add it to iTunes using File > Add File/Folder to Library. This way, you’ll have your entire library, free of DRM, and ready to enjoy on any device.
Key Features of ViWizard Apple Music Converter
Free Trial Free Trial* Security verified. 5, 481,347 people have downloaded it.
- Convert Apple Music songs, albums, playlists, and artists into MP3 for easy access
- Preserve lossless audio, high-resolution lossless, and Dolby Atmos quality
- Strip DRM from Apple Music for unrestricted offline listening
- Save converted audio files while retaining full ID3 tag details
- Begin by downloading both ViWizard Apple Music Converter and the iTunes app on your computer.
- Once installed, open ViWizard, and it will automatically launch iTunes as well.
- Drag and drop songs, albums, playlists, podcasts, and audiobooks directly onto the ViWizard interface, or click the Add Music button at the top to load your entire iTunes library.
- To ensure the music is in a format compatible with iTunes, click the Format tab at the bottom-left. Choose either MP3, AAC, or M4A. You can also adjust settings like bitrate, sample rate, or channel here based on your preferences. After adjusting, click OK to confirm.
- Click the Convert button in the lower-right corner of ViWizard to begin batch converting and downloading your music. The process will complete in no time—up to 30x faster than usual!
- After conversion, click Open to locate the folder containing all the downloaded music files on your computer.
- Use a USB drive or other storage method to transfer the downloaded music files to your new computer.
- Make sure iTunes is installed on your new computer.
- Open iTunes on your new computer and click File > Add File/Folder to Library. Locate the music files or folders you just transferred and click Open to add them to iTunes.
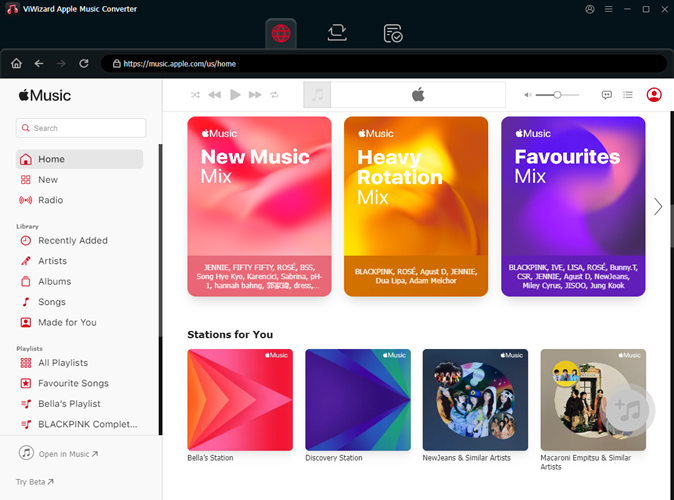
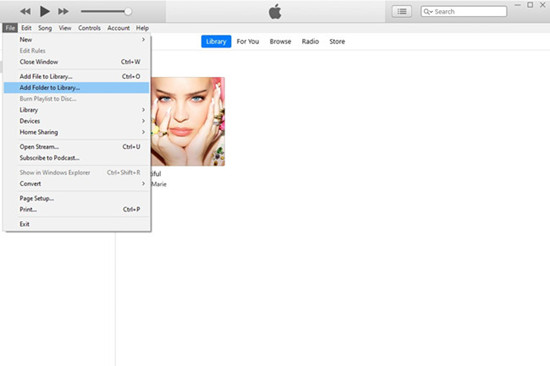
After uploading, your entire iTunes library will be available on the new computer. Once your computer is authorized, you can easily play your music offline without any issues.
Part 3. How to Sync iTunes Library to New Computer
If you're an Apple Music or iTunes Match subscriber, you can easily sync your iTunes library to a new computer via iCloud Music Library. This cloud service lets you store both streamed and locally downloaded music, so you can access your entire library from any compatible device. To use this feature, make sure you haven’t exceeded the device limit (up to 5 computers). Once you’re set up, all you need is to sign in with the same Apple ID you used on your old computer, authorize the new one, and your music should sync effortlessly.
- On your new computer, ensure that iTunes is installed. Log in with the same Apple ID you used on your old computer and make sure you're signed into iCloud with that account.
- Open iTunes on your new computer, then click Account in the menu bar, followed by Authorization > Authorize This Computer. Enter your Apple ID and password when prompted, and click Authorize to give your new computer access to your library.
- On your old computer, open iTunes and navigate to Edit (Windows) or iTunes (macOS) in the menu bar, then select Preferences. Under the General tab, check the box next to iCloud Music Library to enable it.
- After enabling iCloud Music Library, click OK. iTunes will now begin uploading your library to iCloud. Depending on the size of your library, this could take some time.
- Once your library is uploaded to iCloud, your new computer will automatically begin syncing it. This could take a little longer if you have a large library, so a bit of patience is needed.
- After the sync is complete, you’ll be able to access your entire iTunes library, including music, playlists, and other media, on your new computer via iCloud Music Library.
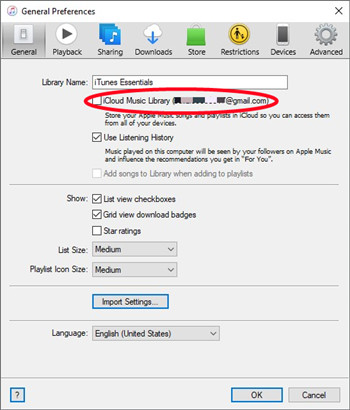
With iCloud Music Library, you can ensure your iTunes library is accessible anytime and anywhere without manual file transfers. Just remember to keep your Apple ID and device authorizations up to date to avoid interruptions.

Leave a Comment (0)