So, you've put together an awesome music collection on your Apple Music account, with playlists for every mood. Now you're thinking about switching to a new Apple ID, whether it's to share with someone or just because you want a fresh start. But here's the bummer: transferring your Apple Music library isn't as easy as it sounds.
Part 1. How Can I Transfer Apple Music Between Different Accounts?
The problem is that all your music is tied to your original Apple ID, and it syncs through iCloud Music Library, which you set up when you subscribed to Apple Music. This means that when you sign out of your old account, most of your downloaded songs and playlists won't magically follow you to the new account. Apple doesn't allow you to transfer your library between accounts, so your music is pretty much stuck where it is.
While you should still have access to your downloaded songs and locally stored music, you might hit a snag with iTunes. Sometimes, it can be a bit finicky and decide that your existing purchases aren't eligible for transfer.
And let's be real - managing multiple Apple IDs can get messy and complicate things. Each one is tied to specific devices, and any Apple device can hold protected content from up to five different Apple IDs, as long as the computer transferring the purchases is authorized for those accounts. This also means that if you've been switching accounts, updating your iOS devices can become a real hassle. Nobody wants to deal with that!
So, what can you do? If you're looking to switch accounts, think about just keeping your current Apple ID and updating the email address associated with it. But if you're determined to make this work smoothly, there are some tricks that might help. You may need to convert files into a format your new account can recognize.
Unprotected content, including most music purchased from the iTunes Store since 2009, doesn't have these restrictions. However, any purchased or protected content from other IDs won't be included. For example, ViWizard Apple Music Converter can help convert all your music tracks to MP3, which is supported for adding to your iTunes library, uploading to iCloud, or syncing across devices, no matter the Apple ID you use to access the platform. Let's see how to make that work!
Part 2. How to Transfer Apple Music from One Apple ID to Another
Even though Apple doesn't make it easy to transfer your entire music library between accounts, there are a couple of workarounds that can help you share your favorite playlists or even keep your songs when switching Apple IDs. These methods essentially focus on either sharing playlists directly with another account - similar to sending them a friend - or converting your tracks into a format that gives you more control, like you actually own them without needing to repurchase from the iTunes Store.
Method 1: Transfer Apple Music Playlists
If you want to bring over the playlists you've created on your old Apple Music account, sharing them directly with your new account is a straightforward option. Keep in mind, though, that this method shares the playlist structure - so you'll still need an active Apple Music subscription on the new account to access the actual songs.
- Open Apple Music on your iPhone, iPad, or iPod touch, signed in with your old Apple ID.
- Go to "Library" and tap "Playlists" to see all your saved playlists.
- Select the playlist you want to transfer.
- Tap the three-dots icon (•••) in the top-right corner and choose "Share Playlist…" from the menu.
- Choose how to share:
- Copy the link to paste it elsewhere or send it to yourself.
- Send via AirDrop to another Apple device signed in with your new Apple ID.
- Share through email or messages for easy access on your new account.
- Open the link on your new Apple ID. It will open in Apple Music, allowing you to add the playlist to your library.
Note: This only shares the playlist, not the downloaded songs. You'll need to re-download them on the new account if you want offline access, and they'll require an active Apple Music subscription.
Method 2: Transfer Apple Music Library
If you want to keep your music files without depending on an active Apple Music subscription, ViWizard Apple Music Converter can convert the songs into a more universal format like MP3. This way, you can add them to your new Apple ID without any compatibility issues. Whether it's Apple Music tracks tied to a subscription, your own files, iTunes purchases, podcasts, or audiobooks, once converted, they're yours to keep and transfer to your new iTunes library.
From there, you can upload them to your iCloud Music Library or sync them across devices, no matter which Apple ID you use to sign in.
The best part? You have the freedom to decide whether you want to keep subscribing to Apple Music without worrying about losing your original library.
Key Features of ViWizard Apple Music Converter
Free Trial Free Trial* Security verified. 5, 481,347 people have downloaded it.
- Convert Apple Music songs, albums, playlists, and artists into MP3 for easy access
- Preserve lossless audio, high-resolution lossless, and Dolby Atmos quality
- Strip DRM from Apple Music for unrestricted offline listening
- Save converted audio files while retaining full ID3 tag details
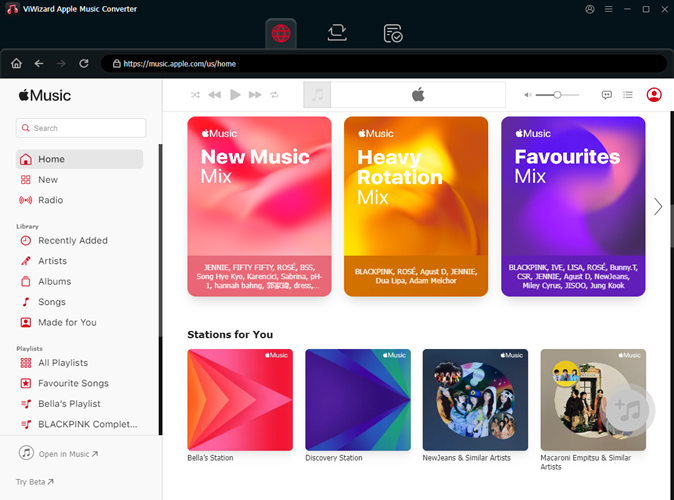
- Open ViWizard Audio Converter on your computer; iTunes will launch automatically.
- Drag and drop the Apple Music tracks you want to convert into the ViWizard interface, or use the Add Files button to select tracks from your iTunes library.
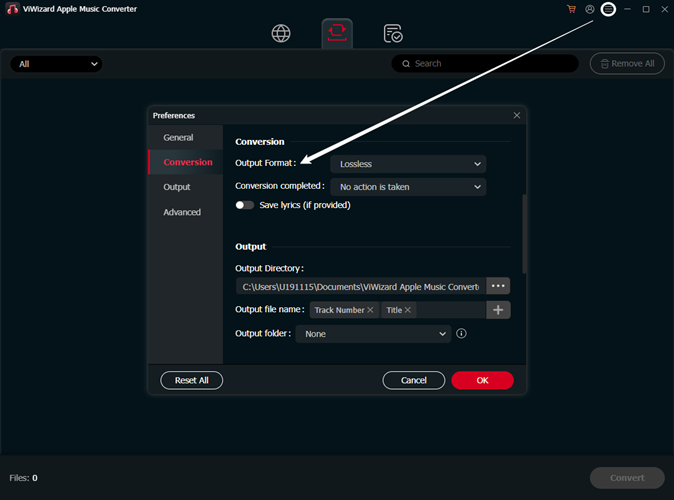
- Click the "Format" button at the bottom to select the desired output format, such as MP3, M4A, or AAC.
- Adjust settings like bit rate and sample rate as needed.
- Choose an output folder by clicking Output and selecting where you'd like the converted files to be saved.
- Click "OK" to save your changes.
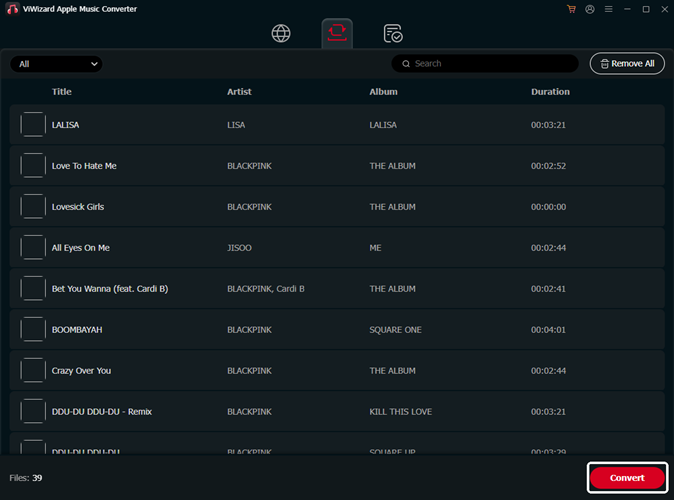
- Click the "Convert" button to begin converting your selected tracks.
- ViWizard will process the conversion, and you can monitor progress in the interface.
- Once done, click "Converted" to access your newly converted files.
- Open iTunes or the Music app and sign in with your new Apple ID.
- Drag and drop the converted files into your new iTunes library.
- To sync them across devices, enable iCloud Music Library in your new account to upload the songs.
- The music will now be accessible across all devices using your new Apple ID.
Part 3. How to Transfer Apple Music from PC to Other Devices
Once you've set up your new library but want to skip subscribing to Apple Music or using iCloud Music Library, you can still transfer your music to other devices like your iPhone, iPad, or iPod. You'll be able to manually sync your converted Apple Music tracks through iTunes - just like handling any other MP3 files.
- Use a USB cable to connect your iPhone, iPad, or iPod to your computer.
- Open iTunes (or the Music app on macOS Catalina and later). If prompted, authorize your computer with your Apple ID.
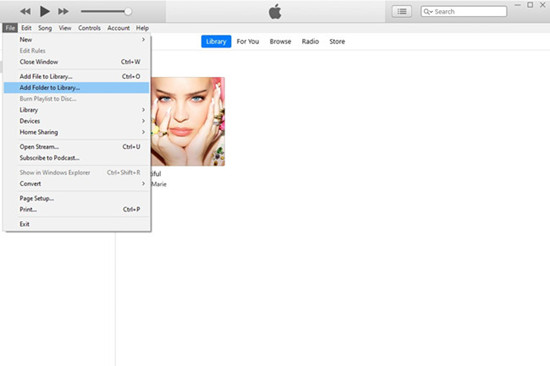
- Drag and drop the converted Apple Music files (now in MP3, M4A, or AAC format) into the iTunes library. Alternatively, use File > Add to Library to select and import the files from their saved location on your PC.
- Click the device icon in iTunes that appears when your device is connected.
- Go to the Music tab in the left sidebar.
- Check "Sync Music" and choose either "Entire music library" or "Selected playlists, artists, albums, and genres" if you want to pick specific tracks.
- Click "Apply" or "Sync" at the bottom right to start transferring your selected music.
- Wait for the process to finish - progress is shown at the top of the iTunes window.
- When done, safely eject your device by clicking the eject icon next to its name.
- Open the Music app on your iPhone, iPad, or iPod to find your synced songs.
- Your converted Apple Music tracks are now available to play offline, no subscription required.
Extra Tip: How to Change Email of Apple ID
If you no longer use the primary email address associated with your Apple ID or if you can't access it, you can easily change it without losing access to your contacts, purchases, or any other account information. The most convenient way to do this is through your iPhone or another trusted device - one that you're already signed in to with your Apple ID.
- On your iPhone (or trusted device), open the Settings app.
- Tap on your name at the top of the screen to access your Apple ID settings.
- Tap on Sign In & Security.
- Next to Email & Phone Numbers, tap Edit.
- Tap the Remove button next to your current primary email address, then confirm by tapping Delete.
- Tap Choose Another Email.
- Enter your new email address and, if prompted, enter your device passcode.
- Follow the on-screen instructions to enter and verify your new email address.
Note: If you remove an email address from your Apple ID, it cannot be associated with another Apple ID for 30 days for security reasons. Make sure to verify your new email as soon as you receive the confirmation email from Apple.


Leave a Comment (0)