Apple Music makes it easy to play your favorite songs, but sometimes the volume can jump from track to track. One song might be way louder than the next, which can be a bit annoying, and this is where the Sound Check feature steps in to save the day. Sound Check automatically adjusts the volume so all your songs play at the same level. Whether you're listening to a playlist or an album, it helps make sure the sound stays consistent. No need to mess with the volume – it does the work for you.
If you want a smoother listening experience, Sound Check is easy to turn on or off on your iPhone, iPad, or Mac. Let's take a look at how it works and how it can make your music sound better.
Wondering how to make Apple Music louder? Come here to get the checklist and 5 methods to fix Apple Music volume!
Part 1. What Does Sound Check Do in Apple Music?
Many Apple Music users might not realize how much Sound Check can improve their listening experience. Apple doesn't advertise it heavily, but it quietly works in the background to ensure that the volume of your songs stays consistent. If you've ever been startled by a sudden jump in volume between tracks, Sound Check is Apple's solution to that problem. It adjusts the loudness of each song, so no matter what you're listening to, the volume stays roughly the same.
For example, let's say you're listening to a soft ballad, and suddenly a loud rock song comes on. Without Sound Check, the rock song could feel much louder compared to the ballad. But with Sound Check enabled, the volume of the rock song is automatically reduced, making the transition less jarring. This way, you won't have to constantly adjust the volume for every track. It's like having a built-in volume manager within the app.
Think of Sound Check as Apple's version of similar features in other music apps

It's comparable to Spotify's Normalize Volume or Amazon Music's Loudness Normalization. Sound Check automatically adjusts the volume without compromising sound quality. It's a small but handy feature that makes your music flow more smoothly, without any unexpected volume spikes.
How Does Sound Check Work Behind the Scenes?
Sound Check uses a system called ReplayGain to measure and adjust the loudness of your tracks. However, it's not always perfect. Some users have pointed out that it can make certain songs sound either too quiet or too loud. The effect of Sound Check can also vary depending on the device you're using—whether you're listening through headphones, a Bluetooth speaker, or in your car.
Part 2. How to Turn On Sound Check on Apple Music
Sound Check is turned on by default in Apple Music on your iPhone, iPad, or Mac. However, it's always a good idea to double-check that it's active to ensure a smoother listening experience. If you're using Bluetooth speakers or headphones, enabling Sound Check can make a noticeable difference by ensuring that each song plays at a similar volume, even in a large music library.
Why Should You Turn On Sound Check?
Sound Check is especially helpful when multitasking, driving, or even hosting a party. For example, if you're creating a workout playlist with tracks from different albums, the volume levels may vary between songs. Without Sound Check, you'd find yourself constantly adjusting the volume to avoid sudden jumps, which can be annoying. With Sound Check enabled, you can focus on your activity—whether it's lifting weights or just chilling—without having to adjust the volume every time a new track starts.
- Sound Check only works for songs in your library: If you're streaming music, like from radio stations or curated playlists, Sound Check will still adjust the volume, but it may not be as effective if the songs come from different sources with varying mastering levels.
- Battery usage and performance: Enabling Sound Check won't impact your battery life or device performance, so you can leave it on without worrying about draining your device's power.
How to Enable Sound Check on Different Devices:
For iPhone or iPad:
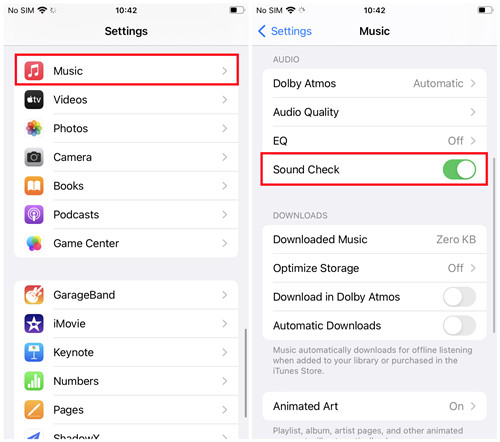
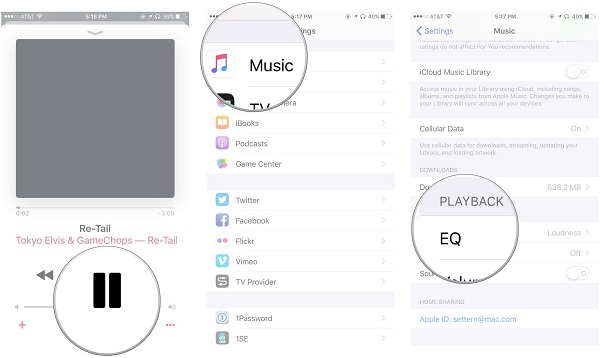
- Open the Settings app.
- Scroll down and tap Music.
- Under the Playback section, find and toggle on Sound Check. The switch will turn green when it's on.
- Open the Music app and start playing your songs. The volume between tracks will be more consistent, even if one song is quieter than another.
For Mac:
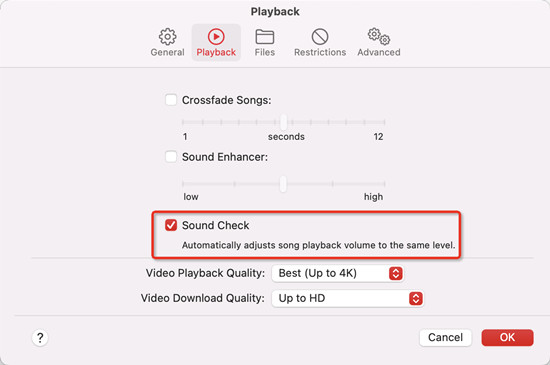
- Open the Music app.
- In the Apple menu bar, click Music, then select Preferences.
- In the Playback tab, check the box next to Sound Check.
- Once enabled, your Mac's Music app will automatically adjust the volume of all songs for a consistent listening experience.
For Mac or PC (iTunes):
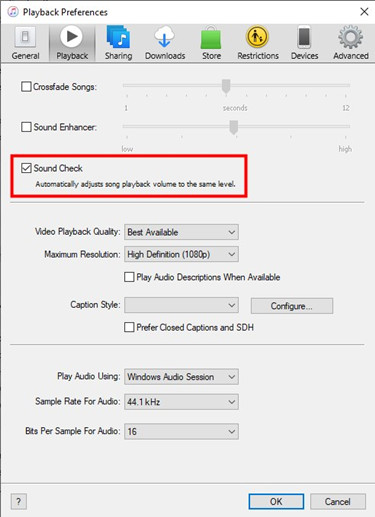
- Open the iTunes app.
- Click File in the top-left corner, then select Preferences.
- In the Playback tab, check the box next to Sound Check.
- With Sound Check enabled, iTunes will automatically adjust the volume of songs from your library or playlists.
Part 3. How to Turn Off Sound Check on Apple Music
If you prefer to listen to your music at its original volume levels without automatic adjustments, you can easily turn off Sound Check. Disabling this feature gives you control over the volume levels, allowing tracks to play as they were originally mastered.
Why Should You Turn Off Sound Check?
While Sound Check is great for consistent volume, there are situations where you might prefer to hear music with its intended dynamics, like for certain genres like classical or live recordings, where the natural volume variation adds to the experience.
- Sound Check Impact on Playlists and Streaming: Disabling Sound Check will stop any automatic volume adjustments, meaning that tracks from different sources or albums may have more noticeable volume fluctuations.
- Battery usage and performance: Just like when it's enabled, turning off Sound Check won't affect battery life or performance, so you can adjust it based on your listening preferences without worrying about power consumption.
How to Disable Sound Check on Different Devices:
For iPhone or iPad:
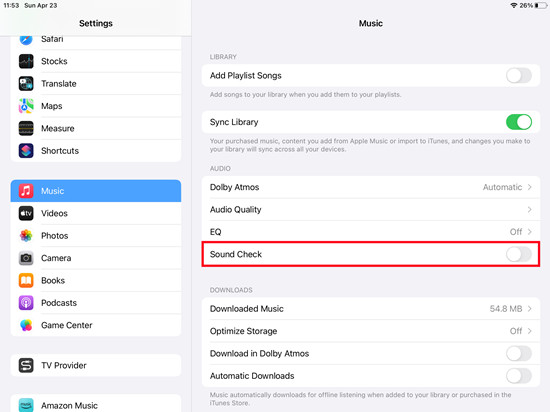
- Open the Settings app.
- Scroll down and tap Music.
- Under the Playback section, find Sound Check and toggle it off. The switch will no longer be green when it's off.
- Open the Music app and start playing your songs. The volume will now play as it was originally recorded, without automatic adjustments.
For Mac:
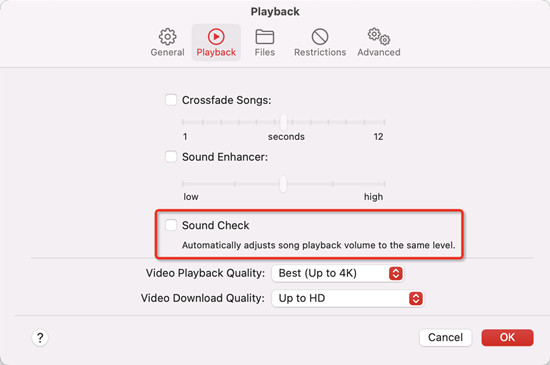
- Open the Music app.
- In the Apple menu bar, click Music, then select Preferences.
- In the Playback tab, uncheck the box next to Sound Check.
- Once disabled, your Mac's Music app will stop adjusting the volume of songs, allowing tracks to play at their original levels.
For Mac or PC (iTunes):
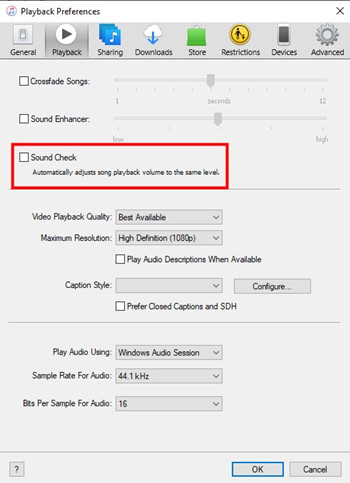
- Open the iTunes app.
- Click File in the top-left corner, then select Preferences.
- In the Playback tab, uncheck the box next to Sound Check.
- With Sound Check disabled, iTunes will stop adjusting the volume of songs from your library or playlists.
Bonus Tip: How to Download Apple Music to MP3s for Your Devices
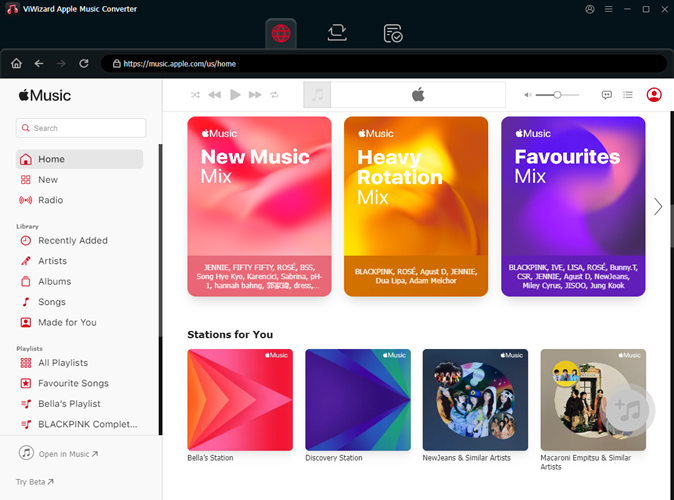
If you want or need to download your entire Apple Music library to your devices for offline play on any media players, you have to download music included to MP3 audio files. You may know that your Apple Music downloads with subscription has DRM-protection, which restricts the music playback within the Apple Music app only. Fortunately, an Apple Music downloader can work with iTunes program to download any music tracks you want from Apple Music directly to your computer devices. Then you have the ability to transfer them as downloaded music to your other devices for unlimited playback.
ViWizard Apple Music Converter is designed for Apple Music users to download the desired contents into files in several formats: MP3, M4A, M4B, WAV, AAC and FLAC. In addition to Apple Music, iTunes files, podcasts, audiobooks and even Audible audiobooks can be downloaded to your devices directly. Once you have made your Apple Music library offline on your PC or Mac, you can play the audio files with the most common media players.
Key Features of ViWizard Apple Music Converter
Free Trial Free Trial* Security verified. 5, 481,347 people have downloaded it.
- Convert Apple Music songs, albums, playlists, and artists into MP3 for easy access
- Preserve lossless audio, high-resolution lossless, and Dolby Atmos quality
- Strip DRM from Apple Music for unrestricted offline listening
- Save converted audio files while retaining full ID3 tag details


Leave a Comment (0)