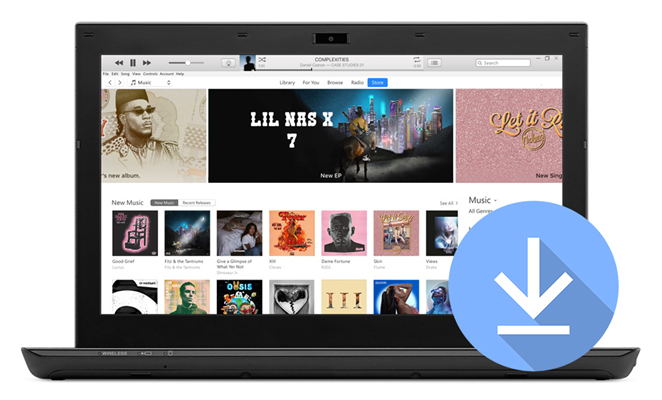
Apple Music is one of the most well-known streaming platforms, offering access to millions of songs, albums, and curated playlists. As of this year, Apple Music boasts over 90 million subscribers, available on platforms like iPhone, iPad, iPod, Android smartphones and tablets, as well as Windows PC and Mac computers. With Apple Music gradually rolling out its dedicated app for PC (Windows 11 and later), iTunes remains available for Windows 10 users. The service allows users to stream music on-demand, but what happens when you want to save your favorite songs for offline listening on your PC or Mac?
Until recently, users could only access their downloaded Apple Music content as long as their subscription remained active. Once canceled, any downloaded tracks would no longer be available. However, there's more than one way to download Apple Music songs to your PC or Mac and keep them permanently. For official downloads, you'll need to ensure you have the Apple Music app or iTunes. As for MP3 downloads, ViWizard Apple Music Converter works seamlessly on both PC and Mac, ensuring your music stays with you no matter what.
Listen to Apple Music on PC is a great option when you are working or surf the Internet on your computer. Here are 4 best ways to do it.
Part 1. Is Apple Music Available for PC?
Yes, Apple Music is available for PC, both as a dedicated app and through the Apple Music Web Player (music.apple.com). You can access all of its features, though offline downloads are limited to the Apple Music app or iTunes. Once set up, you can easily listen to your Apple Music library, sync playlists, and download your favorite tracks for offline listening, whether you're using a PC or Mac.
Downloading Apple Music to Your PC using the Apple Music App:
- Download the Apple Music app from the Microsoft Store (Windows 11 or later) and click Install.
- Open the app from the Start Menu or search bar.
- Log in with your Apple ID. If you don't have one, you can create it within the app.
- Once logged in, browse your Library for saved content and the For You tab for personalized recommendations.
- Keep the app updated by opening the Microsoft Store, going to Library, and selecting Get updates.
Downloading Apple Music to Your PC using iTunes:
- On Windows 10, download iTunes from the Microsoft Store. On Mac, iTunes is pre-installed.
- Open iTunes and log in with your Apple ID, or create one via the Account menu.
- Explore music, playlists, and albums in the Apple Music section. The Browse tab shows trending music, and the Library section has your saved content.
- To stay updated, check for iTunes updates by going to the Help menu and selecting Check for Updates.
Part 2. How to Download Music from Apple Music Directly to PC or Mac (Alternative Workaround)
Sometimes, streaming Apple Music isn't enough, and you may want to download music directly to your PC. Unfortunately, the tracks come in formats like M4P or AAC (which we'll discuss in Part 3), and these aren't as flexible as MP3. M4P files are locked with Digital Rights Management (DRM), restricting how you can use them. AAC files, while not DRM-protected, come with an extra cost on the iTunes Store. The solution? Converting those tracks into a more universally accepted format, like MP3.
MP3 files have long been one of the most widely recognized formats, compatible with nearly all devices—not just those authorized by Apple Music. Fortunately, there's a straightforward workaround to help you achieve this: ViWizard Apple Music Converter.
What You Need: ViWizard Apple Music Converter
ViWizard Apple Music Converter is a powerful yet user-friendly tool that allows you to download music directly from Apple Music to your PC, remove DRM protection, and convert tracks into more flexible audio formats like MP3. With this converter, you can download songs, albums, artists, playlists—essentially any Apple Music track—and transfer them to other devices without restrictions. The program features a built-in Apple Music Web Player, allowing you to select any tracks and choose your desired format.
In addition to MP3, ViWizard supports a variety of other common formats such as WAV, FLAC, AIFF, M4A, and M4B.
The download quality will be based on your account settings and official offers, such as Dolby Atmos, 256kbps AAC, lossless audio, and more. However, you can also customize output settings such as bit rate, sample rate, channel, codec, and more, depending on your personal preferences.
Key Features of ViWizard Apple Music Converter
Free Trial Free Trial* Security verified. 5, 481,347 people have downloaded it.
- Convert Apple Music songs, albums, playlists, and artists into MP3 for easy access
- Preserve lossless audio, high-resolution lossless, and Dolby Atmos quality
- Strip DRM from Apple Music for unrestricted offline listening
- Save converted audio files while retaining full ID3 tag details
Step 1Download and Install ViWizard Apple Music Converter
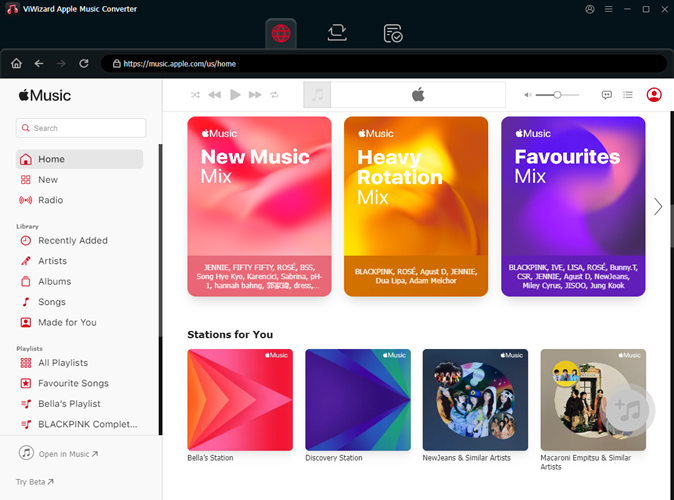
First, download and install ViWizard Apple Music Converter on your PC or Mac. This tool will allow you to remove DRM protection from Apple Music tracks and convert them into formats like MP3, WAV, FLAC, or AAC. Once installed, open the application and log in using your Apple ID to access your Apple Music library. The app will load your entire music library, giving you the ability to choose which songs or playlists to convert. To add tracks, simply click the "+" button in the app's interface.
Step 2Select the Output Format
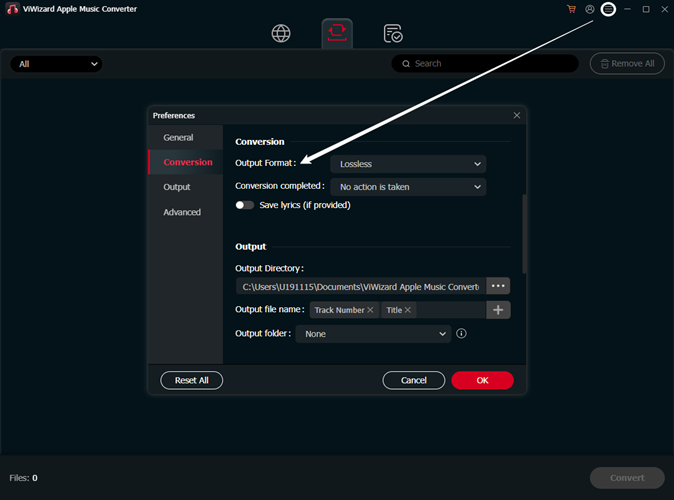
Next, you'll need to select an output format for your music. ViWizard offers a range of formats, including MP3, WAV, FLAC, and AAC—all of which are compatible with most devices and media players. To customize your settings, click on the settings icon (typically located in the top-right corner). Here, you can adjust various parameters, including sample rate, bit rate, and audio channels, ensuring the converted files meet your personal preferences. Once you're happy with the settings, click "OK" to save your choices.
Step 3Add Your Music and Start the Conversion
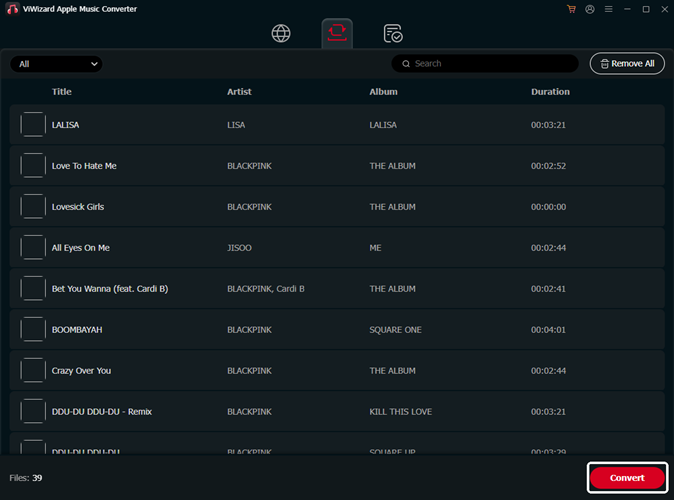
Browse your Apple Music library or use the search bar to find the specific tracks, albums, or playlists you want to convert. Once you've found the music you want, click "Add to Conversion List" to add it to the queue. After that, hit the "Convert" button, and ViWizard will begin the process of downloading and converting your music into the format you selected. The conversion process ensures that your Apple Music tracks are now DRM-free and ready to be enjoyed offline.
Step 4Access Your Converted Files
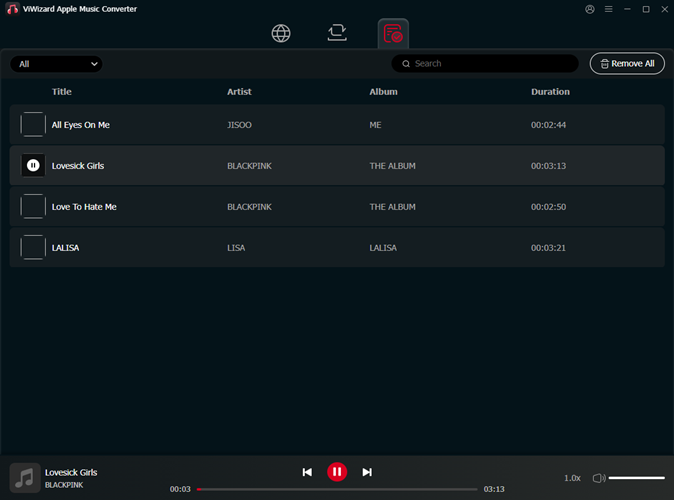
Once the conversion is complete, click on the "History" button to view a list of your converted files. You can then click the folder icon to open the location where your music is saved on your PC or Mac. From here, you can transfer your converted files to any device, media player, or app that supports your chosen format, allowing you to enjoy your Apple Music offline without any subscription restrictions.
Part 3. How to Download Apple Music on PC or Mac (Official Method)
Yes, you can download music from Apple Music to your PC or Mac, but there are a few things you need to know. First, you must have an active Apple Music subscription. This is essential because only subscribers have access to download songs for offline listening. On Windows PCs, the Apple Music app is available on Windows 10 and later, such as Windows 11. Mac users can use either the Apple Music app (for macOS Catalina and later) or iTunes (for macOS Mojave and earlier). If you don't know, the Apple Music app on Windows 11 has improved and is now more reliable and user-friendly, even though it had its fair share of issues initially.
Option 1: Add and Download Apple Music in M4P Format on PC or Mac
When you download music from Apple Music, it typically comes in the M4P format, which is protected by DRM (Digital Rights Management). This means the music can only be played on authorized devices and apps. Here's how you can download Apple Music content on both Windows and Mac:
For Windows 11 Users:
- Download the Apple Music app from the Microsoft Store if you haven't done so already.
- Open the app and log in with your Apple ID that has an active Apple Music subscription.
- Browse or search for the songs, albums, or playlists you want to download.
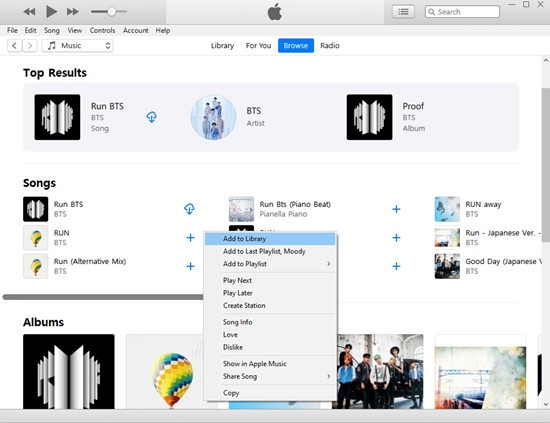
- Click the "+" icon to add the music to your library.
- Once the music is added, click the download icon next to the track, album, or playlist to start downloading.
- The downloaded files are stored in a location managed by the Apple Music app. You can adjust the storage location by following these steps:
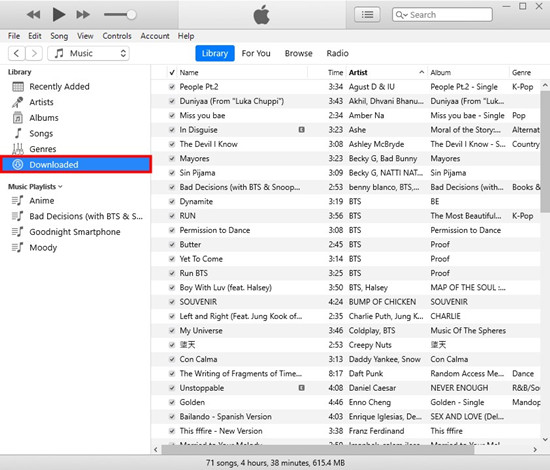
- For Windows PC: Navigate to C:\Users[Your username]\Music\iTunes\iTunes Media.
For Mac Users:
-
macOS Catalina and Later (Apple Music App):
- Open the Apple Music app.
- Log in with your Apple ID.
- Search for the music you want and click the "+" button to add it to your library.
- Click the download icon next to the music you wish to download.
- Music is stored in the Music folder, but managed by the app. You can adjust the storage location in the app's settings.
- For Mac: Go to
/Users/[Your username]/Music/Music/Media/Music/.
- For Mac: Go to
-
macOS Mojave and Earlier (iTunes):
- Open iTunes on your Mac.
- Log in with your Apple ID.
- Search for the content you want to add and click the "+" button.
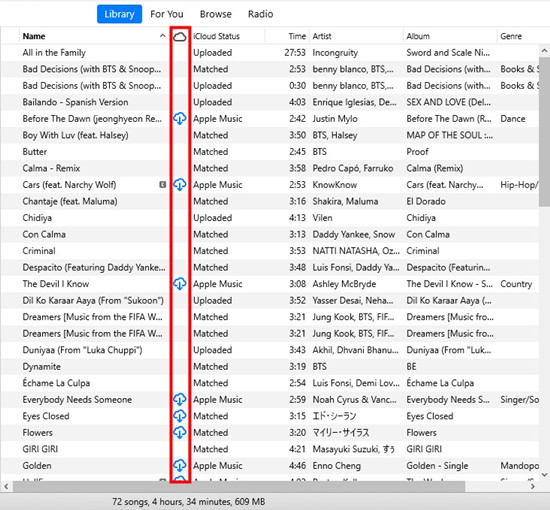
- Click the cloud icon with a downward arrow to download the music.
- Downloaded music is stored in the iTunes Media folder within your Music directory. You can adjust the storage location in iTunes settings.
- For Mac: Go to
/Users/[Your username]/Music/iTunes/iTunes Media/.
- For Mac: Go to
Option 2: Buy and Download Apple Music in AAC Format on PC or Mac
If you prefer DRM-free music for offline use, purchasing tracks from the iTunes Store is a great option. Unlike Apple Music's streaming service, which uses protected M4P files, iTunes Store purchases are in DRM-free AAC format. This allows you to freely use the music across devices and even set songs as ringtones.
Here's how to purchase and download music to your PC or Mac:
For Windows and Mac Users:
- Launch iTunes (available from the Microsoft Store if not already installed).
- Log in with your Apple ID.
- Go to the iTunes Store tab. Search for the music you want. Albums generally cost between $9.99 and $14.99, and individual songs are about $1.29. Click Buy to purchase.
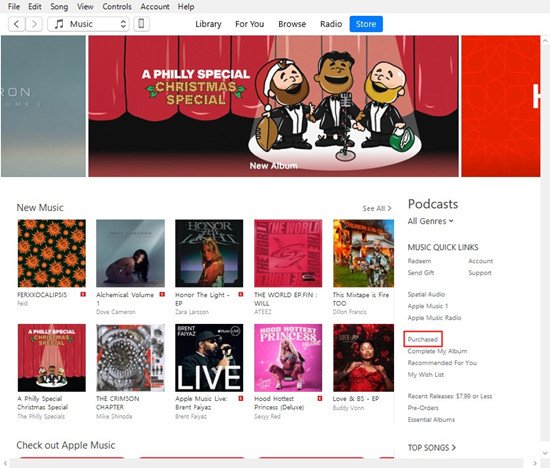
- Purchased music will automatically download. Alternatively, go to the "Purchased" section of the iTunes Store to view your purchased music. Click the download icon next to the track or album to download it manually.
- To locate your purchased music:
- For Windows:
Go to C:\Users[Your username]\Music\iTunes\iTunes Media\Music. - For Mac:
Go to /Users/[Your username]/Music/Music/Media/Music/.
- For Windows:

Tip:To ensure access to your purchased music across all your Apple devices, make sure iCloud Music Library is enabled. AAC files purchased through iTunes can be played on any authorized device linked to your Apple ID.
Part 4. How to Locate and Transfer Apple Music from PC to Others
Now that you've successfully downloaded Apple Music to your PC, let's take a closer look at where these files are stored based on their formats—M4P, AAC, or MP3—and how you can manage and transfer them to other devices.
If you want to access your Apple Music downloads on your PC, you should use iTunes.
If you want to find your M4P or AAC files downloaded via iTunes, you should check the default iTunes library folder.
If you want to easily locate MP3 files converted with ViWizard, you should check the folder you specified during the conversion process.
If you want to consolidate all your downloaded Apple Music tracks into one place, you should use iTunes to manage your library.
If you want to transfer your Apple Music downloads to your iPhone, iPad, or Android device, you should sync your files using iTunes or a suitable file manager.
A full-featured Apple Music converter that easily converts Apple Music songs, albums, playlists—including iCloud Music Library content, personalized recommendations, and curated playlists—into MP3, M4A, M4B, WAV, AIFF, and FLAC so you can keep your Apple Music forever or transfer it to any device without restrictions.
Transferring Apple Music Downloads to Your iPhone or iPad:
- Use a USB cable to connect your iPhone or iPad to your PC.
- Open iTunes on your PC and drag and drop the MP3 files into your iTunes library.
- Go to the "Music" section in iTunes and select the option to sync music to your device.
- Choose your entire music library or specific playlists/albums for syncing.
- Start the syncing process to transfer your Apple Music files to your iPhone or iPad.
- On your iPhone or iPad, open the Music app.
- Navigate to "Downloaded" and find the MP3 tracks you just transferred.
Read More: How Does Apple Music Work on Android?
Transferring Apple Music Downloads to Android Smartphones or Tablets:
- Use a USB cable to connect your Android phone to your PC.
- Open the Android phone's storage on your PC.
- Find the ViWizard output folder containing your MP3 files, and copy them to a folder on your Android phone.
- Open your preferred music app on your Android phone.
- Use the app's import or add music feature to add the ViWizard-converted Apple Music files to your library.
Conclusion
If you decide to constantly renew Apple Music and don't plan to play Apple Music on more devices, you could only download Apple Music songs as cache files for offline listening on PC. But with the help of ViWizard Apple Music Converter, you can download Apple Music songs to PC locally. Furthermore, it convert Apple Music songs to several unprotected audio files for playing anywhere.


Leave a Comment (0)