Got a huge collection of music that you've built over the years—some of it streaming, some of it gathered from your personal files? Maybe you've ripped a few songs from CDs, downloaded some live tracks, or grabbed a rare album here and there. As great as Apple Music is with its massive streaming catalog, sometimes you just want to hear those personal tracks, the ones that are unique to you. Luckily, Apple Music lets you add your own local files and bring them together with your favorite streaming music.
But what if you want to mix your personal music collection with the millions of songs available on Apple Music? Well, it's easier than you might think. The local files feature is here to help you build your ultimate music library. So, it's time to take control of your music, and we're here to guide you every step of the way! We'll show you exactly how to add, sync, play, and troubleshoot local files with Apple Music, plus some great tips to convert streaming music files into local files, like MP3!
Wanna know how to add music to your Apple Music library, even from your own music? Here's the complete tutorial. You'll learn how to add music to Apple Music, and, sync them to all your Apple devices.
Part 1. What Are Local Files on Apple Music?
When you think of Apple Music, you probably imagine streaming songs from its huge library. But what if you want to listen to music you already own? That's where local files come in. These are music files, like MP3s, AACs (m4a), WAVs, AIFFs, or Apple Lossless, saved directly on your device. Apple Music supports different types of audio files, so you're not limited to just one kind. This means you can mix your personal music with the millions of songs available on Apple Music.
Next, we'll show you how to add local files to Apple Music and start building your perfect music library.
Part 2. How to Put Local Files on Apple Music
Your music collection is one of a kind, and some of your favorite tracks may not be available on streaming platforms. Whether it's a rare find, a personal recording, or an old favorite, Apple Music makes it easy to add these local files directly to your library. By using the Apple Music app on your PC or Mac, you can upload compatible files, making them accessible across all your Apple devices. This ensures that your entire music collection is with you, wherever you go.
Note: Local files are treated a bit differently. When you add them to Apple Music, they stay separate from your streaming content.
1. Importing Ripped CDs
If you have CDs that you want to add to Apple Music, you can rip them using the Apple Music app (or iTunes on Windows). Here's how:
- Open Apple Music or iTunes:
- On Windows, launch iTunes. If it's not installed, you can download it from the Apple website.
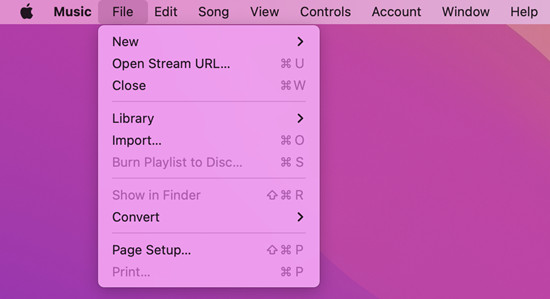
- On Mac, open the Apple Music app.
- In the app, go to the "Music" menu (or "iTunes" on Windows) and click on "Preferences" or "Settings."
- Under "Import Settings," choose your preferred format (MP3, WAV, or AAC).
- You can choose MP3 for broad compatibility, WAV for high-quality audio, or AAC for efficient file sizes.
- Once you've selected your format, begin the import process.
- The tracks will appear in your library once the import is complete.
2. Adding Purchased Music from Other Sources
If you've purchased music from other sources (like Amazon, Bandcamp, etc.), you can easily add it to your Apple Music library. Here's how:
- Open Apple Music or iTunes:
- On Windows, launch iTunes.
- On Mac, open the Apple Music app.
- Tip: If you're using an older macOS version, you might still have iTunes, and the process will be similar to the Windows steps.
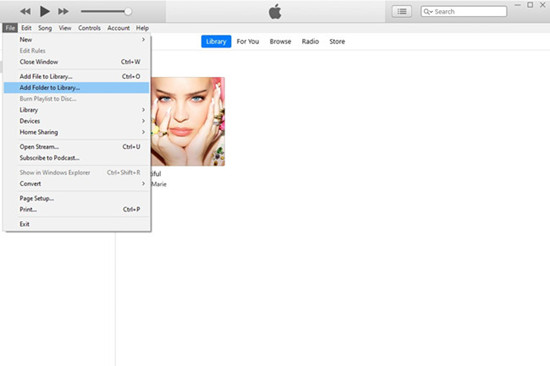
- Click "File" in the menu bar, then choose "Add File to Library" for individual tracks or "Add Folder to Library" for a group of songs.
- Browse your computer for the music files or folders you want to add. Select them and click "Open."
- Once added, the files will appear in your library, ready for listening or organizing into playlists.

- Import Ripped CDs with Custom Settings: Choose your preferred file format (MP3, AAC, WAV) when ripping CDs in Apple Music or iTunes. Edit metadata if tracks show as "Unknown Artist" or "Unknown Album."
- Add Purchased Music from Other Sources: In Apple Music or iTunes, go to File > Add to Library, select the files or folders, and enable iCloud Music Library to sync across devices.
- Ensure Accurate Metadata: Use Get Info to update track details, or use tools like MusicBrainz Picard for advanced edits.
- Backup Your Music Library: Always back up your files before making major changes to avoid losing tracks.
Part 3. How to Sync Local Files across Apple Music Devices
Apple Music allows you to sync your local music files across various devices, including Windows PCs, Macs, iPhones, iPads, and even Android devices, as long as you're signed into the same Apple ID. There are two main ways to sync your music:
Option 1: Sync via iCloud Music Library
iCloud Music Library enables you to store and sync your music in the cloud, ensuring it's accessible on all your Apple devices without the need for physical connections. Once enabled, any local files added to your Apple Music library will be automatically uploaded to iCloud. After syncing, these files are available from any device signed into your Apple ID.
- Apple Music or iTunes Match subscription
- Sufficient iCloud storage
- Organized local files in your Apple Music library
Syncing Local Files across Devices:
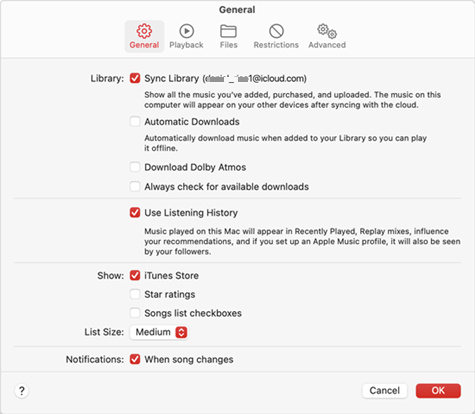
- On your PC/Mac, open iTunes (Windows) or Apple Music (Mac), and go to Preferences.
- Enable iCloud Music Library (Windows) or Sync Library (Mac). This setting ensures your local files are synced across devices.
- Upload or match local files:
- Matched songs: Automatically added to your library.
- Unmatched songs: Uploaded to iCloud, which may take some time depending on file size.
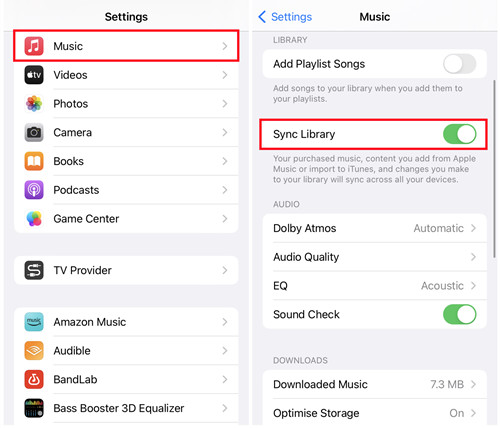
- On your iPhone/iPad, go to Settings > Music and enable Sync Library to make your local files available on your mobile devices.
- Tip: If you have a large music collection, you may need additional iCloud storage. You can manage storage settings via iCloud Preferences on your Mac or iCloud settings on your iPhone.
Once syncing is complete, your local files will be available on all devices with Sync Library enabled.
Option 2: Sync via USB Cable
For those who prefer to manually sync music, you can use a USB cable to transfer local files from your computer directly to your Apple device. While this method works well for manual syncing, keep in mind it's not as seamless as iCloud syncing for accessing your music across multiple devices.
- USB cable
- A computer with iTunes (Windows) or Apple Music (Mac)
- An iPhone, iPad, or iPod
Syncing Local Files with a USB Cable:
-
On Windows:
- Open iTunes on your Windows PC and connect your iOS device with a USB cable.
- Click on the device icon in the upper-left corner of iTunes.
- In the sidebar, click on Music.
- Check Sync Music and select one of the following options:
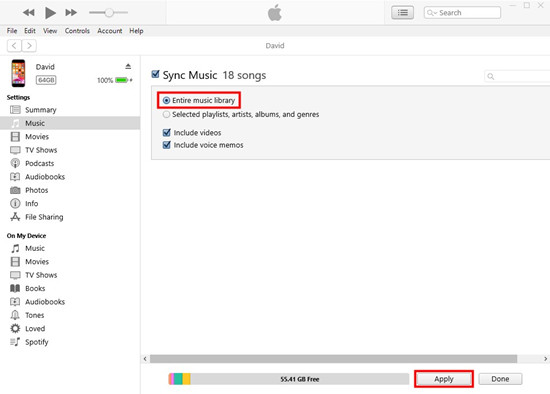
- Entire music library
- Selected playlists, artists, albums, and genres
- If your local files are not already in iTunes, add them by going to File > Add File to Library or Add Folder to Library.
- Click Apply or Sync to start transferring your music files to your iOS device.
- Open the Music app on your iOS device to find and play your synced local files.
-
On Mac:
- Open Finder on your Mac and connect your iOS device with a USB cable.
- Select your device from the sidebar under Locations.
- Go to the Music tab and check Sync music onto [your device].
- Choose one of the following options:
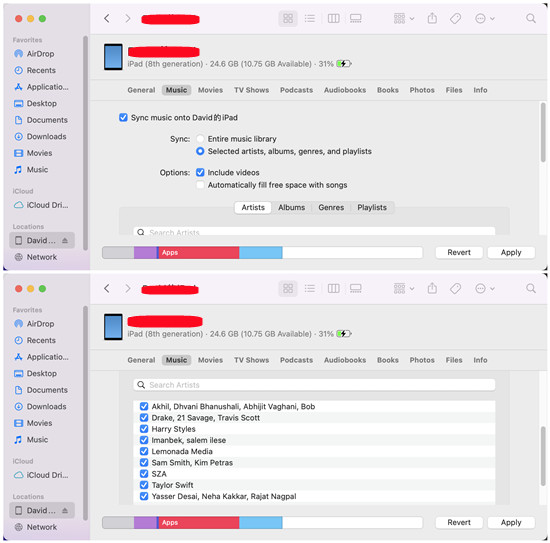
- Entire music library
- Selected artists, albums, genres, and playlists
- If needed, add local files to your Apple Music library by going to File > Add to Library.
- Click Apply to start syncing your music files to your iOS device.
- Open the Music app on your iOS device to find and play your synced local files.
Part 4. How to Play Local Files on Apple Music
Once your local files are synced via iCloud or USB, here's how to play them on your computer:
On Mac (Apple Music):
- Open the Apple Music app on your Mac.
- Navigate to the "Library" section and select "Songs," "Albums," or "Playlists" from the sidebar.
- If you've added them correctly, they will appear alongside your Apple Music content.
- Click on any song or album to start listening.
On Windows PC (iTunes):
- Open iTunes on your Windows computer.
- Click on "Library" at the top of the window.
- Choose "Songs," "Albums," or "Playlists" from the sidebar. They should appear alongside your iTunes content if added properly.
- Click on any song or album to play your tracks.
On iPhone (Apple Music):
- Open the Music app on your iPhone.
- Tap on the "Library" tab, then select "Downloaded" to view your local files.
- Tap on any song or album to start playback.
Part 5. How to Use Local Files on Apple Music on Android
Apple Music on Android is focused on streaming its catalog and does not support local file playback. However, you can still listen to your own music by transferring the files to your device and using a different music player app, such as Poweramp, VLC Media Player, or others.
- Before transferring your files, you need to find them on your computer:
- For Mac:
- Open Apple Music.
- Right-click on the song or album you want to transfer.
- Select "Show in Finder." This will open the folder where your file is stored.
- For Windows:
- Open iTunes.
- Right-click on the song or album.
- Select "Show in File Explorer." This will open the folder where your file is stored.
- Connect your Android device to your computer using a USB cable.
- Navigate to the folder where your local music files are stored.
- Move the files into a music folder on your Android device.
- Once the transfer is complete, disconnect your Android device from your computer.
Since Apple Music on Android doesn't support local file playback, you'll need a third-party music player to access your files.
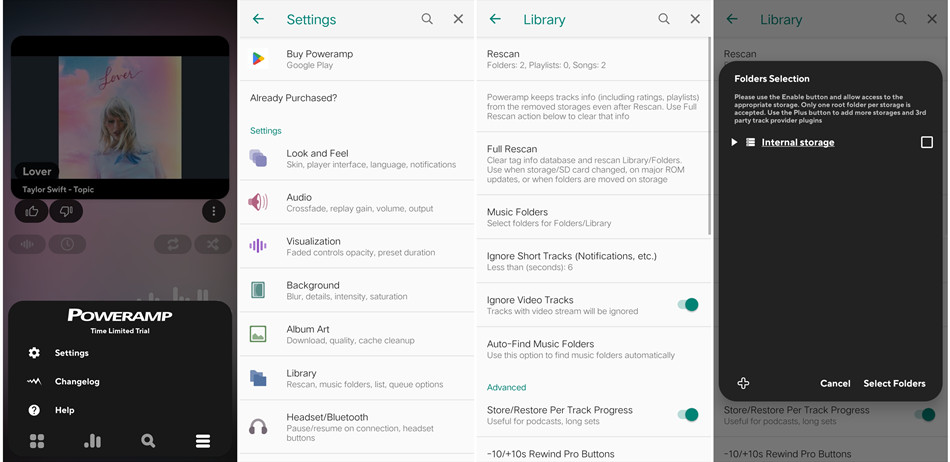
- Download and install a music player like Poweramp from the Google Play Store.
- Open the Poweramp app on your Android device.
- Go to Settings > Library.
- Select "Music Folders" and navigate to the folder containing your local music files.
- Choose the folder and tap "Select Folders" to add it to Poweramp.
- Go to the Poweramp library and locate the folder you added.
- Tap on a track to start playing it.
Part 6. How to Convert Protected Apple Music Songs to Local Files (MP3)
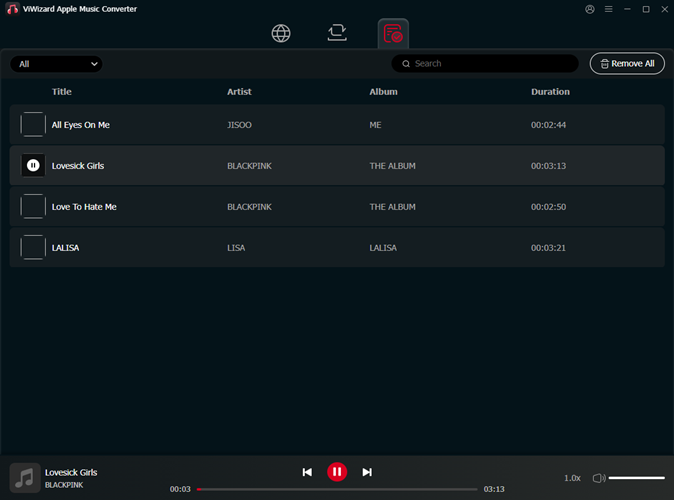
Sometimes, the music you've collected on Apple Music may not be in a format compatible with your devices or media players. If you need to convert your Apple Music songs into more commonly used file formats, you'll need a tool like ViWizard Apple Music Converter. It's an effective way to convert your Apple Music library into MP3, M4A, or other formats. This tool is also useful if you've lost the original files on your computer but still have access to them in your iTunes library.
With its DRM-removal feature, ViWizard Apple Music Converter is designed for iTunes users to convert and download various content types to commonly used formats such as MP3, M4A, M4B, WAV, AAC, and FLAC. When extracting music from iTunes, ViWizard preserves the lossless audio quality and retains full ID3 tags with the downloaded music. After conversion, you can transfer the files to any device you want, without any restrictions.
Key Features of ViWizard Apple Music Converter
Free Trial Free Trial* Security verified. 5, 481,347 people have downloaded it.
- Convert Apple Music songs, albums, playlists, and artists into MP3 for easy access
- Preserve lossless audio, high-resolution lossless, and Dolby Atmos quality
- Strip DRM from Apple Music for unrestricted offline listening
- Save converted audio files while retaining full ID3 tag details
Step 1Download and Install ViWizard Apple Music Converter
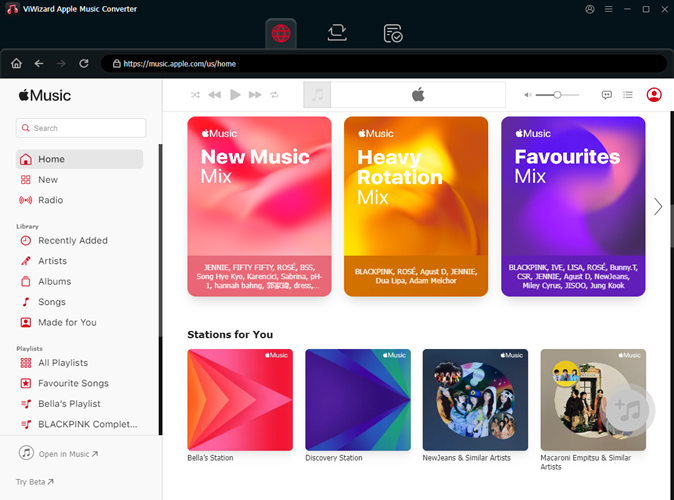
Begin by downloading and installing the ViWizard Apple Music Converter on your computer. This software is specifically designed to remove the DRM protection from Apple Music tracks, allowing you to convert them into various formats such as MP3, WAV, or AAC. After the installation process, open the application and sign in with your Apple Music account by using your Apple ID. Once you're logged in, you can access your entire music library. To start the conversion process, click the "+" button to add the songs or albums you wish to convert.
Step 2Select Your Desired Output Format
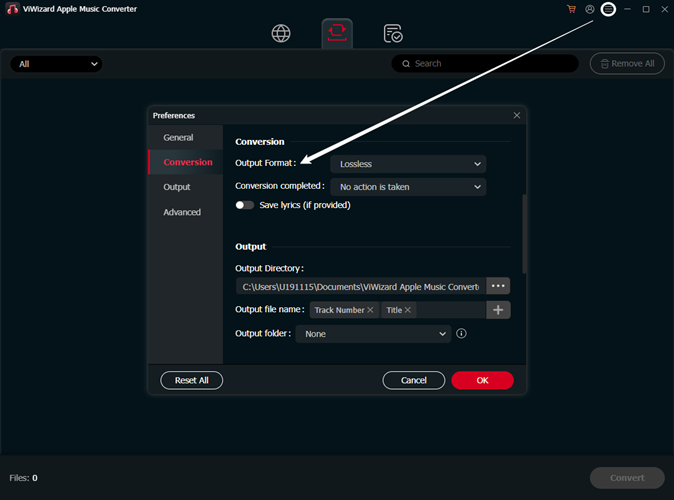
Once your music is added, choose the format you want for your local files. For most purposes, MP3 or WAV will be ideal for compatibility with most devices and software. To adjust the settings, click the settings icon in the top-right corner of the ViWizard interface. Here, you can fine-tune additional parameters like sample rate, bit rate, and audio channels according to your preferences. Once satisfied with your choices, click "OK" to confirm.
Step 3Add Music to Conversion Task and Start the Process
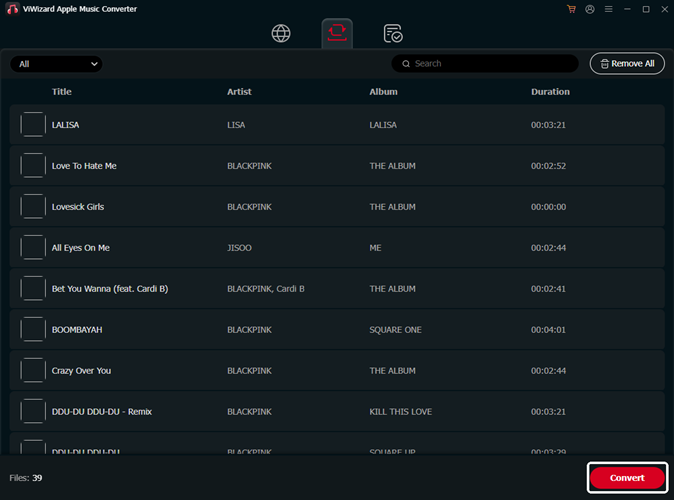
Browse through your Apple Music library to find the songs, albums, or playlists you want to convert. Alternatively, you can paste the URL of specific tracks directly into the ViWizard interface. Once you've selected the desired music, click the "Add to Conversion List" button. When everything is added, click the "Convert" button. ViWizard will start downloading and converting the selected music into the format you've chosen. The process is quick, and your files will be ready for use in just a few moments.
Step 4Access and Use Your Converted Files
Once the conversion process is finished, click on the "History" button to locate your converted files. By selecting the folder icon, you'll be directed to the location where your tracks have been saved on your computer. From here, you can transfer your converted music files to any device, use them in video editing software, or enjoy them offline, free from DRM or subscription-based restrictions.
Conclusion:
After reading the article, now you may know how to put local files to Apple Music. You may import local files to Apple Music or iTunes on your computer first, then you can sync the files to your phone. To play Apple Music in other places, you can use ViWizard Audio Converter to download Apple Music in MP3 or other formats you want.
You May Be Interested


Adam Gorden, the digital media specialist at ViWizard, is dedicated to providing the best solutions for digital media management, including audio and video conversion, file optimization, and media workflow enhancements.
Leave a Comment (0)