
HomePod is a smart speaker released by Apple in 2018 that comes with Siri, which means you can use voice commands to control the speaker. You can use Siri to send a message or pick a phone call. The basic features like setting a clock, checking the weather, playing music, and others are available.
Because HomePod was released by Apple, it has great compatibility with Apple Music. The default music app of HomePod is Apple Music. Do you know how to play Apple Music on HomePod? In this article, we'll show you how to play Apple Music on HomePod in multiple ways.
How to Play Apple Music on HomePod
HomePod is the best audio speaker for Apple Music. There're several ways to play Apple Music on HomePod. If you want to know, just follow the guides below. First of all, make sure your device and speakers are connected to the same network.
1.1 Use Siri Command to Play Apple Music on HomePod
1) Download the Home app on iPhone.
2) Set up HomePod to log into your Apple ID.
3) Say "Hey, Siri. Play [the title of song]" then the HomePod will start to play the music. You can also use other voice commands to control the playing like rising volume or stopping playing.
1.2 Use Hand Off Feature on iPhone to Play Apple Music on HomePod
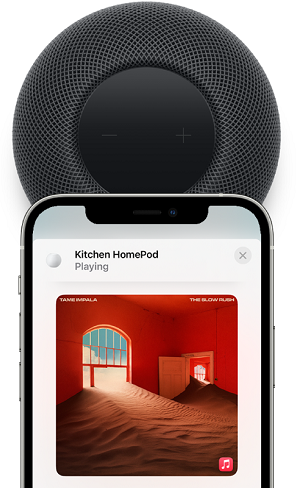
1) Go to Settings > General > AirPlay & Handoff on your iPhone, then turn on Transfer to HomePod.
2) Hold your iPhone or iPod touch close to the top of the HomePod.
3) Then a note will pop up on your iPhone to show "Transferring to HomePod".
4) Now your music has been transferred to the HomePod.
Note: To hand off the music, your device must have Bluetooth turned on
1.3 Use Airplay on Mac to Play Apple Music on HomePod
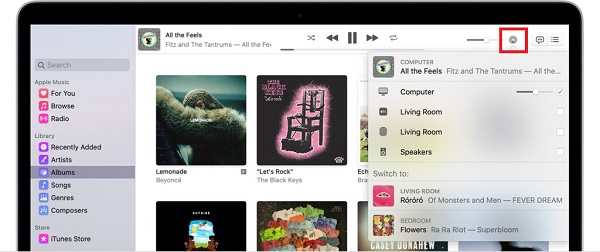
1) Open the Apple Music app on your Mac.
2) Then play a song, a playlist, or a podcast you like from Apple Music.
3) Click the AirPlay button at the top of the Music window, then click the checkbox next to HomePod.
4) Whatever song you were playing in Music on your computer now plays on HomePod, too.
Note: The way is also workable on other ios devices with AirPlay 2, like iPad and Apple TV.
1.4 Use Control Center on iPhone to Play Apple Music on HomePod
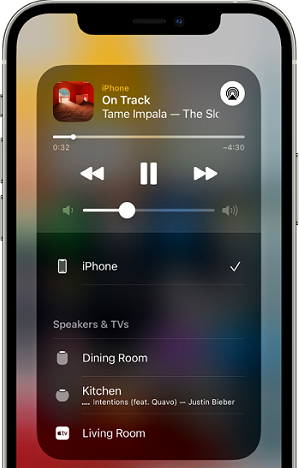
1) Swipe down from the top-right edge or swipe up from the bottom on your devices to open Control Center.
2) Tap the Audio Card, tap the AirPlay button, then select your HomePod speakers.
3) Then your HomePod will start to play Apple Music. You can also use the Control Center to control the playing of the music.
Alternative Way to Play Apple Music on HomePod Without iOS Device
Once your device and your HomePod speaker have connected to the same WiFi, you can play Apple Music on the speaker without much effort. But what should you do when the network is bad or crash? Don't worry, here's a way to make you play Apple Music on HomePod without iOS device.
The first thing you need to do is to remove the encryption of Apple Music. Apple Music is in an encoded M4P file that can only be played on its app. You can use an Apple Music converter to convert Apple Music to MP3 for playing on HomePod.
As the leading Apple Music converter, ViWizard Audio Converter is designed for downloading and converting Apple Music in MP3, AAC, WAC, FLAC, and other universal formats with lossless quality. It can save the ID3 tags as well and allows users to edit the tags. Another high light of ViWizard is the 30x faster conversion speed which can save you a lot of time for other tasks. Now you can download the app to have a try.
ViWizard DRM Audio Converter Key Features
- Convert and download Apple Music for playing offline
- Strip DRM M4P Apple Music and iTunes audios to MP3
- Download DRM-protected Audible audiobooks to common audio formats
- Customize and personalize your audio files according your needs
Guide: How to Convert Apple Music with ViWizard Audio Converter
Now let's see how to use ViWizard Audio Converter to save Apple Music in MP3. Ensure you have installed ViWizard Audio Converter and iTunes on your Mac/Windows computer.
Step 1Select Apple Music Songs You Need to ViWizard
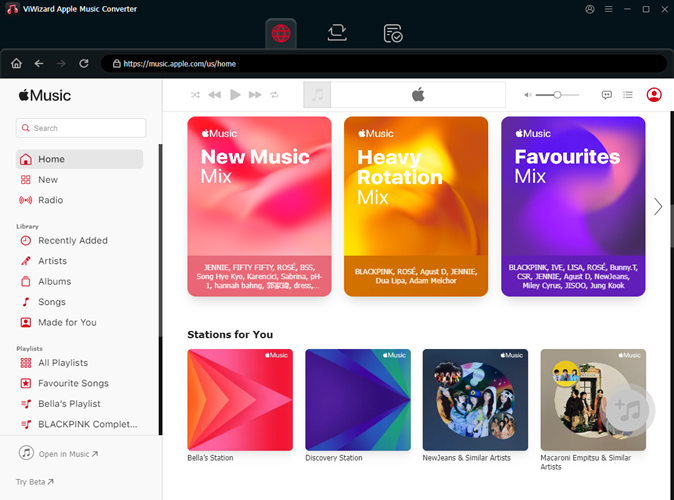
Open ViWizard and from the main interface, you will see three icons on the central top of the main screen. Here's what they for:
1) ![]() This Music Note button is for importing DRM audios to the Converter.
This Music Note button is for importing DRM audios to the Converter.
2) ![]() This one is to add non-DRM audios to the Converter.
This one is to add non-DRM audios to the Converter.
3) ![]() This is the "Converted History". When the conversion is done your converted files will be placed under this catalog.
This is the "Converted History". When the conversion is done your converted files will be placed under this catalog.
Apple Music are enrypted files, so you should hit the Music Note button to import them to the converter. Or directly drag the local files from the Apple Music folder to the ViWizard Audio Converter.
Step 2Tune the Output Apple Music for Playing
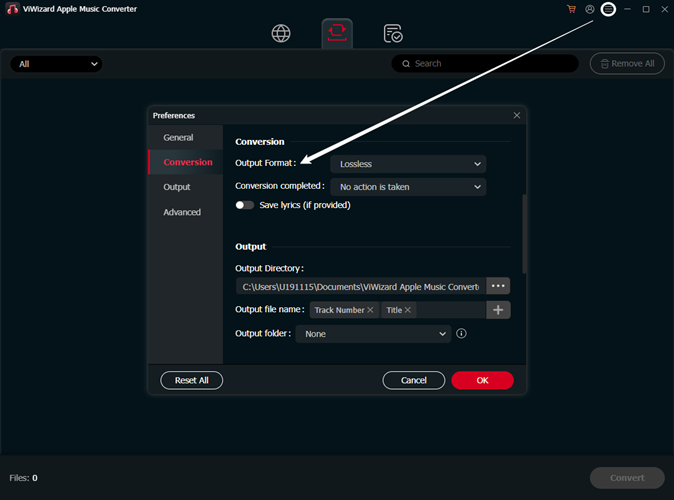
After uploading music to the converter, hit the Format panel to select an format for output audio files. We suggest choose MP3 for correct playing. Right next to the Format is the Output Path option. Click on ![]() to select a file destination for you converted songs. Don't forget to click OK to save.
to select a file destination for you converted songs. Don't forget to click OK to save.
Step 3Start Converting Apple Music to MP3
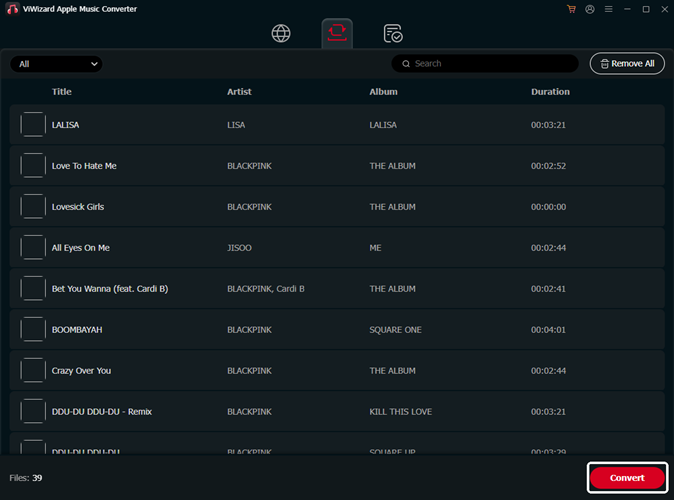
Once all the settings and editings are saved, you can begin the conversion by pressing the Convert button. Wait for a few minutes until the conversion is done, then you can locate the converted Apple Music files in the folder you've selected. You can also go to the Converted History and use ![]() to find the converted music.
to find the converted music.
Step 4Transfer the Converted Apple Music to iTunes
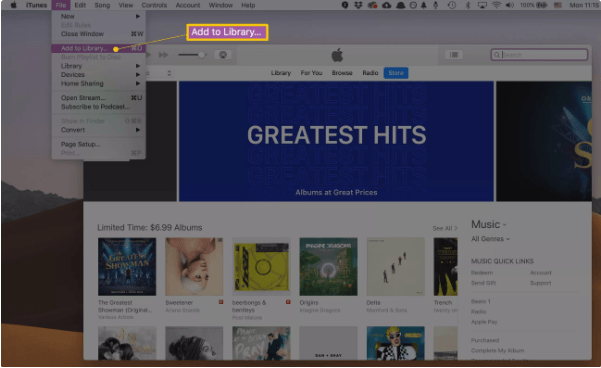
You will find the converted Apple Music on your computer after the conversion. Then you need to transfer these converted music files to iTunes. First, launch iTunes on your desktop, then go to the File option and select Add to Library to upload the music files to iTunes. After the uploading is finished, you can play the Apple Music on HomePod without any iOS devices.
Other Tips about HomePod
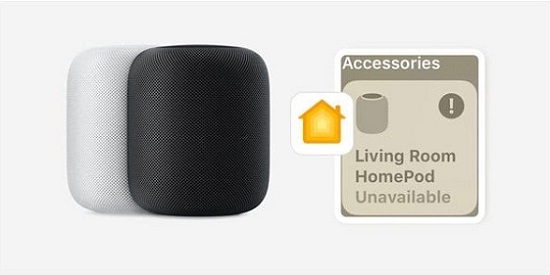
1. How to Sign out of HomePod/reassign a new Apple ID to HomePod
There are two ways to do reset the HomePod or change the Apple ID associated with it.
Reset the Settings Through the Home App:
Scroll down to the Details page and tap Remove Accessory.
Reset the Settings Through the HomePod Speaker:
1. Unplug the HomePod and wait for ten seconds, then plug it back in.
2. Tap the top of the HomePod and keep holding down until the white light turns red.
3. You'll hear three bleeps, and Siri will tell you the HomePod is about to reset.
4. Once Siri has spoken, the HomePod is ready to be set up with a new user.
2. How to Allow Others to Control Audio on HomePod
1. In the Home app on your iOS or iPadOS device, tap the Show Homes button, then tap Home Settings.
2. Tap Allow Speaker & TV Access and choose one of the following options:
3. Why HomePod Won't Play Apple Music
When your HomePod won't play Apple Music, check the network connection first. Then ensure your speaker and your device have connected to the same network. If there's no problem with the network, you can restart the HomePod speaker and the Apple Music app on your device.
Summary
That's it. To play Apple Music on HomePod is quite easy. Just make sure your device and the HomePod have connected to the same WiFi. When you are in a bad or crash network, you can also use ViWizard Audio Converter to convert and download Apple Music in MP3 for offline playback. You can click the link below to try it now. Welcome to leave your comments below, and we will reply to you ASAP.
- How to Transfer Apple Music to SD Card Easily
- Play Apple Music on iPod Nano/Shuffle/Classic/Touch: A Step-by-Step Guide
- Denon: Best Way to Play Apple Music on Denon Receiver
- How to Link Apple Music on Amazon Echo with 3 Ways
- How to Connect Apple Music to Google Home & Nest in 2023
- How to Access Apple Music Service & Features on Apple TV in 2023

Adam Gorden is an experienced writer of ViWizard who is obsessed about tech, movie and software.