Hey there! If you love music, there's nothing quite like hearing your favorite song when your phone rings or buzzes. It really adds a personal touch! With an Apple Music subscription, you have access to huge library of songs. However, not every track can be used as a ringtone, which is where the iTunes Store comes in.
A lot of songs on Apple Music are protected by something called Digital Rights Management (DRM). This just means that while you can listen to your favorite songs whenever you want, you can't use them as ringtones without purchasing them. It might seem a little annoying, but it's also a way to support the artists you enjoy while getting the perfect ringtone for your phone.
Is it possible to make a ringtone for iPhone from Spotify? Sure! Here you'll find the simple tutorial to set ringtone from Spotify on iPhone by converting Spotify to iPhone ringtone.
Part 1. How to Buy Ringtones for iPhone from iTunes Store
The good news is that buying ringtones from the iTunes Store is super simple! You'll find a wide variety of choices, from the latest hits to classic sound effects. Plus, these ringtones are designed specifically for iPhones, so you won't run into any compatibility issues.
So, are you ready to customize your phone? Let's go through the steps to buy ringtones from the iTunes Store and make your iPhone feel even more like you!
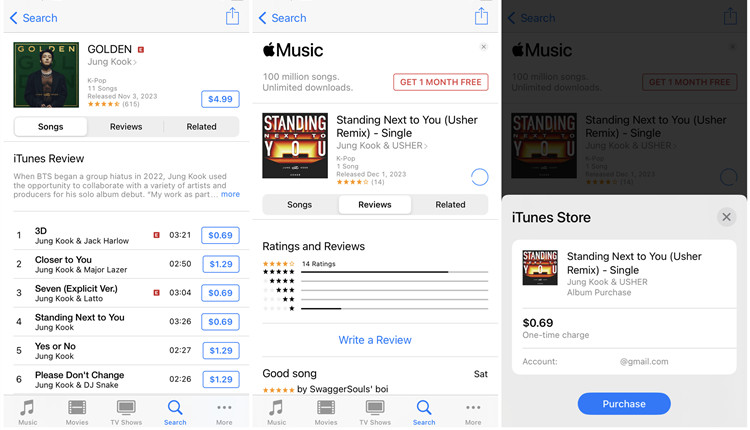
- Launch the iTunes Store app on your iPhone.
- Scroll down and select "Ringtones" from the categories.
- Scroll through the available options or use the search bar to find a specific ringtone you like.
- Tap on a ringtone to preview it. If you want it, tap the price button to buy. You may need to authenticate your purchase with Face ID, Touch ID, or your Apple ID password.
- Once purchased, go to Settings > Sounds & Haptics > Ringtone. Your new ringtone will be at the top of the list. Tap it to set it as your default ringtone.
- To customize a ringtone for a contact, open the Contacts app, find the person, tap Edit, then select Ringtone to choose your new tone. Tap Done to save.
Can you still buy music on iTunes? Yes, you can purchase music from iTunes even without subscription to Apple Music. However, you still can't play music you've paid for without Apple services, but here's a solution to download and play iTunes music everywhere without restriction.
Part 2. How to Make Ringtones for iPhone from Apple Music
If you're an Apple Music fan, you probably have a collection of your favorite songs that you'd love to turn into custom ringtones for your iPhone. The only problem? The songs you download from Apple Music are encrypted, which means they can only be played within the app. So, you can't set them as ringtones directly since iPhones require ringtones to be in M4R format.
Luckily, there's an easy solution with ViWizard Apple Music Converter. It lets you convert your Apple Music tracks into formats compatible with your iPhone, like MP3, WAV, or M4A. Essentially, it helps you unlock your music so you can use it however you like.
Getting started is easy. First, download and install ViWizard on your computer. Once you've got it up and running, just select the songs you want to convert from your Apple Music library. You can choose the output format that fits your needs - if you're looking to make ringtones, MP3 is a good first step! And don't worry about losing any track details: ViWizard keeps all the important information intact. Later, you can personalize them further and make them ringtones within iTunes, GarageBand, or Finder.
Key Features of ViWizard Apple Music Converter
Free Trial Free Trial* Security verified. 5, 481,347 people have downloaded it.
- Convert Apple Music songs, albums, playlists, and artists into MP3 for easy access
- Preserve lossless audio, high-resolution lossless, and Dolby Atmos quality
- Strip DRM from Apple Music for unrestricted offline listening
- Save converted audio files while retaining full ID3 tag details
- Open the ViWizard application on your computer.
- Click the "Add Files" button to load the M4P files you've saved offline on your computer.
- Alternatively, you can drag and drop the songs from a local folder directly into the ViWizard interface.
- If you want to add songs from your Apple Music library, click the "Load From Library" icon to import them.
- Once the Apple Music M4P songs are successfully imported, click on the "Format" option. This opens the preferences window.
- Choose MP3 as your desired output format.
- You can also set other parameters such as:
- Audio codec
- Channel
- Bitrate
- Once you've made all your adjustments, click the "OK" button to save your changes.
- Click the "Convert" button to start converting the DRM-protected Apple Music files to MP3.
- Once the conversion is complete, you can find your converted music by clicking the "Converted" icon.
- This section will also show you the location of the converted files on your computer.
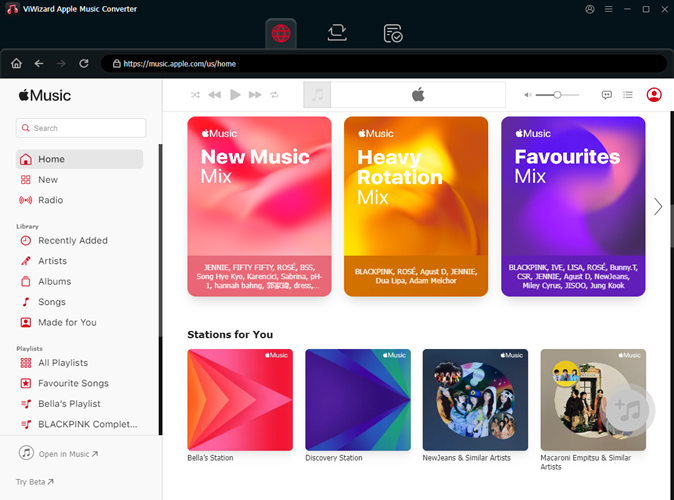
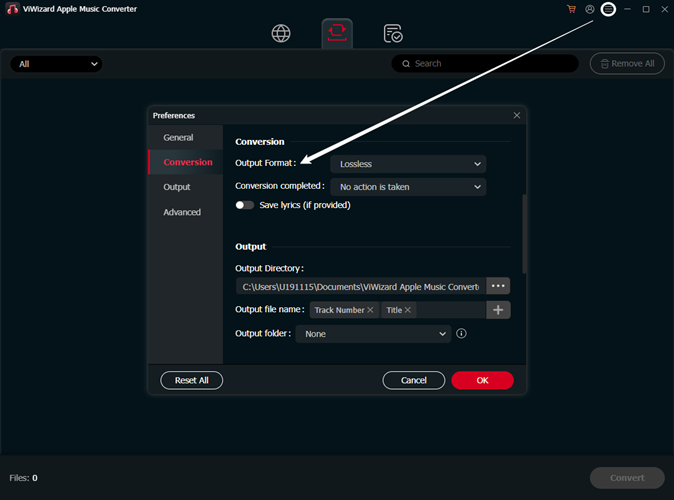
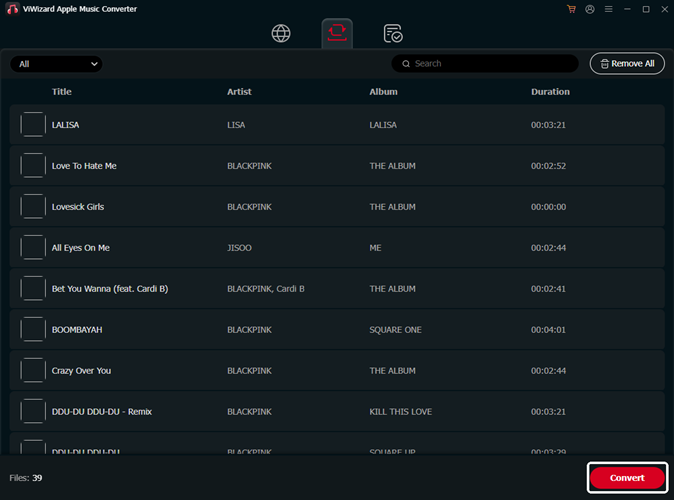
Congratulations! You've successfully converted your Apple Music tracks into MP3 format using ViWizard. These converted files are now ready for you to use as custom ringtones on your iPhone.
Now, you can proceed to choose a tool that works best for you to create those ringtones without any limits.
Part 3. How to Create Ringtones for iPhone from Apple Music
It's time to turn them into ringtones for your iPhone! You can do this using either GarageBand or iTunes/Finder.
Way 1: Using GarageBand
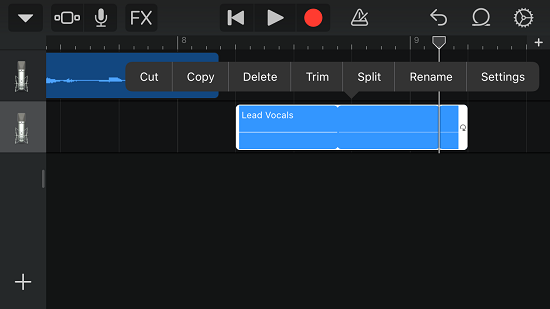
- First things first, ensure to set up iCloud Drive:
- On Your iPhone: Go to Settings > [Your Username] > iCloud > iCloud Drive, and turn it on.
- On Your Mac: Open System Preferences > Apple ID > iCloud and make sure you are signed in and iCloud Drive is enabled.
- Open GarageBand on your Mac.
- Select Audio Recorder and find the Apple Music song you want to use. You can edit the length, volume, and effects as needed.
- Click Share > Project to GarageBand for iOS.
- Choose the GarageBand for iOS folder in iCloud Drive and click Save.
- Open GarageBand on your iPhone and go to the My Songs browser.
- Tap Browse > Select and choose the project you shared.
- Tap the Upload icon > Ringtone. Name your ringtone and tap Export. If it's longer than 30 seconds, GarageBand will shorten it automatically.
- Set it as your standard ringtone by tapping "Use sound as" and selecting Standard Ringtone.
Way 2: Using iTunes / Finder
- Open iTunes (or Finder on macOS Catalina and later).
- Drag your converted Apple Music files into your iTunes library or Finder.
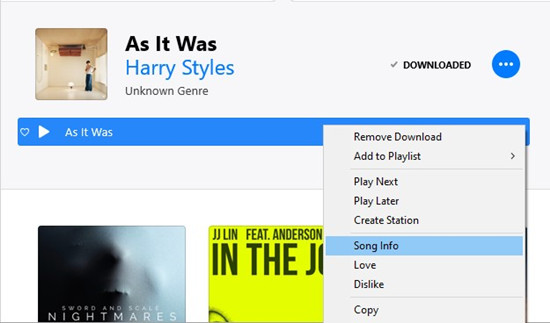
- Find the track, right-click on it, and select Song Info.
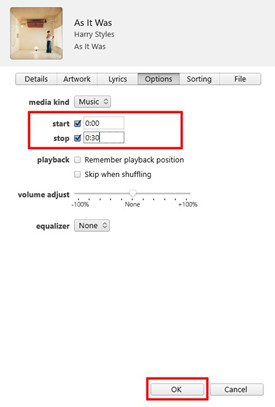
- Go to the Options tab and set the start and stop times for your ringtone (up to 30 seconds). Click OK to save.
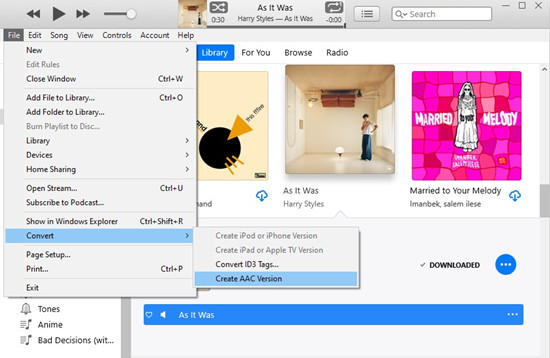
- With the track selected, go to File > Convert > Create AAC Version. A new version of the track will be created.
- Right-click the new AAC file and select Show in Finder (or Show in Windows Explorer).
- Change the file extension from .m4a to .m4r. If file extensions aren't visible, adjust your system settings to show them.
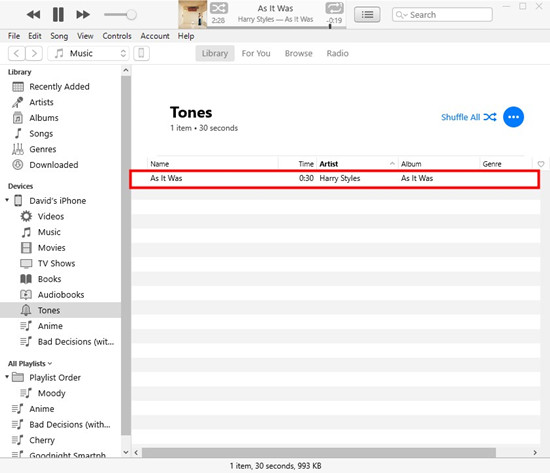
- Return to iTunes or Finder, connect your iPhone, and locate the Tones section.
- Drag and drop the renamed .m4r file into the Tones section to sync it to your device.
Part 4. How to Set Ringtones on iPhone
Once you've created your custom ringtones, it's time to set them on your iPhone! Here's how to easily locate and use your new ringtones.
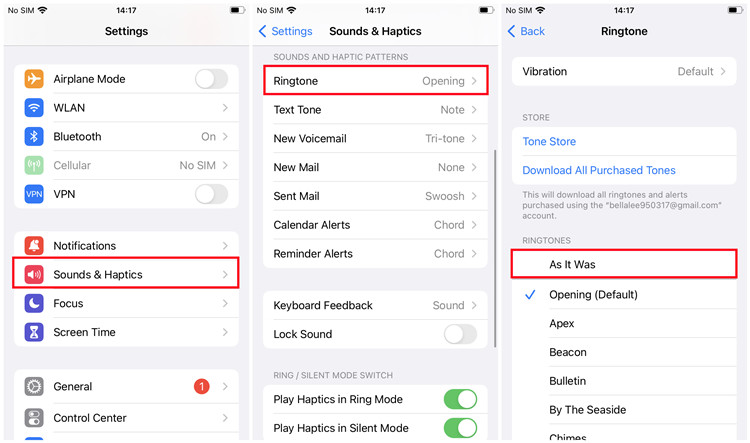
- On your iPhone, open the Settings app.
- Scroll down and tap on Sounds & Haptics.
- In the Sounds and Vibration Patterns section, tap on Ringtone.
- Scroll through the list of available ringtones. Your custom ringtone will typically be listed at the top of the list and is likely around 29 seconds long (if you customized the length to 30 seconds).
- Tap on the custom ringtone you want to use. You'll see a checkmark next to it, indicating that it's now your selected ringtone.
- Once you've set your ringtone, you can simply exit the Settings app. Your custom ringtone is now ready to use!

Leave a Comment (0)