Many iTunes users run into an issue where, after purchasing music from the iTunes Store, it doesn't appear in their library. One user shared their frustration on Apple Discussions:
"I purchased an album from iTunes, and it showed up in my Apple Music library almost an hour later. Maybe waiting a bit helps?"
This is a common problem, and it can happen for a few different reasons, such as syncing issues, problems with your Apple ID, or glitches with iTunes or the Music app. Regardless of the cause, the result is the same: your purchased music is missing, and you're left wondering how to fix it.
In this guide, we'll walk you through several steps to help recover your missing iTunes purchases. From simple fixes like checking your internet connection to more advanced solutions such as re-authorizing your computer or adjusting iCloud settings, we've got you covered. Whether you're using iTunes on your computer or the Music app on your iPhone, these steps will help you get your music back. Let's get your library organized so you can enjoy your purchases once again.
Part 1. Why Aren't My iTunes Purchases Showing Up?
Cause 1: Account Discrepancies
One of the most common reasons your iTunes purchases might not show up is because you're signed in with the wrong Apple ID. If iTunes can't link your purchases to the right account, they won't appear in your library. This can happen if you've used a different Apple ID to make the purchase or if the account was switched without you realizing it. The fix is simple—just make sure you're signed into the correct Apple ID. If you're unsure, try signing out and then signing back in.
Fix: Check Your Apple ID
-
For iTunes on your computer:
- Open iTunes and click on the "Account" menu in the top bar.
- Select "View My Account" and enter your Apple ID password if prompted.
- Check that the Apple ID displayed is the one used for your purchases. If it's incorrect, sign out by clicking "Account" > "Sign Out", then sign back in with the correct Apple ID.
- Go to "Account" > "Purchased" to check if your music appears. If it does, you can download it to your library.
-
For iPhone:
- Open the Settings app and tap your name at the top.
- Verify that the Apple ID displayed is correct.
- If it's incorrect, scroll down and tap "Sign Out," then sign back in with the correct Apple ID.
- Open the Music app, tap "Library" to see if your missing music appears. If not, tap "Downloaded Music" to check if the music is stored locally.
Cause 2: Hidden iTunes Purchases
Sometimes, purchases might not show up because they've been hidden in your account. iTunes allows you to hide certain purchases, which could be why you're not seeing them. If this happens, check the "Hidden Purchases" section and unhide anything that's missing. This should bring your purchases back into your library.
Fix 1: Check iTunes Store for Purchases
- Open the iTunes Store app and tap "More" at the bottom right, then tap "Purchased". Here, you can view and re-download any purchased content.
- If you're using a computer, open iTunes and click "Account" > "Purchased" to view your past purchases.
Fix 2: Unhide iTunes Purchases
- On iTunes, go to the "Store" section and look for the "Purchased" option.
- Click on "All" to view all available items. On your iPhone, tap "Purchased" in the iTunes Store app and switch to the "All" tab.
- Tap "Not on This [device]" to see hidden items.
- Tap the download button next to any item you want to unhide and download it.
Fix 3: Restore iTunes Purchases
- Open the App Store app.
- Tap your profile picture at the top, then select "Purchased".
- Find the app or content you need and tap the download button to restore it. This will re-download your purchases to your device.
Fix 4: Show All Apple Music
- Open the Music app and tap "Library" > "Edit".
- Make sure "All Music" is checked. This will display all content in your library, including music purchased through iTunes.
Cause 3: iCloud Music Library Conflicts
If you use iCloud Music Library to sync your music across devices, syncing issues can sometimes cause your purchases to go missing. To fix this, turn off the "Sync Library" option, wait a moment, and then turn it back on. This will force iTunes to refresh and sync your library. Make sure you have a stable internet connection while doing this to avoid any syncing problems.
Fix 1: Use iCloud for Syncing
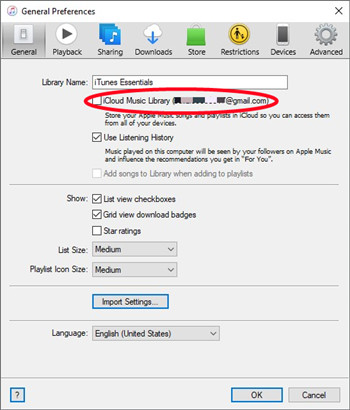
- Go to Settings > Music on your device.
- Toggle on "Sync Library" (or "iCloud Music Library" on older versions).
- This will allow your music purchases to sync across all devices linked to your Apple ID. If you're using a family plan, this ensures shared content is available to all members.
Fix 2: Manually Sync Purchases
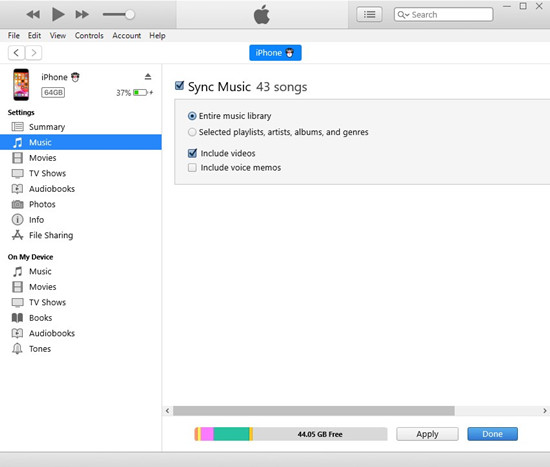
- Connect your device to a computer with iTunes installed.
- In iTunes, select your device and go to the "Music" tab.
- Ensure "Sync Music" is checked. If you want to sync video content as well, make sure "Include videos" is selected.
- Click "Apply" to manually sync your music purchases to your device. This option is particularly useful if your device isn't syncing correctly over Wi-Fi or iCloud.
Part 2. How to Fix iTunes Purchases Not Showing Up
Solution 1: Check Internet Connection
An unstable or inactive internet connection can prevent iTunes from syncing purchases or downloading music from the cloud. Ensure you're connected to a reliable Wi-Fi network. If you're using a VPN or proxy, disable it. Also, make sure your firewall or antivirus isn't blocking iTunes.
Solution 2: Restart Device and Sign Out/In
A simple restart and signing out and back into your Apple ID on iTunes or your device can often fix issues with missing music. This refreshes your connection to Apple's servers and can help resolve syncing problems.
Solution 3: Update iTunes and Device OS
Updates often include bug fixes, security patches, and improvements that can resolve issues like purchased music not showing up in your library. Recently, Apple has been migrating iTunes functionalities to the Apple Music and Apple TV apps, especially for movies and TV shows. While this migration doesn't directly affect music purchases, it can impact overall functionality and cause unexpected issues. By updating iTunes and your device OS, you can resolve many underlying problems.
How to Update iTunes:
- Launch iTunes on your computer:
- On a Mac: Open the "App Store" from the Dock or Finder. Click on "Updates" in the toolbar, and if an iTunes update is available, click "Update."
- On Windows: Open iTunes, click "Help" in the menu bar, then select "Check for Updates." Follow the prompts to install any available updates.
- If an update is found, follow the on-screen instructions to download and install the latest version of iTunes.
- Once the update is complete, restart iTunes to ensure all changes take effect.
How to Update iOS:
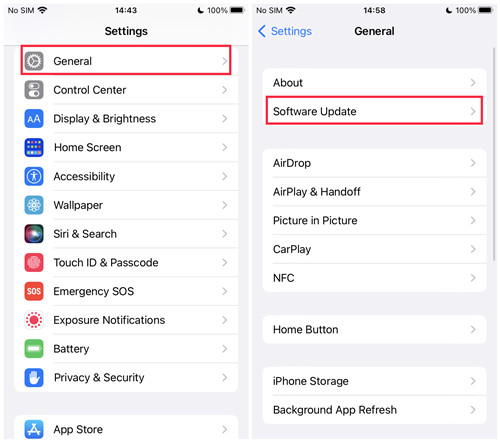
- Go to the "Settings" app on your iPhone.
- Tap on "General," then tap "Software Update."
- If an update is available, tap "Download and Install." You may need to enter your passcode to proceed.
- Follow the on-screen instructions to complete the installation. Your device will restart during the update process.
- After the update, open the "Music" app and check if your purchased music appears in the library.
Solution 4: Reauthorize Computer on iTunes
If your purchased music is not showing in iTunes, it could be due to an authorization issue with your computer. iTunes requires that each computer you use to access your purchased content be authorized with your Apple ID.
For iTunes:
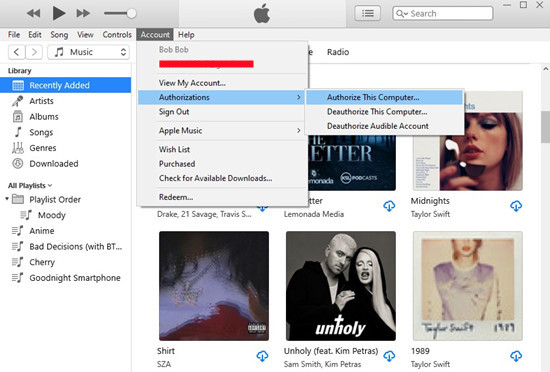
- Open iTunes on your computer.
- Click on the "Account" menu at the top of the screen.
- Select "Authorizations" from the dropdown menu.
- Click "Authorize This Computer..."
- Enter your Apple ID and password when prompted.
- Click "Authorize."
- iTunes will confirm that the computer has been successfully authorized.
- After re-authorizing, check your iTunes library to see if the purchased music now appears.
Solution 5: Download Purchases Again
If your purchased music is still not showing in your iTunes library after trying other solutions, re-downloading the music ensures that the purchased content is re-synced with your iTunes library or downloaded directly to your device.
For iTunes:
- Launch iTunes on your computer.
- Click on the "Account" menu at the top of the screen.
- Select "Purchased" from the dropdown menu.
- In the Purchased section, click "Music" to view all your purchased music.
- Browse through your purchased music library to find the tracks that are missing from your main library.
- Click the cloud icon next to each track you want to download. This action downloads the music directly to your iTunes library.
For iPhone:
- Go to the "iTunes Store" app on your iPhone.
- Tap on your profile icon or name at the top of the screen.
- Tap on "Purchased" to view your purchased items.
- Tap on "Music" to view all your purchased music.
- Scroll through your purchased music to locate the tracks that are missing from your library.
- Tap the cloud icon next to each track you want to download. This action downloads the music directly to your iPhone's Music app.
Solution 6: Reset Device Settings (Last Resort)
As a last resort, you can reset your device settings. This will not erase your content but will reset system settings like network configurations, privacy settings, and location services. After the reset, try accessing your music again.
To reset your device settings:
- Go to Settings > General.
- Scroll down and tap Reset.
- Select Reset All Settings.
- Enter your passcode if prompted and confirm.
Solution 7: Convert iTunes Purchases to MP3
If you're encountering persistent issues with iTunes not displaying purchased music, converting your purchased music to MP3 format can be a workaround. This method ensures that your music is in a widely compatible format that can be manually synced to any device without encountering DRM (Digital Rights Management) restrictions.
Converting purchased music to MP3 allows you to create a backup of your music library in a format that is not tied to iTunes or Apple's ecosystem. By using a tool like ViWizard Apple Music Converter, you can convert both purchased and ripped audio from iTunes into MP3 files, making them easier to manage and sync across different devices.
Key Features of ViWizard Apple Music Converter
Free Trial Free Trial* Security verified. 5, 481,347 people have downloaded it.
- Convert Apple Music songs, albums, playlists, and artists into MP3 for easy access
- Preserve lossless audio, high-resolution lossless, and Dolby Atmos quality
- Strip DRM from Apple Music for unrestricted offline listening
- Save converted audio files while retaining full ID3 tag details

Leave a Comment (0)