Cancel Apple Music Membership is just like breaking up with someone. Maybe soon here comes an end of the three months free trial and things didn't work out between you and Apple Music. Or maybe after the years of subscription, you suddenly realize that you don't need Apple Music's companion any more. At this moment, you'll need the easiest steps to help you say goodbye to Apple Music. Here we prepare two ways to show you how to turn off the auto renewal in order to avoid being charged on your iPhone or Mac. We also have an extra tip for you to save Apple Music songs for playback even when the subscription is canceled.
Part 1. What You Must Know Before Cancelling Apple Music
Before you decide to cancel your Apple Music subscription, there are some important things you need to understand. Many people think about cancelling because the monthly fees can add up, or maybe they've found another music service that fits their needs better. Whatever your reason, it's crucial to know what cancelling your Apple Music subscription really means, especially when it comes to your music library.
When you cancel your Apple Music subscription, you will lose access to the entire digital music catalog that Apple Music offers. This might seem obvious - you stop paying, so you stop getting access. But what many people don't realize is that you will also lose everything in your personal music library. All the songs, albums, and playlists you've spent years building will be gone. Your carefully curated playlists, favorite albums, and even the songs you've downloaded for offline listening - everything will disappear once your subscription ends.
In the end, the decision to cancel is entirely yours. But make sure you fully understand the consequences - losing your music library can feel like losing a part of yourself. If you value your music collection, take the necessary steps like using ViWizard Apple Music Converter to protect it before you say goodbye to Apple Music.
A full-featured Apple Music converter that easily converts Apple Music songs, albums, playlists—including iCloud Music Library content, personalized recommendations, and curated playlists—into MP3, M4A, M4B, WAV, AIFF, and FLAC so you can keep your Apple Music forever or transfer it to any device without restrictions.
Here you can find the step-by-step process to restore your Apple Music seamlessly after subscription ends.
Part 2. How to Cancel Apple Music Subscription
It's important to know how to cancel your Apple Music subscription across various devices because it's a significant decision, whether you're using an iPhone, Android, Mac, Windows computer, or even the web.
There are a few key details you should be aware of. For example, if you're part of a Family subscription, only the group organizer - the person who set up Family Sharing - can cancel the subscription. So if you're a family member who wants to cancel, you'll need to ask the organizer to do it for you. Likewise, if you have a Student subscription, canceling it might end other student-related exclusives, like the Apple TV+ with no extra fee, so make sure you're prepared for that.
Canceling on iPhone, iPad, or Android:
- On your iPhone or iPad, go to Settings, tap on your name, then select Subscriptions. On Android, open the Apple Music app and tap the three dots in the top-right corner, then select Account.
- Find Apple Music in your list of subscriptions and tap on it.
- Tap on Cancel Subscription and confirm your decision.
Canceling on Mac or Windows:
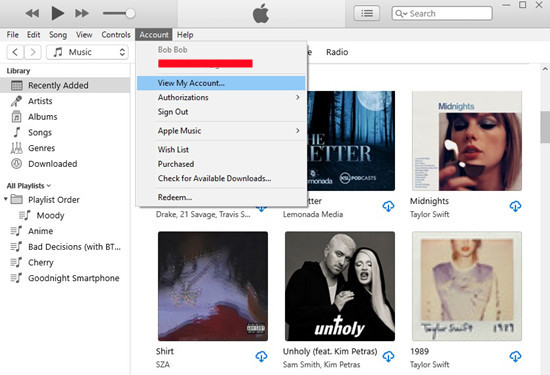
- On Mac, open the Music app. On Windows, open iTunes.
- In the top menu, click on Account, then select View My Account.
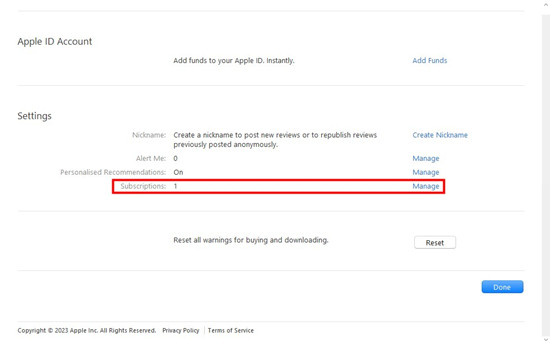
- Scroll to the Settings section and click Manage next to Subscriptions.
- Find Apple Music and click Cancel Subscription. Confirm to complete the cancellation.
Canceling on the Web (music.apple.com):
- Open your web browser and go to music.apple.com.
- Click on Sign In and enter your Apple ID and password.
- Click on your profile icon, select Settings, scroll down to Subscriptions, and click Manage.
- Click Cancel Subscription and confirm your choice.
You'll retain access to Apple Music until the end of your current billing cycle, even after canceling. Use this time to back up any playlists or albums that are important to you.
Part 3. How to Change Apple Music Subscription
Sometimes, instead of canceling, you might decide that changing your Apple Music subscription is a better option. Whether you're looking to downgrade to a cheaper plan, upgrade to a Family subscription, or switch to a Student subscription, Apple Music offers flexibility in managing your plan.
For example, if you're a student, you might be eligible for a discounted subscription through UNiDAYS. This option allows you to keep Apple Music for half the price of an Individual plan, plus you get access to Apple TV+ at no extra cost. This discount is available for up to 48 months.
Changing Your Subscription on iPhone or iPad
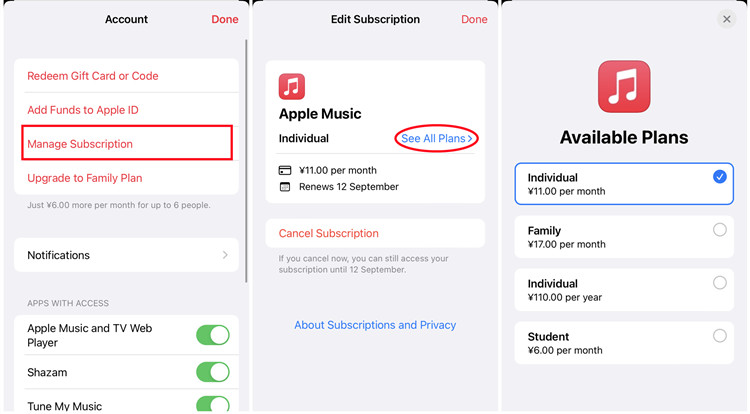
- Go to Settings on your iPhone or iPad.
- At the top of the screen, tap your name to access your Apple ID settings.
- Scroll down and tap on Subscriptions.
- Find Apple Music in your list of active subscriptions and tap on it.
- You'll see different subscription options - Individual, Family, or Student. Select the plan you want to switch to, and then confirm your choice.
Changing Your Subscription on Android
- On your Android device, open the Apple Music app.
- Tap the three dots in the top-right corner, then select Account.
- Tap on Manage Subscription to see your current plan.
- Select the subscription plan you want to switch to - Individual, Family, or Student - and confirm your selection.
Changing Your Subscription on Mac or Windows
- On Mac, open the Music app. On Windows, open iTunes.
- In the top menu bar, click on Account, then select View My Account.
- Scroll to the Settings section and click Manage next to Subscriptions.
- Find Apple Music in your list of subscriptions and click Edit.
- Select the new subscription plan you want and confirm your choice.
Part 4. How to Keep Apple Music Forever for Backup
When the Apple Music service is unsubscribed successfully, you'll still have access to the Apple Music until the end of the three-month trial or billing cycle. By that time, the music you previously downloaded for offline usage will no longer be accessible. Don't worry. The good news is that there's still turn-around to listen to Apple Music offline streams after unsubscription.
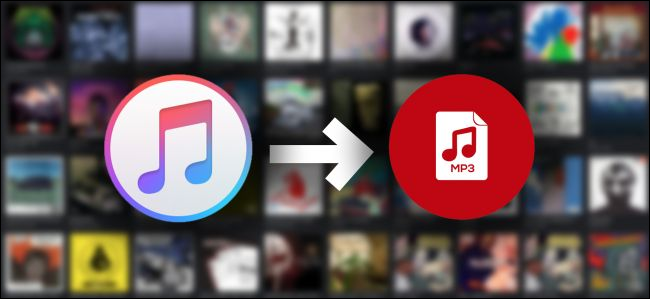
The most important thing you should be clear about is that the Apple Music songs are protected. If you want to access to Apple Music downloads when the subscription ends, you need to use ViWizard Apple Music Converter, a third-party software to convert the protected M4P Apple Music songs to common MP3, AAC, WAV, etc. You can refer to the tutorial below to see how to truly save Apple Music songs offline.
Key Features of ViWizard Audio Converter
Free Trial Free Trial* Security verified. 5, 481,347 people have downloaded it.
- Convert Apple Music songs, albums, playlists, and artists into MP3 for easy access
- Preserve lossless audio, high-resolution lossless, and Dolby Atmos quality
- Strip DRM from Apple Music for unrestricted offline listening
- Save converted audio files while retaining full ID3 tag details
Step 1 Add Apple Music to ViWizard
First, please download and install ViWizard DRM Audio Converter from the above link. There are two buttons to import audios, one for Apple Music song, iTunes audiobooks, and Audible audiobooks. Another one is for DRM-free audios. To add Apple music, please click the "Music Note" button. Before importing them to ViWizard, please download the songs you wish to convert and authorize iTunes to play them on your computer.
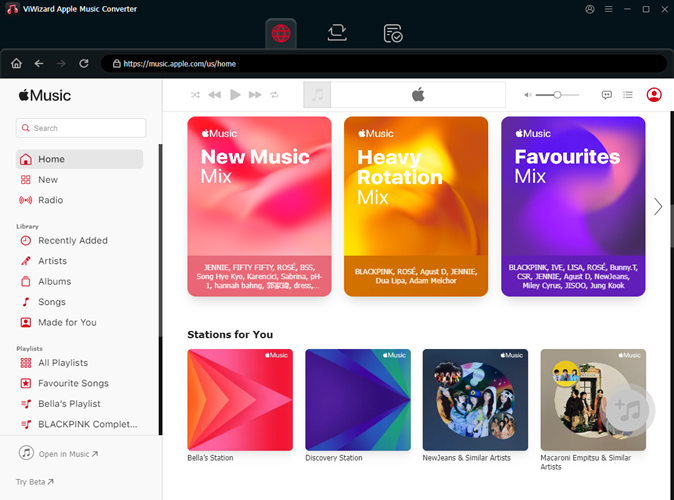
Step 2 Customize Audio Output Format
The Format panel is at the bottom left of the converter. MP3 is the recommended output format. Open it and you can select the output format other parameters for your files in the pop-up window. If you want to keep the song short or make some changes, you can cut it before the conversion. Click the "Edit" icon at the end of each column of the audio track enables you to do some editing and add some special effects to your audios. When you are all set, please click on "OK" to save the settings.
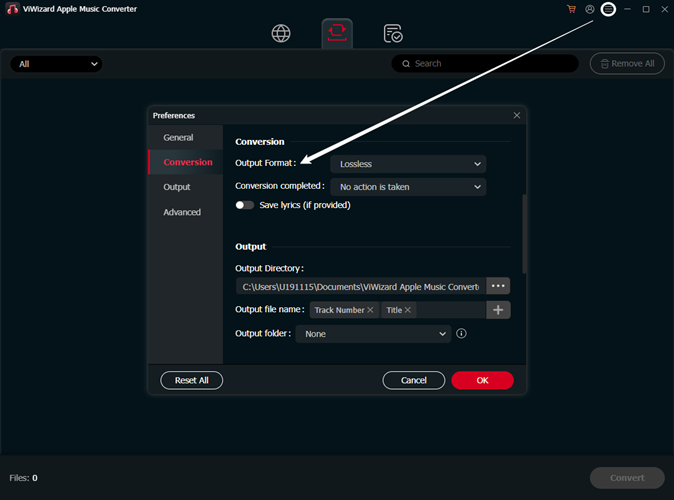
Step 3 Convert Apple Music Songs to MP3
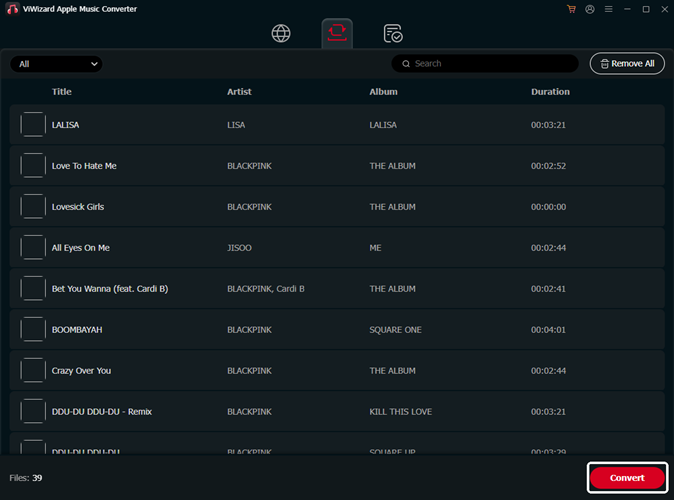
Then click the Convert button to convert the Apple Music tracks to MP3. You can find these audios by clicking the Converted button.

Leave a Comment (0)