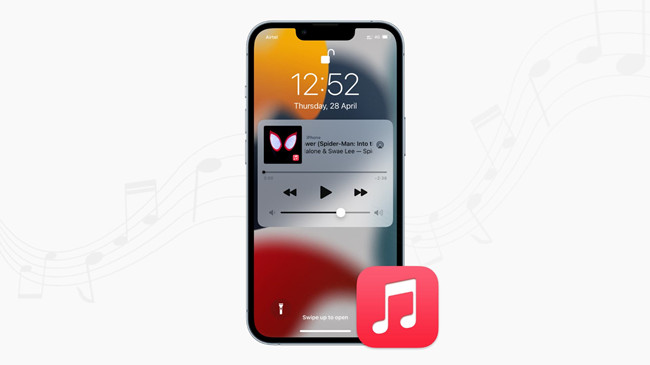
Have you come across an Apple Music auto-play problem? Some Apple Music users report that their Apple Music will play music automatically when they get into the car. Some others found this problem happened to their iPhone, iPad, AirPods, or headphones. If you are looking for a method to stop Apple Music from automatically playing, you can follow this tutorial which contains several methods to fix Apple Music playing automatically on iPhone, iPad, and Mac, as well as, the solutions to Apple Music playing automatically in car.
The problem that Apple Music plays automatically happens when lots of users use Apple Music on their iPhone, iPad, or Mac. Fortunately, there are several methods to stop Apple Music from playing automatically. Let's see how to get Apple Music to stop playing automatically.
Encounter Spotify Music plays automicatically unecpectedly and don't know how to fix this problem? We'll colelct possible fixes to this issue. Come check this out.
1. Clear Apple Music Recently Played (iPhone/Android/PC/Mac)
Whether you're using Apple Music on your iPhone, Android device, or computer, clearing your Recently Played list is a straightforward way to prevent automatic playback. Follow these steps based on your device:
-
For iPhone/Android:
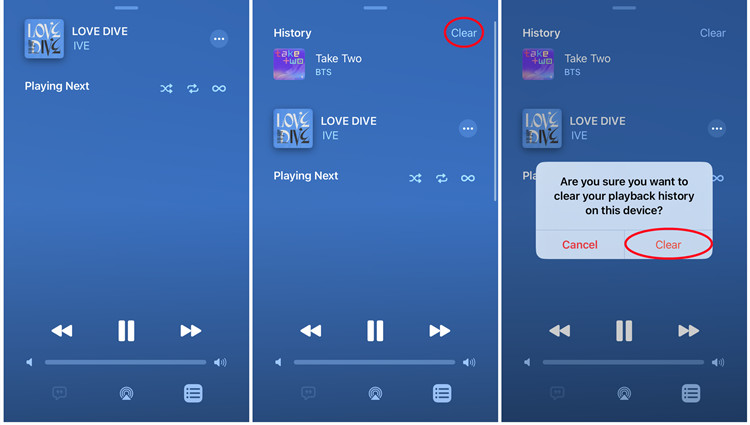
- Open the Music app on your smartphone or tablet.
- Navigate to Now Playing and tap the hamburger menu (three horizontal lines).
- Swipe down to access your Apple Music history.
- Tap on "Clear."
- Confirm the action by tapping "Clear" again.
-
For PC/Mac:
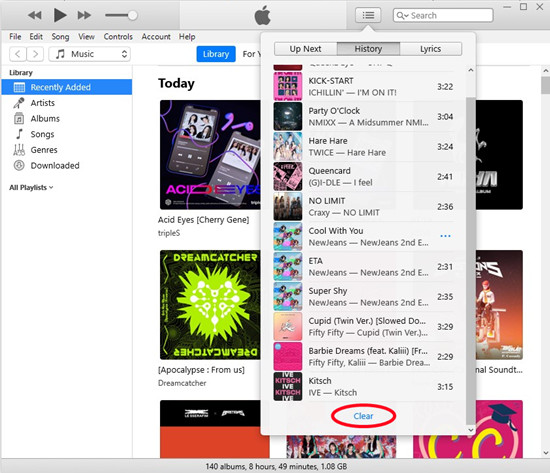
- On your computer, open iTunes (Windows) or Music (macOS).
- Click on the hamburger menu (three horizontal lines) and select History.
- Look for the "Clear" button located at the bottom of the songs list.
- Click on "Clear" and confirm the deletion.
By clearing your Recently Played list across all devices, you regain control over when and what plays on Apple Music.
2. Turn off Autoplay (iPhone/Android/PC/Mac)
Apple Music includes an Autoplay feature designed to continue playing music from your library or suggest random songs once an album or playlist concludes. While this feature can introduce you to new tracks, there are times when you might prefer to have more control over your music experience. If you find Apple Music automatically playing on any device, follow this comprehensive guide to disable the Autoplay feature.
-
For iPhone & Android:
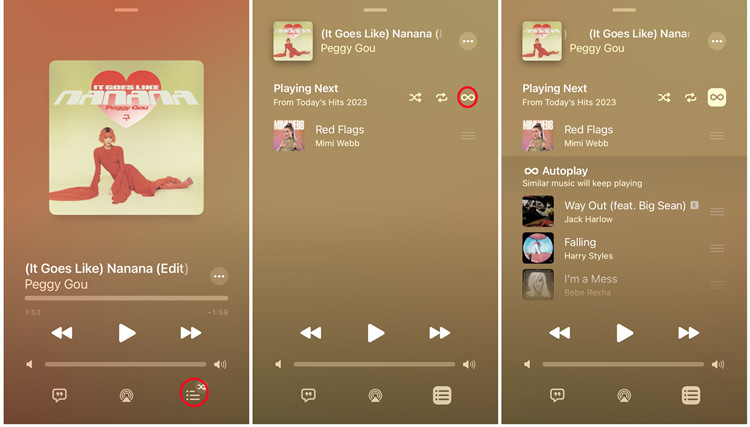
- From the home screen of your iOS device, open the Music app.
- Tap the song's Now Playing bar at the bottom of the screen.
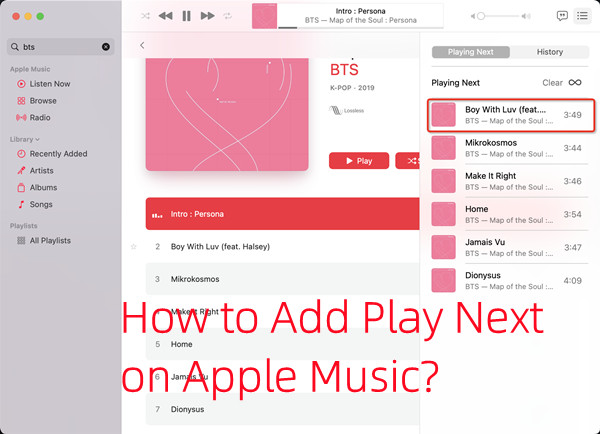
- Look for the Autoplay icon in the bottom-right corner and tap it. If Autoplay is enabled, the Playing Next playlist displays upcoming songs, and the Autoplay icon is highlighted. To turn off Autoplay, tap the Autoplay icon on the right of Playing Next to dim it.
-
For PC & Mac:
- On your computer, open the Apple Music app.
- From the Playing Now drop-down, click the Up Next icon to view the Playing Next playlist. If Autoplay is active, tap the Autoplay icon to dim it.
3. Turn off Handoff (iPhone/Mac)
If you're experiencing automatic playback issues on your iPhone and have Handoff enabled, disabling this feature can help regain control over your music playback. Follow these steps to turn off Handoff:
Note: If you have multiple Apple devices linked to the same Apple ID and Handoff is enabled, disabling it on one device can prevent the unintended continuation of music playback on others.
-
For iPhone:
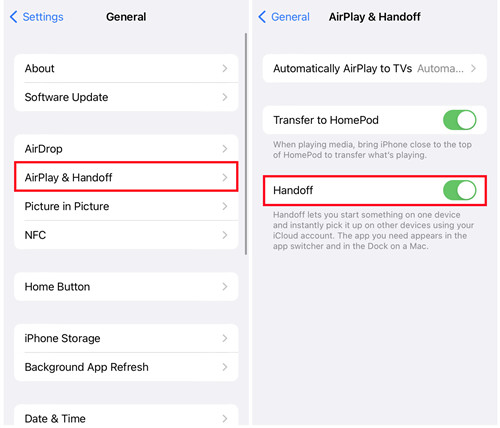
- Open the Settings app on your iPhone.
- Scroll down and tap on "General."
- Select "AirPlay & Handoff."
- Toggle off the switch next to "Handoff."
-
For Mac:
- Click on the Apple logo in the top-left corner of your Mac's screen.
- Select "System Preferences."
- Choose "General."
- Uncheck the box next to "Allow Handoff between this Mac and your iCloud devices."
By turning off Handoff, you prevent the seamless transfer of music playback between your iPhone and other Apple devices.
4. Enable Cellular Data Usage (iPhone)
If you've been experiencing automatic playback issues on Apple Music, enabling cellular data usage on your iPhone can be a strategic solution. Here's how it works:
-
For iPhone:
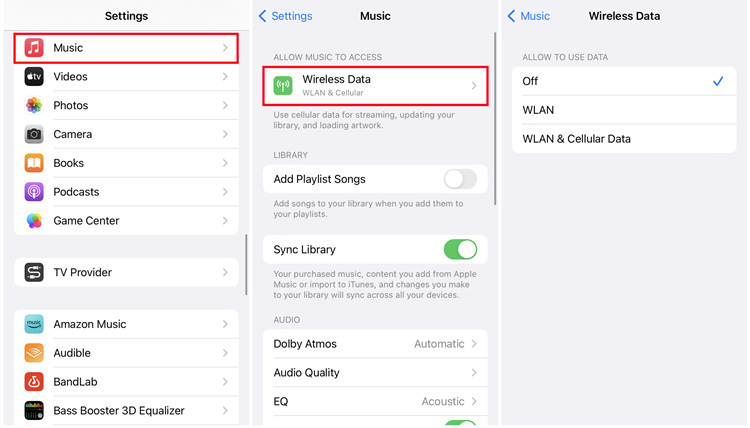
- Open the Settings app on your iPhone.
- Scroll down and tap on "Music."
- Under the "Cellular Data" section, toggle on the switch next to "Cellular Data."
By allowing the Music app to use cellular data, you ensure that it can seamlessly stream content over mobile networks. This adjustment is particularly helpful if you've encountered automatic playback issues, as it provides an alternative to relying solely on Wi-Fi for music playback.
5. Disable Background App Refresh (iPhone/Android)
If you're encountering automatic playback issues on Apple Music, adjusting the Background App Refresh settings on your smartphone can help manage background activities. Follow these steps for both iPhone and Android:
-
For iPhone:
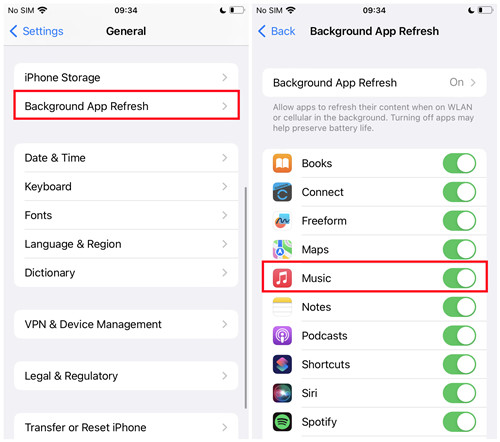
- Open the Settings app on your iPhone.
- Scroll down and tap on "General."
- Select "Background App Refresh."
- Toggle off the switch next to "Background App Refresh."
By disabling Background App Refresh, you restrict apps, including Apple Music, from updating content in the background. This can help prevent automatic playback triggered by background activities.
-
For Android:
Note: On Android devices, the specific wording may vary, but look for options related to background data usage.
- Open the Settings app on your Android device.
- Navigate to "Apps" or "Application Manager."
- Find and tap on "Apple Music."
- Select "Battery."
- Disable the option for "Allow Background Activity."
On Android devices, by turning off "Allow Background Activity," you limit the app's ability to refresh content in the background, reducing the likelihood of automatic playback.
6. Set a Timer (iPhone)
Another effective method to prevent Apple Music from playing automatically is by using the Timer feature. Unfortunately, Android doesn't have a native Timer feature specifically designed to stop music playback. However, you can use third-party timer apps available on the Google Play Store to achieve a similar result.
-
For iPhone:
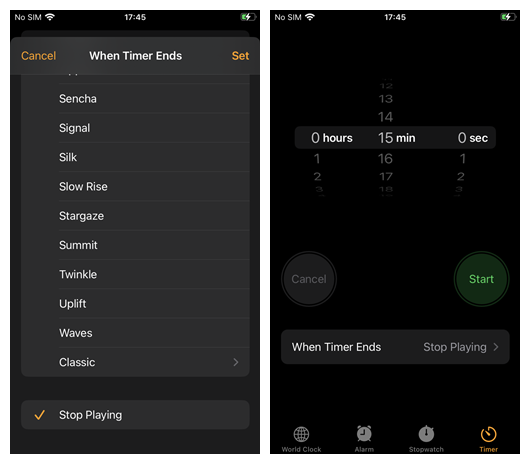
- From the home screen of your iOS device, open the Clock app.
- Navigate to the "Timer" tab.
- Use the time picker to select the desired interval for the Timer.
- Tap the current option next to "When Timer Ends" and choose "Stop Playing" instead.
By setting a Timer with the "Stop Playing" option, you establish a time limit for music playback, preventing automatic continuation beyond the specified duration.
7. Create Shortcut Automation (iPhone/Bluetooth-Enabled Car)
Another method iOS users can try to stop Apple Music from playing automatically is by using the Timer feature with the Shortcuts app.
-
For iPhone:
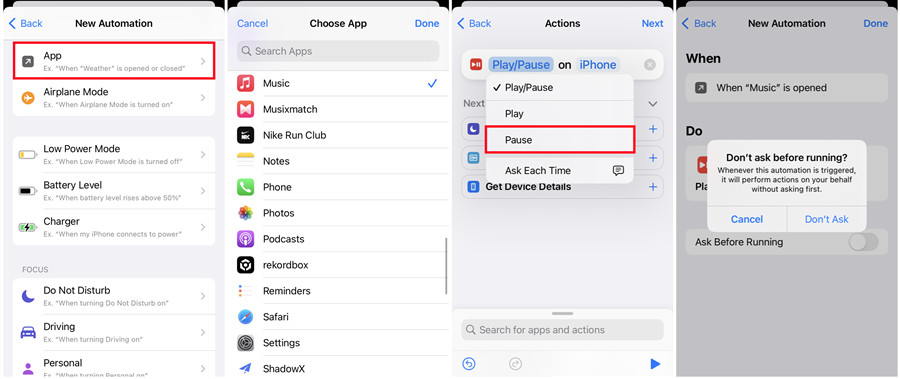
- From your iOS device's home screen, open the Shortcuts app.
- Tap "Automation" at the bottom of the screen, then tap the Plus icon at the top-right.
- Select "Create Personal Automation."
- Under "Trigger," choose "App" and select the "Music" app.
- Tap "Next" and then tap "Add Action."
- In the search field, type "Play/Pause" under Media.
- Tap "Play/Pause" and limit the option to "Pause." The full action should now read "When Music is opened, Pause."
- Return to the home screen.
-
For Bluetooth-Enabled Car:
If you want to stop Apple Music from automatically playing when connected to your Bluetooth-enabled car, use the following steps:
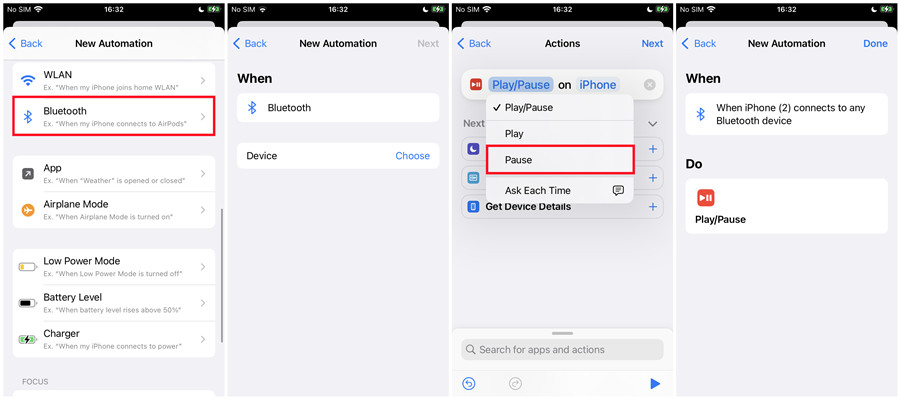
- On your iPhone, open the Shortcuts app.
- Tap "Automation," then create a personal automation.
- Select "Bluetooth."
- Tap "Choose" next to Devices and choose your Bluetooth device (e.g., your car) under the "MY DEVICES" section.
- If your Bluetooth device isn't listed, ensure Bluetooth is enabled in your iPhone's Settings app.
- Once selected, tap "Done" > "Next."
- Tap "Add Action" and search for the "Play/Pause" action.
- Tap "Play/Pause" at the top and choose "Pause." The action should now be "Pause on iPhone."
- Tap "Next" > "Done." Now, when your iPhone connects to your selected Bluetooth device, this shortcut will pause Apple Music playback.
These shortcut automations provide a customized solution to prevent automatic playback, whether you're using your iPhone or connecting to a Bluetooth-enabled car.
8. Turn Off Screen Time (iPhone)
-
For iPhone:
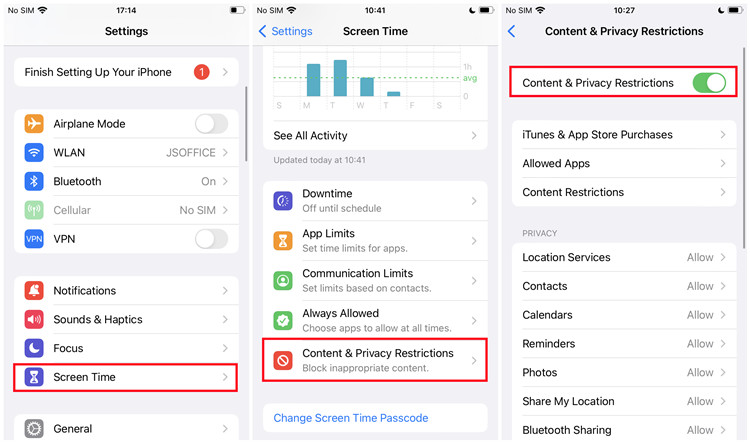
- On your iPhone, open the Settings app > Screen Time.
- Scroll to Content & Privacy Restrictions.
- Tap Allowed Apps > CarPlay, then turn off the "CarPlay" option.
9. Turn Off Start Music Automatically (Android)
If you use Android Auto to play Apple Music in a car and it starts automatically playing, you're suggested to turn off the setting for Android Auto called "Start music automatically" to fix this issue.
-
For Android:
- On your Android phone, open the Settings app > Screen Time.
- Tap Connection preferences.
- Tap Android Auto > Start music automatically, then turn off the "Start music automatically" option.
10. Disable Automatic Ear Detection (AirPods-Connected iPhone/Mac)
To prevent Apple Music from playing automatically when using AirPods, you can adjust the "Automatic Ear Detection" setting. Here's how:
-
For iPhone:
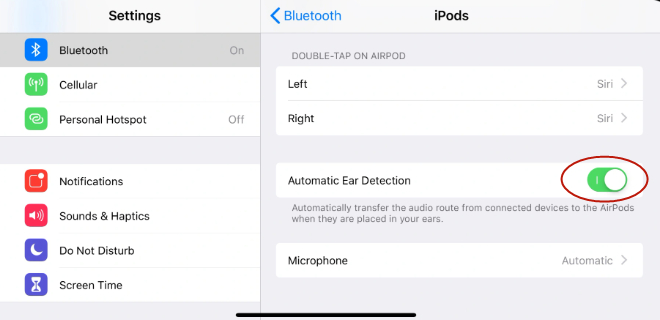
- If you're experiencing automatic playback issues when using AirPods with your iPhone, you can disable Automatic Ear Detection. Here's how:
- On your iPhone, open the Settings app.
- Scroll down and tap on "Bluetooth."
- Find your connected AirPods in the list and tap the "i" icon next to them.
- Toggle off the switch next to "Automatic Ear Detection."
Disabling Automatic Ear Detection prevents your AirPods from automatically playing music when they are detected in your ears, offering more control over playback.
-
For Mac:
- To disable Automatic Ear Detection on a Mac connected to AirPods:
- Click the Apple logo in the top-left corner and select "System Preferences."
- Click on "Bluetooth."
- Find your connected AirPods in the list and click the "Options" button next to them.
- Uncheck the box next to "Automatic Ear Detection."
By turning off Automatic Ear Detection on your Mac, you ensure that AirPods won't trigger automatic playback when placed in your ears.
11. Reset Apple Music Settings (iPhone)
If you're still experiencing automatic playback issues on Apple Music, you can try resetting all settings on your iPhone. Keep in mind that this will reset all system settings, not just those related to Apple Music.
Note: Resetting all settings will revert your iPhone to its default configurations. This includes network settings, wallpaper, and other preferences. It won't delete your apps or data, but you'll need to reconfigure settings such as Wi-Fi passwords and wallpaper.
-
For iPhone:
- Open the Settings app on your iPhone.
- Scroll down and tap on "General."
- Scroll to the bottom and tap on "Reset."
- Select "Reset All Settings."
- Enter your device passcode when prompted.
- Confirm the action by selecting "Reset All Settings."
12. Convert Apple Music to Other Media Player (PC/Mac)
While the above methods can help disable automatic playback on Apple Music, a more definitive solution is to transfer your Apple Music playlists to another media player, allowing you to enjoy your favorite songs without encountering the automatic playback issue. This approach frees you from the constraints of the Apple Music app.
Before transferring Apple Music playlists, an essential step is to convert Apple Music to MP3. MP3 is a universally compatible audio format accepted by most media players. For this conversion, we recommend using ViWizard Apple Music Converter. This tool can convert Apple Music to various formats, including MP3, at an impressive 30× faster speed while preserving the original sound quality.
Key Features of ViWizard Apple Music Converter
Free Trial Free Trial* Security verified. 5, 481,347 people have downloaded it.
- Convert Apple Music songs, albums, playlists, and artists into MP3 for easy access
- Preserve lossless audio, high-resolution lossless, and Dolby Atmos quality
- Strip DRM from Apple Music for unrestricted offline listening
- Save converted audio files while retaining full ID3 tag details
For PC/Mac:
Before we start, click the above Download button to install ViWizard Audio Converter on your computer. Now, let's see how to download Apple Music to MP3 with lossless quality by using ViWizard software. Make sure that iTunes or Music has been installed on your computer.
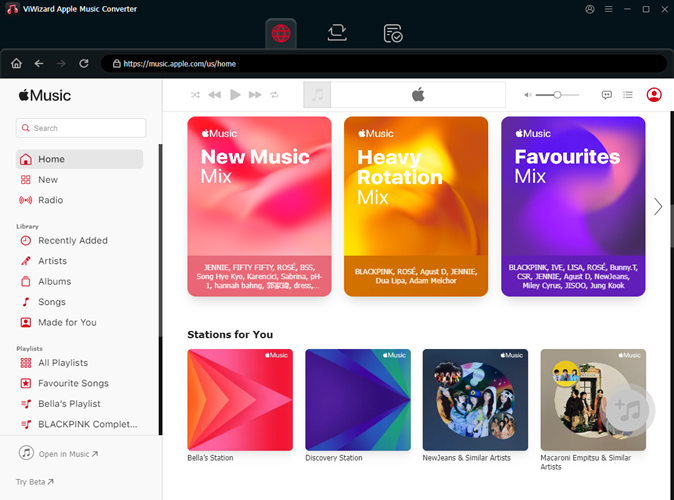
Step 1 Load Apple Music You Need to the Converter
Launch ViWizard Audio Converter on your computer. The iTunes app will be opened as well. When you click the Load iTunes Library button, a pop-up window with your iTunes library will appear, from which you can pick Apple Music you like. You may also add music by dragging and dropping it from local folder.
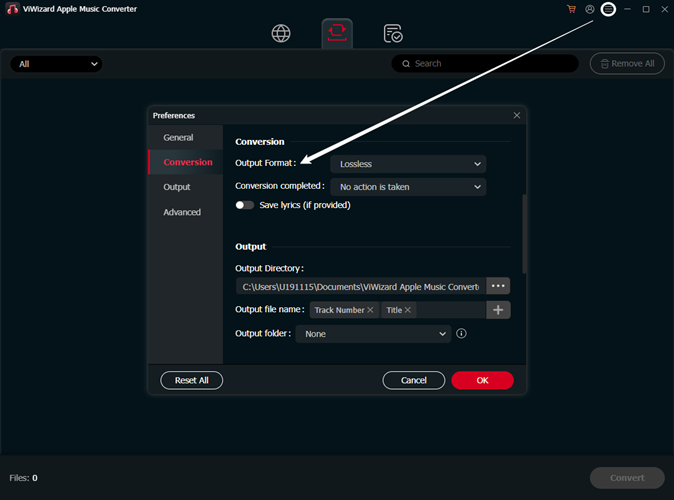
Step 2 Choose MP3 as Output Format and Set Parameters
Next, in the left corner, click the Format button. Then, choose MP3 as your desired output format. You may also tune the audio parameters as your needs by altering the codec, channel, bit rate, and sample rate, and so on. Finally, press OK to save your changes.
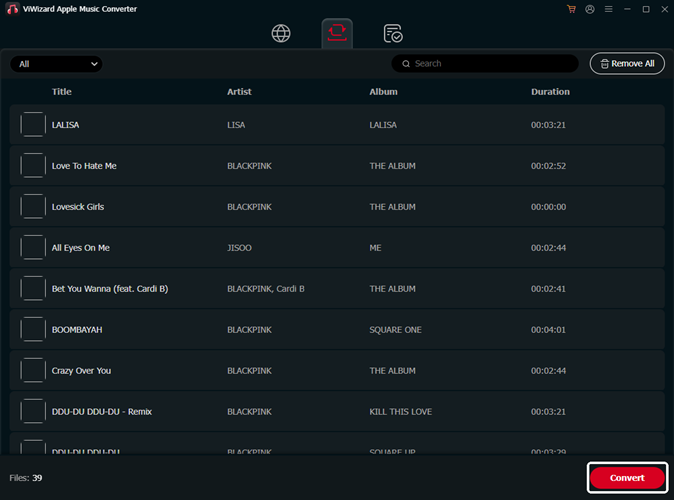
Step 3 Start to Download Apple Music for Offline Playing
Then, on the bottom right corner, click the Convert button to begin downloading and converting Apple Music to MP3 for offline playing. Following the downloaded Apple Music files, click the Converted button and then you are able to transfer them to any device and player.
Conclusion
It's easy to stop Apple Music from automatically playing through the above solutions. You can try them one by one to fix the error. The best method to avoid this error is to use ViWizard Audio Converter to download Apple Music playlists for playing. When the conversion is over, you can transfer those converted Apple Music songs to any media player you like. Just click the download button to learn more about ViWizard at once and you won't be disappointed.


Leave a Comment (0)