
If you're using iTunes and experiencing songs that skip or don't play at all, you're not alone. This frustrating issue can often come with the error message: "There was a temporary problem completing your request. An unknown error occurred (-42110)." This error usually points to a temporary glitch, leading to one of two situations: either all your tracks are skipped, or just a few specific songs won't play.
This problem can disrupt your listening experience, whether you're trying to enjoy a playlist or your favorite albums. Fortunately, there are several steps you can take to troubleshoot and fix this issue. Below, we'll guide you through each solution to help you get back to enjoying your music without interruptions.
Part 1. How to Fix iTunes Keeps Skipping Songs
Check Internet Connection
First, ensure you have a stable internet connection. A weak or unstable connection can cause songs to skip or not play at all, especially when streaming from Apple Music. Confirm that your internet is working well for a smoother listening experience.
- Ensure your device is connected to Wi-Fi or a wired network. Look for the Wi-Fi icon in the taskbar (Windows) or menu bar (Mac).
- Open a web browser and visit a website (like Google). If it loads quickly, your connection is stable.
- If not, check if other devices on the same network are having issues.
- Unplug the router, wait 10 seconds, then plug it back in. Wait a couple of minutes for it to reconnect.
- If possible, connect your computer directly to the router using an Ethernet cable for a more stable connection.
Restart iTunes and Your Computer
Sometimes, simply restarting iTunes or your computer can fix playback issues. This refreshes the app and clears any temporary glitches, making it a quick and easy first step.
- Close iTunes:
- On Windows: Right-click the iTunes icon in the taskbar and select "Close window."
- On Mac: Click "iTunes" in the menu bar and choose "Quit iTunes."
- Click the Start menu (Windows) or Apple menu (Mac) and select "Restart." After your computer restarts, open iTunes again.
- Close iTunes:
Sign Out and Back In to Apple Music
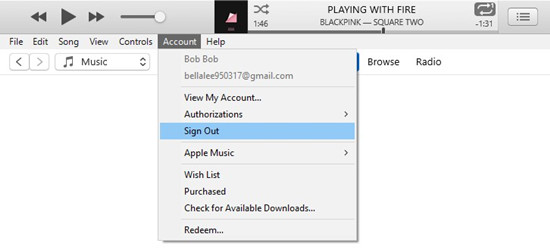
Signing out of your Apple Music account and then signing back in can help refresh your access to your library. This step often resolves account-related issues that may affect playback.
- Launch the iTunes application.
- Click your account name in the upper right corner and select "Sign Out."
- Click your account name again, select "Sign In," and enter your Apple ID and password.
Delete iTunes SC Info Folder (Windows)
The SC Info folder contains important data about your iTunes library. Deleting it can help fix playback problems, but remember to back up your data first. This allows iTunes to rebuild its information and can resolve various errors.
- Ensure iTunes is completely closed.
- Press Windows key + R to open the Run dialog.
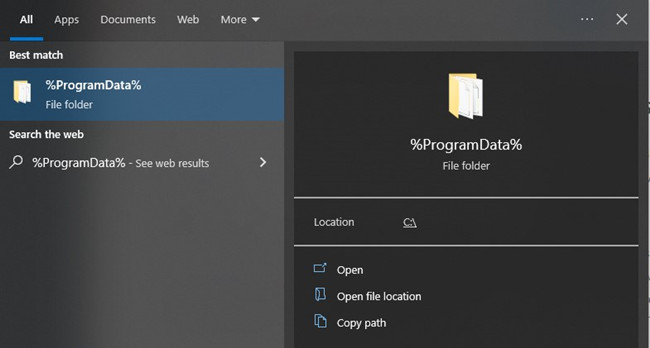
- Type %ProgramData% and press Enter.
- Show Hidden Files:
- Windows 10: Click "View" and check "Hidden items."
- Windows 8/7: Go to "Organize" > "Folder and search options." On the View tab, select "Show hidden files, folders, and drives."

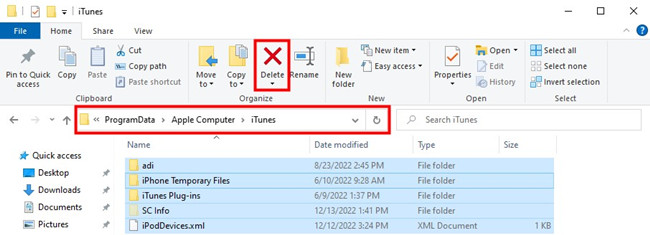
- Navigate to Apple Computer > iTunes. Right-click the SC Info folder and select "Delete."
- Restart your computer and then open iTunes again.
Authorize the Computer
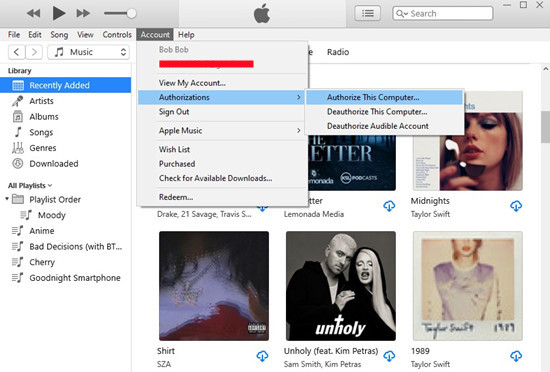
To play Apple Music content, you need to authorize your computer. Each Apple ID can authorize up to five computers, so keeping track of your authorizations is essential to avoid playback issues.
- Start the iTunes application.
- Click Account > Authorizations > Authorize This Computer.
- Enter your Apple ID and password if prompted.
Check System Resources
If your computer is running low on memory or processing power, it might struggle to play music smoothly. Close any unnecessary applications to free up resources, which can help prevent songs from skipping.
- For Windows (Task Manager):
- Press Ctrl + Shift + Esc to open Task Manager.
- Click on the Performance tab to see CPU, memory, and disk usage.
- If any resource is maxed out (close to 100%), it may affect iTunes performance.
- For Mac (Activity Monitor):
- Press Command + Space to open Spotlight, type "Activity Monitor," and hit Enter.
- Check the CPU and Memory tabs for usage statistics. High usage can lead to performance issues.
If your resources are being heavily used, close any applications you're not currently using to free up memory and CPU power.
- For Windows (Task Manager):
Check iTunes Crossfade (Optional)
The crossfade feature creates smooth transitions between songs, but if not set up correctly, it can lead to skipping. Try adjusting or turning off this feature to see if it improves playback.
- Click on Edit (Windows) or iTunes (Mac) in the menu bar, then select Preferences.
- Click on the Playback tab.
- If "Crossfade Songs" is checked, try adjusting the slider to a lower setting or unchecking it entirely.
- Click OK to save your changes and see if the skipping issue resolves.
Check Music Files (Optional)
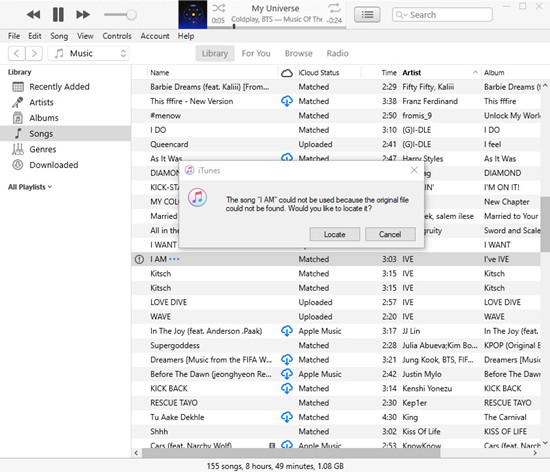
If only specific songs are skipping, the issue might be with those files themselves. In iTunes, check the status of these songs to see if they're corrupted. If you find any problems, you can try relocating or replacing the affected files.
- Launch the iTunes application on your computer.
- In iTunes, click on the Apple Music menu (or the Music tab) and select Music.
- Click on the Songs section in the sidebar to display your music library.
- Click View in the menu bar and select Show View Options.
- In the pop-up window, check the box next to Cloud Status. This will display the status of your music files in relation to iCloud.
- Scroll through your list of songs and look for any that may be marked with an exclamation point (!). This indicates that iTunes can't locate the original file.
- Right-click on any song showing the exclamation point and select Locate. A dialog box will open.
- Navigate through your computer's folders to find and select the original music file. Once located, click Open to re-establish the connection.
Part 2. How to Back Up iTunes Library
If you have tried out all the fixes above and still can't fix the problem. The last one I'm going to introduce is to play your iTunes music offline, even without the iTunes app. Of course, you can directly download songs on iTunes and play them offline, but you can't make sure that the iTunes app will never go wrong again. So what's the solution to play every song on iTunes offline without using the iTunes app? Check this out.
With ViWizard Apple Music Converter, you can download all your songs from iTunes library to your computer. Then your can play them all offline without the iTunes app, but any media player you have on your computer. Comes with an intuitive interface, the ViWizard Audio Converter is designed to convert all protected iTunes, Apple Music songs and audiobooks into MP3, M4A, AAC, FLAC and other common formats.
The specially designed booster will keep the converting speed up to 30X faster with high output quality preserved. With this tool, you'll be able to remove the protection of all the songs from your iTunes and play them without interruption. You won't be annoyed by songs skipping again. Also, you can play the converted iTunes Music on any media player or device you like.
Key Features of ViWizard Audio Converter
Free Trial Free Trial* Security verified. 5, 481,347 people have downloaded it.
- Convert Apple Music songs, albums, playlists, and artists into MP3 for easy access
- Preserve lossless audio, high-resolution lossless, and Dolby Atmos quality
- Strip DRM from Apple Music for unrestricted offline listening
- Save converted audio files while retaining full ID3 tag details
Guide: How to Use ViWizard to Download iTunes Music in MP3
Do you want to know how to download iTunes Music in MP3? Let's have a look now. Don't forget to download ViWizard Audio Converter from the link above.
Step 1Launch ViWizard and Load iTunes Music
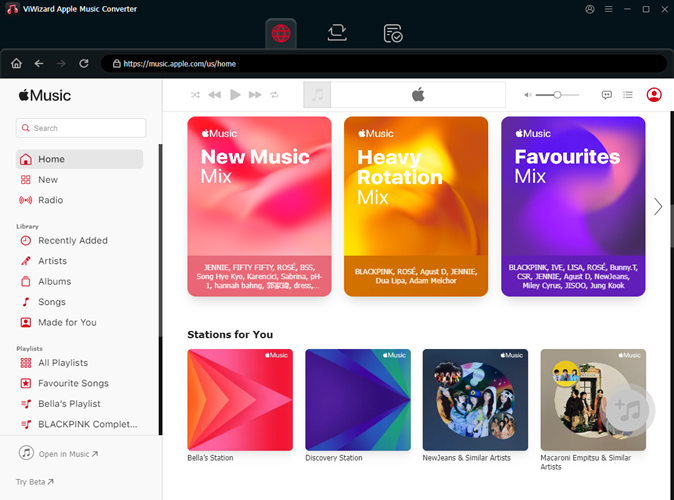
Open ViWizard and from the main interface, you will see three icons on the central top of the main screen. Here's what they for:
1) ![]() This Load in iTunes button is for importing DRM audios to the Converter.
This Load in iTunes button is for importing DRM audios to the Converter.
2) ![]() This one is the Add Files button to add non-DRM audios to the Converter.
This one is the Add Files button to add non-DRM audios to the Converter.
3) ![]() This is the Converted History. When the conversion is done your converted files will be placed under this catalog.
This is the Converted History. When the conversion is done your converted files will be placed under this catalog.
iTunes Music are enrypted files, so you should hit the Load in iTunes button to import them to the converter. Or directly drag the local files from the iTunes Music folder to the ViWizard's interface.
Step 2Customize the Output iTunes Music for Playing
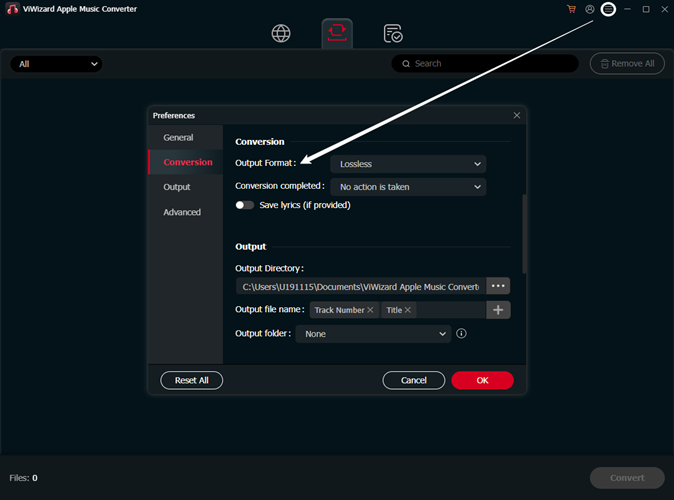
After uploading music to the converter, hit the Format panel to select an format for output audio files. We suggest choose MP3 for correct playing. You can also choose the correct format from MP3, WAV, AAC and others. Right next to the Format is the Output Path option. Click on ![]() to select a file destination for you converted songs. Don't forget to click OK to save.
to select a file destination for you converted songs. Don't forget to click OK to save.
Step 3Start Up the Conversion to Free iTunes Music
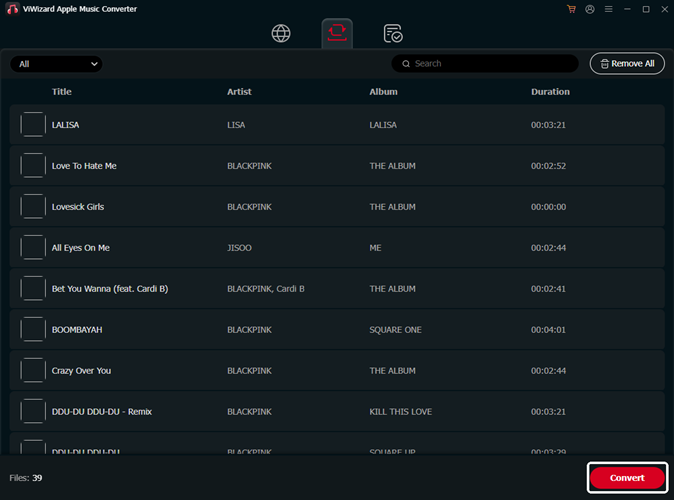
Once all the settings are over, you can begin the conversion by pressing the Convert button. Wait for a few minutes until the conversion is done, then you can locate the converted iTunes Music files in the folder you've selected. You can also go to the Converted History and use ![]() to find the converted music.
to find the converted music.
Summary
When you finish reading this article, you should not be bothered by iTunes skipping through songs anymore. The most common problem is a network problem. You can pick the one that suits you from the above methods, go ahead and try it out. Don't forget that ViWizard Audio Converter can also help you solve the problem of songs skipping on iTunes, it also helps you to easily play your iTunes Music playlists on any device. Click the button below to start trying it out.



Leave a Comment (0)