
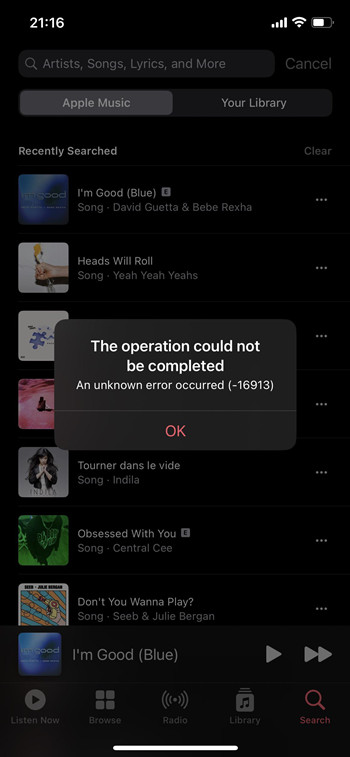
Once of the frustrations that most Apple Music fans have is while accessing Apple Music's service but receive the error message: "The operation could not be completed, An unknow error occurred (-16913)", so that the item won't be played.
No worries. We'd like to share some collected methods to fix this error 16913. If these methods won’t help, we also provide workarounds for all Apple Music subscribers to download Apple Music tracks for offline listening.
How to Fix Apple Music Error 16913
Method 1: Force Stop Apple Music App
For starters, please force stop the Apple Music app.
Step 1. From the bottom of the Home screen, swipe up. Or press the Home button twice to see the apps' preview.
Step 2. Swipe left or right to pause on the Apple Music app's preview, and then swipe up.
Method 2: Restart the Device
We also suggest to restart the device to see whether a simple reboot can make the Music app work fine to fix the error 16913 with Apple Music.
On iPhone:
Step 1. To see the power-off slider on iPhone models, press and hold either volume button and the side button (for iPhone X, 11, 12 or 13), or press and hold the side button (for iPhone SE, 8, 7 or 6), or press and hold the top button (for iPhone 5 or earlier) until it appears on the screen.
Step 2. Drag the slider, then wait 30 seconds for the device to turn off.
Step 3. To restart the device, repeat some steps with the power buttons to see the Apple logo.
Method 3: Delete and Redownload Apple Music Songs
You should also need to delete the downloaded Apple Music songs. After that, you can redownload them to your device. This will do the trick.
How to delete downloaded Apple Music songs
On iPhone/iPad:
Step 1. From the Home screen of the Ios device, open the Music app.
Step 2. Tap Library.
Step 3. Tap Downloaded. On iPad, tap Downloaded in the sidebar instead.
Step 4. Find the problematic song. Tap and hold the title > Remove.
Step 5. Select either Remove Download to remove it from the device or Delete from Library from all your devices that you use Apple Music with your Apple ID.
On Mac:
Step 1. Open the Music app.
Step 2. Find and select the problematic song.
Step 3. From the menu bar, click View > Only Downloaded Music.
Step 4. Click the More button (horizontal 3 dots icon) next to the title > Remove Download.
Step 5. Decide whether to Remove Download to remove the item from the current device or Delete from Library to remove it from all of your devices.
How to redownload Apple Music songs
You can choose to redownload the problematic songs to your device. Or you can have the benefits to download the actual files of the contents you want from Apple Music streaming catalog. Please scroll to Method 6.
Method 4: Turn off Content & Privacy Restrictions Settings
Sometimes the problematic song is an Apple Music explicit content and it so happens that the related restrictions are enabled on the device you use with your Apple ID. This Apple Music Error 16913 may appear on the screen if you try to play the song tagged with E but hasn't allowed it for Content & Privacy Restrictions setting on your device. You can pick either iPhone, iPad, Mac or Windows to see how to turn on this setting to avoid this error.
How to check for and turn off Content & Privacy Restrictions
You can pick your device to check for and turn off Content & Privacy Restrictions.
On music.apple.com:
Step 1. Use a browser to visit music.apple.com and log in.
Step 2. In the exact position to Sign In, click the profile icon > Settings.
Step 3. Scroll to Parental Controls.
Step 4. Under Content Restrictions, switch the toggle on and enter or setup a passcode.
Step 5. Under Music, select Explicit to allow all music. Or tap Clean to allow clean music.
On iPhone/iPad:
Step 1. From the Home screen of the iOS device, open the Settings app.
Step 2. Tap Screen Time. If the "Screen Time" has been enabled, please tap Content & Privacy Restrictions to turn it off.
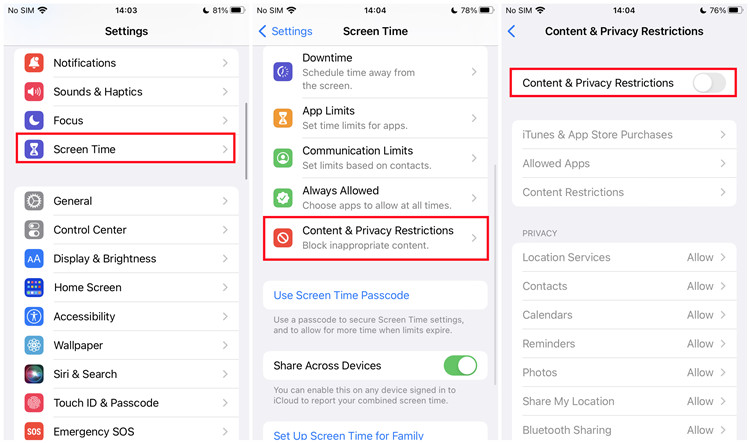
Step 3. Or for the problematic Apple Music song, tap Content Restrictions > Music, Podcasts, News, Fitness > Explicit. At this time the Content & Privacy Restrictions is enabled.
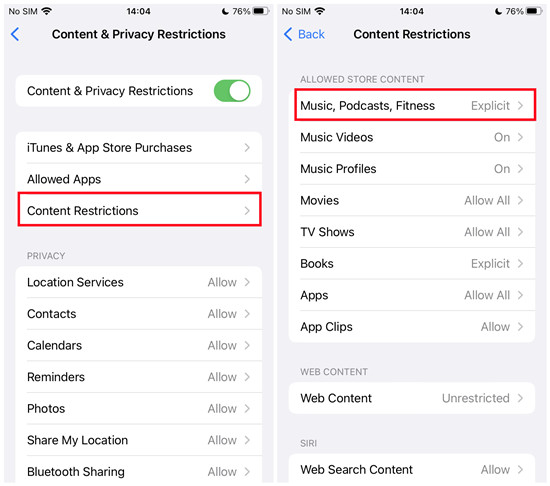
Step 4. Ensure the content options here under ALLOWED STORE CONTENT (such as Music, Podcasts, News, Fitness) are either On, Allow All or Explicit.
Step 5. Restart the Music app to check if the issue persists.
On iTunes app:
Step 1. On either Windows or Mac, launch the iTunes app.
Step 2. From the top menu, select Edit > Preferences.
Step 3. Select the Restrictions tab.
Step 4. View and click on the padlock icon in the lower left corner. When prompts, click Yes to allow iTunes app to make changes to the current device. Now the padlock icon is unlocked.
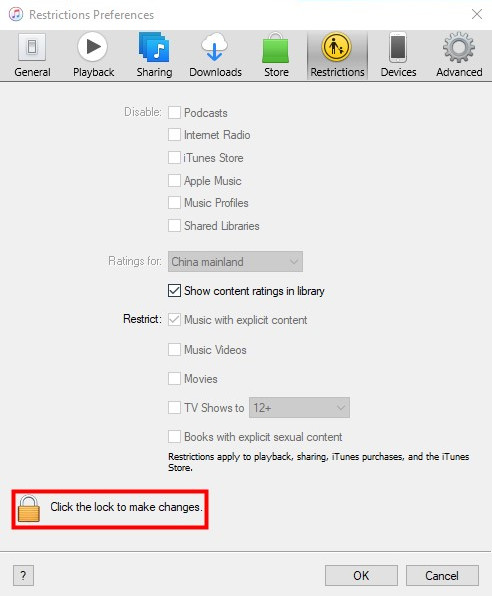
Step 5. Go to Restrict. Ensure the "Music with explicit content" checkbox is not selected. After that, you can choose to click on the padlock icon again to pre vent further changes. Click OK to save this setting.
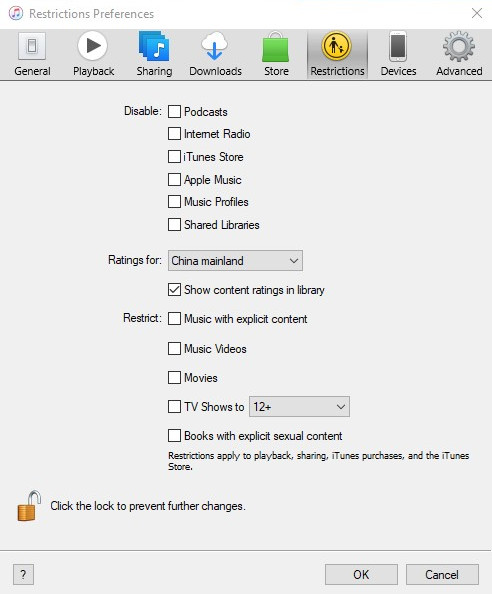
Step 6. Return to the Apple Music song and see if the issue still persists.
On Mac:
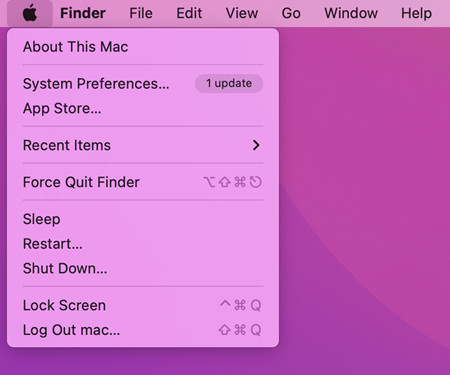
Step 1. In the upper left corner, use Apple menu > System Settings > System Preferences (or General).
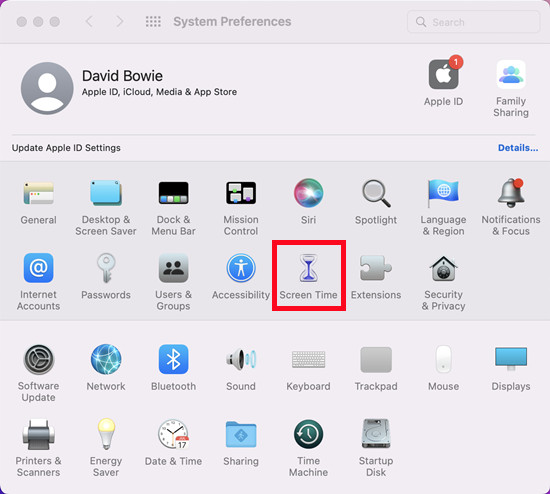
Step 2. Click Screen Time > Screen Time > Turn On or make sure the status is "Screen Time: On".
Step 3. In the lower left corner, click Options.
Step 4. Head to Content & Privacy in the left panel, check Content & Privacy Restrictions > Turn Off… or make sure the status is "Content & Privacy Restrictions: Off". You can also uncheck "Explicit Music, Podcasts & News" while the Restrictions is enabled.
Method 5: Reinstall Apple Music
You must uninstall the Apple Music application from your device if all the methods above are tried with no luck.
How to uninstall Apple Music application
On iPhone/iPad:
Step 1. From the Home screen of the iOS device, find Apple Music app.
Step 2. Press and hold on the Apple Music app icon.
Step 3. Select Remove.
Step 4. Select Delete App > Delete to confirm.
On Windows:
Step 1. From the Search box, open Control Panel.
Step 2. Select Uninstall a program under Programs.
Step 3. In the apps list, scroll to iTunes.
Step 4. Right-click on iTunes > Uninstall. Follow the on-screen instructions to uninstall it from the Windows computer.
On Mac:
Step 1. Switch to the Finder.
Step 2. Select the Music app. Drag the app to the Trash or select it and choose File > Move to Trash from the menu bar. Also enter the name and password of an administrator account.
Step 3. To delete the app after moving it to the Trash, choose Finder > Empty Trash.
Method 6: Redownload Apple Music Songs
There have been several complains from Apple Music subscribers about this error 16193 also happens when streaming Apple Music online. So in this instance, please also ensure the network is stable to access the full music service from Apple. Of course, there's an ultimate fix to avoid such Apple Music errors to ensure the seamless listening experience, that is, to download the actual music files from Apple Music streaming catalog. To do this, a professional Apple Music downloader such as ViWizard Audio Converter is essential.
ViWizard Audio Converter is the best Apple Music downloader that helps Apple Music subscribers to download Apple Music contents, such as Apple Music, iTunes files, iTunes audiobooks and even Audible audiobooks. With ViWizard, Apple Music users are able to convert the desired music tracks in 6 supported audio file formats: MP3, M4A, M4B, WAV, AAC and FLAC. Once the conversion is complete at a 30x speed, the files are stored on your computer device so you can listen to them offline.

ViWizard Apple Music Converter Key Features
- Losslessly download and convert Apple Music for offline playing on any device
- Convert M4P Apple Music to MP3, AAC, WAV, FLAC, M4A, M4B
- Retain 100% original quality and ID3 tags
- Support converting Apple Music songs, iTunes audiobooks and Audible audiobooks
- Convert between DRM-free audio file formats
- How to Stop Apple Music from Automatically Playing
- How to Fix Apple Music This Content Is Not Authorized
- How to Fix ‘This Song Is Not Synced Across Your Devices' in 2023
- 7 Solutions to Fix a SSL Error on Apple Music [2023 Guide]
- How to Fix iTunes Keeps Skipping Songs on Windows & Mac
- 10 Proven Solutions to Fix Apple Music Request Timed Out

Adam Gorden is an experienced writer of ViWizard who is obsessed about tech, movie and software.