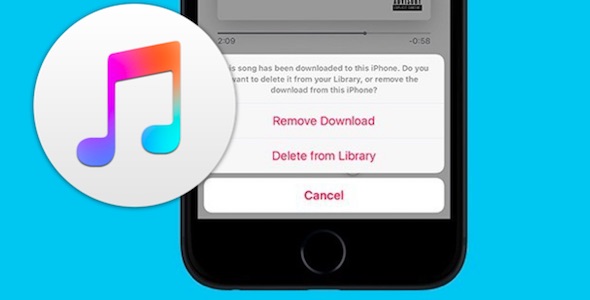
Since its launch in 2015, Apple Music has grown tremendously over the years. This is evident by the tons of songs and millions of users on its platform. Apple Music dwells on hand-picked content, which makes you want to save as many tracks and playlists as possible. This then takes us to the need to delete songs from Apple Music library from time to time. The old songs, of course, fade with time as you add your newly found fresh and trending tracks. If not anything to go by, deleting songs from Apple Music is also a simple way of keeping your storage free. Here's how to remove songs from Apple Music playlist.
Option 1: Remove a Song from Apple Music Playlist/Library
Managing your Apple Music library is key to a personalized and clutter-free music experience. In this guide, we'll explore various options for removing songs, catering to both mobile users (iOS/Android) and desktop users (Windows/Mac).
1.1 Remove a Song from Apple Music Playlist
-
For iOS/Android:
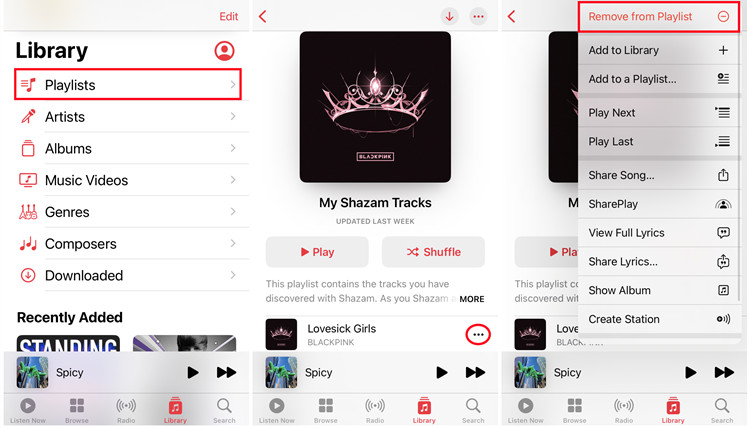
- Launch the Apple Music app.
- Tap on "Library."
- Navigate to the "Playlists" section and select the specific playlist with the song.
- Locate the song, tap on "More."
- Choose "Remove from Playlist."
-
For Windows/Mac:
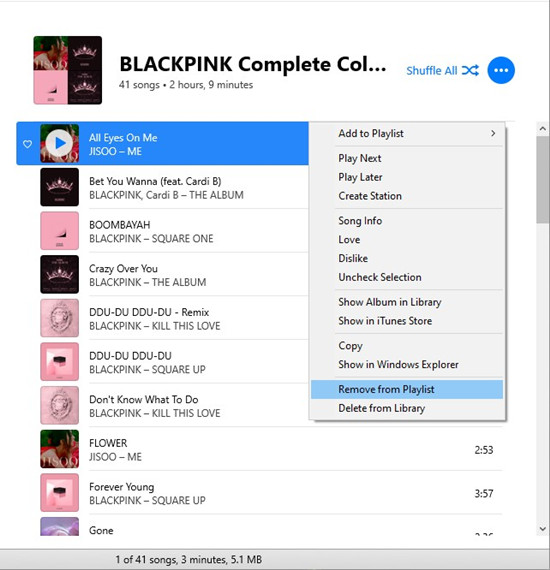
- Open iTunes or the Apple Music app on your computer.
- Find the playlist in the sidebar under "Playlists."
- Right-click on the song you wish to remove.
- Select "Remove from Playlist."
- To remove the song from your entire library, click "Remove from Library."
1.2 Remove a Song from Apple Music Library
-
For iOS/Android:
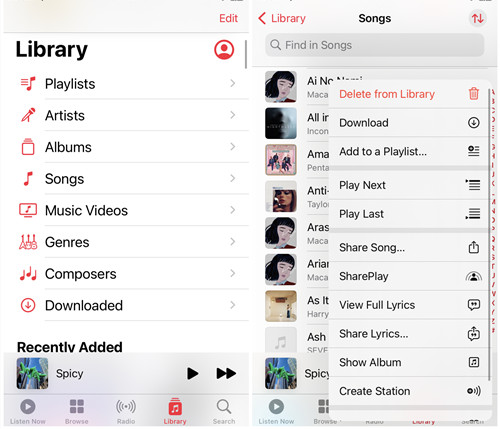
- Open the Apple Music app.
- Tap "Library."
- Navigate to the "Songs" section.
- Locate the song within the list.
- Tap "More" or long-press on the song.
- Select "Delete from Library."
- Confirm your decision by tapping "Delete Song."
-
For Windows/Mac:
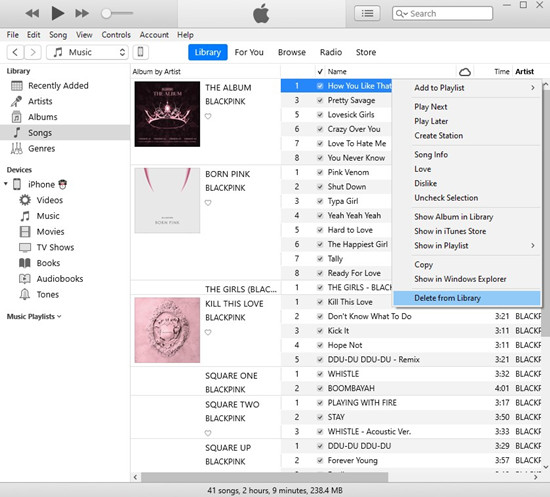
- Open iTunes or the Music app on your computer.
- Go to the "Songs" section in the sidebar.
- Scroll through the song list or use the search tool to find the specific song.
- Right-click on the song and choose "Remove from Library."
Option 2: Remove The 'Songs' Section from Apple Music
As we explore ways to refine your Apple Music experience, let's now delve into the option of streamlining your library by removing the 'Songs' section. This can be particularly useful if you prefer organizing your music through playlists rather than a comprehensive songs list.
2.1 Edit the Songs Section of Apple Music Library
-
For iOS/Android:
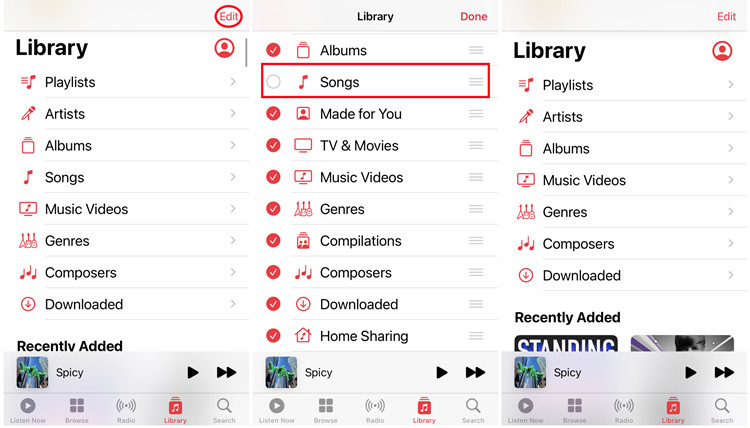
- Open up the Apple Music app.
- Head to "Library."
- Find the "Songs" section – it's where the complete list resides.
- Tap "Edit" (usually hanging out in the top-right corner).
- Uncheck the "Songs" option.
- Seal the deal by tapping "Done" to solidify your changes.
-
For Windows/Mac:
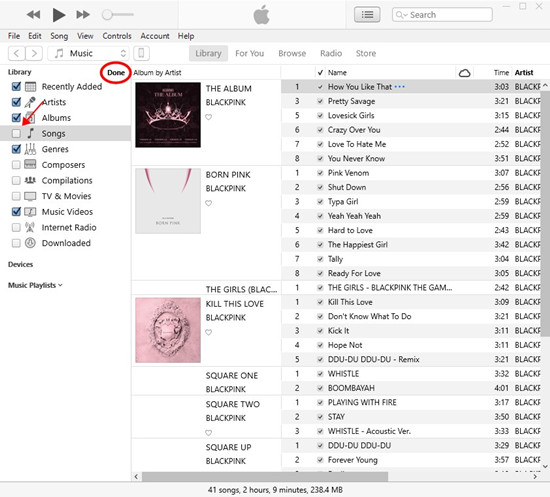
- Fire up iTunes or the Apple Music app on your computer.
- Navigate to the "Library" section.
- Locate and click on "Songs" in the sidebar.
- Hit up "Edit" at the top of your screen.
- Uncheck the "Songs" option to bid it farewell.
- Confirm your decision by clicking "Done."
Option 3: Remove a Downloaded Song from Device/Music Library
If you want to have more flexibility to free up space and curate your offline music experience, you may need to remove your downloads from your Apple Music library or even your device entirely. You can efficiently manage your downloaded songs, making room for fresh content and tailoring your offline music library to suit your ever-evolving tastes.
3.1 Remove a Downloaded Song Using Apple Music App
-
For iOS/Android:
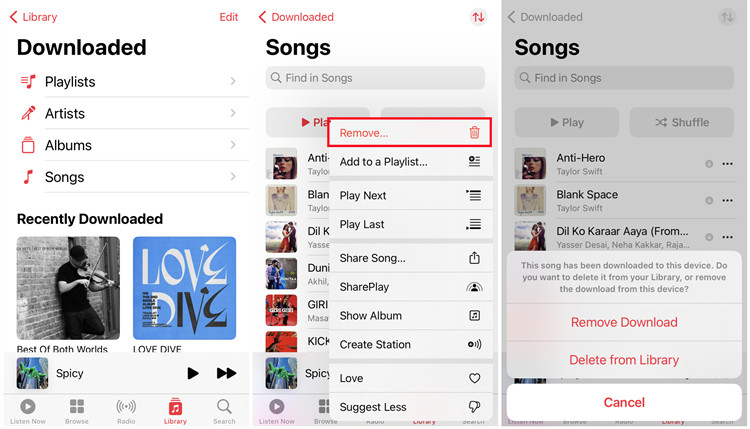
- Launch the Apple Music app.
- Tap "Library."
- Go to the "Downloaded" section.
- Find the downloaded song containing in any sections, including "Playlists," "Artists," "Albums," "Songs," "Genres" and many others.
- Tap the "More" button or swipe left.
- Tap "Remove."
- Select "Remove Download" to remove the song from your device, or "Remove from Library" to remove it solely from your music library.
-
For Windows/Mac:
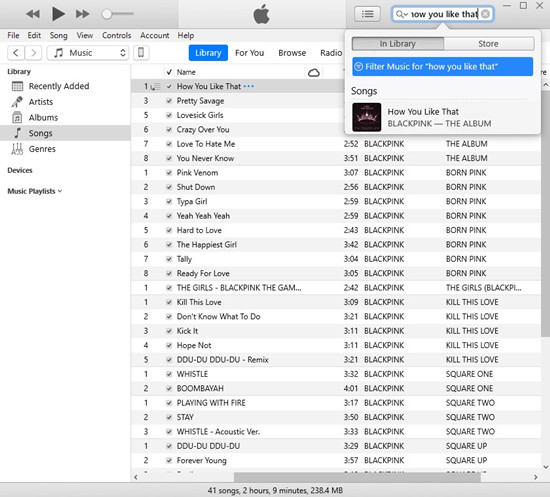
- Open iTunes or the Apple Music app on your computer.
- Navigate to the "Library" section.
- Utilize the filter to view downloaded music only.
- Use the search bar to locate the downloaded song.
- Right-click on the song and select "Delete from Library."
3.2 Remove a Downloaded Song Using Settings App
-
For iOS Only:
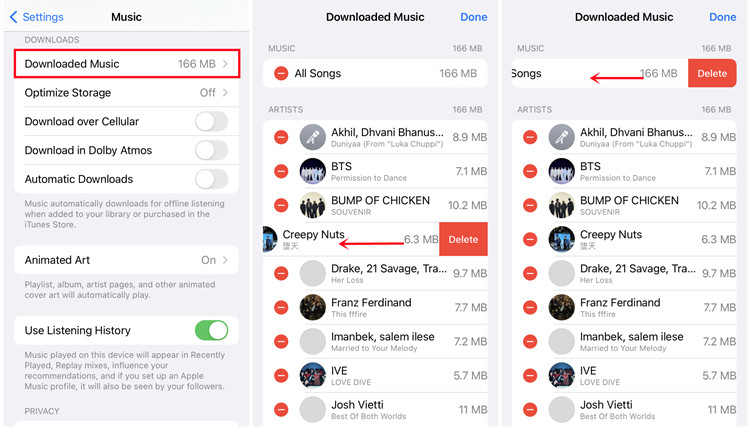
- Open the "Settings" app.
- Scroll down and tap "Music."
- Under the "Downloads" section, tap "Downloaded Music."
- Find the song you want to remove and swipe left.
- Tap "Delete" to remove the downloaded song.
Option 4: Remove All Songs from Apple Music Device/Music Library
Now, let's explore the comprehensive approach of removing all songs from your Apple Music library, offering you a clean slate to curate your collection.
4.1 Remove All Songs Using Apple Music App
Note: We recommend performing this action on a computer for a more convenient and efficient experience.
-
For Windows/Mac:
- Open iTunes or the Apple Music app on your computer.
- Navigate to the "Library" section.
- Click on "Songs" or a similar option to display all songs.
- Create a backup or playlist if you want to save your current collection.
- Select all songs, usually by clicking and dragging or using keyboard shortcuts (Ctrl + A on Windows, Command + A on Mac).
- Right-click and choose "Delete from Library."
4.2 Remove All Downloaded Songs Using Settings App
-
For iOS Only:
- Open the "Settings" app.
- Scroll down and tap "Music."
- Under the "Downloads" section, tap "Downloaded Music."
- Create a backup or playlist if you want to keep certain songs.
- Find the "All Songs" and swipe left.
- Tap "Delete."
Extra Tip: How to Get More Storage Space without Removing Music
Managing storage space is crucial, especially if your device is running low on capacity. Here are two handy tips to help you free up space without bidding farewell to your beloved tunes.
5.1 Offload the Apple Music App Using the Settings App
Offloading the Apple Music app removes the app itself while keeping your downloaded songs intact. If you reinstall the app later, your music library will be restored.
-
For iOS Only:
- Open the "Settings" app.
- Scroll down and tap "General."
- Select "iPhone [or iPad] Storage."
- Locate and tap on "Apple Music."
- Toggle on "Offload App."
- Confirm the action if prompted.
5.2 Optimize Storage Using the Settings App
Optimizing storage ensures that your device automatically manages your downloaded music, keeping recent and frequently played songs while removing others to save space.
-
For iOS Only:
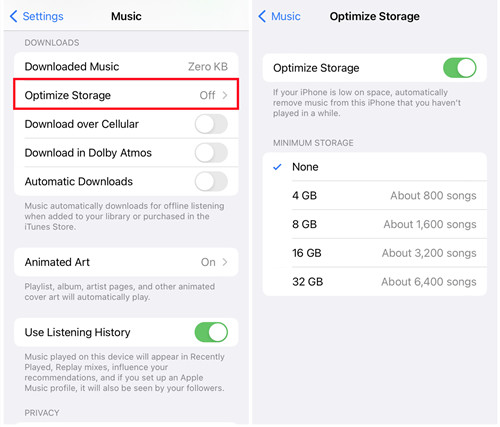
- Open the "Settings" app.
- Scroll down and tap "Music."
- Under the "Downloads" section, toggle on "Optimize Storage."
- Set the slider to your preferred storage limit.
- Confirm the changes.
Part 6. How to Customize Lyrics on Apple Music Across Devices
If you have a second thought as you delete Apple Music songs, you may as well back up Apple Music songs for later use. As you should know, Apple doesn't allow any user to save the downloaded Apple Music songs on computer or non-Apple devices. In order to make a backup of Apple Music tracks anywhere, you'll need the help of ViWizard Apple Music Converter, a 3rd-party Apple Music converter that can easily convert Apple Music songs to MP3, M4A, M4B, AAC, FLAC, WAV at up to 320 Kbps and at a 30X faster speed with ID3 tags kept. You can download the free version below for a try.
Key Features of ViWizard Apple Music Converter
Free Trial Free Trial* Security verified. 5, 481,347 people have downloaded it.
- Convert Apple Music songs, albums, playlists, and artists into MP3 for easy access
- Preserve lossless audio, high-resolution lossless, and Dolby Atmos quality
- Strip DRM from Apple Music for unrestricted offline listening
- Save converted audio files while retaining full ID3 tag details
Step 1Import Songs from Apple Music to ViWizard
After the installation is complete, just launch the ViWizard Audio Converter application on your PC. Then, from the top menu, choose Music Note to load the Apple Music files to rip. Simply drag and drop the music files you want to download into the Apple Music downloader.
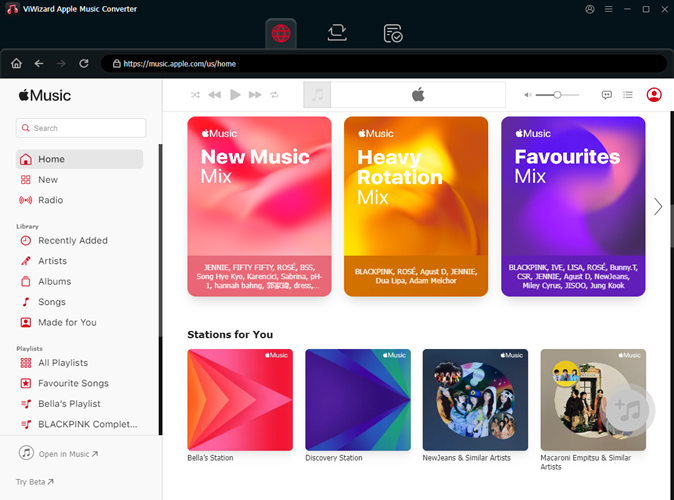
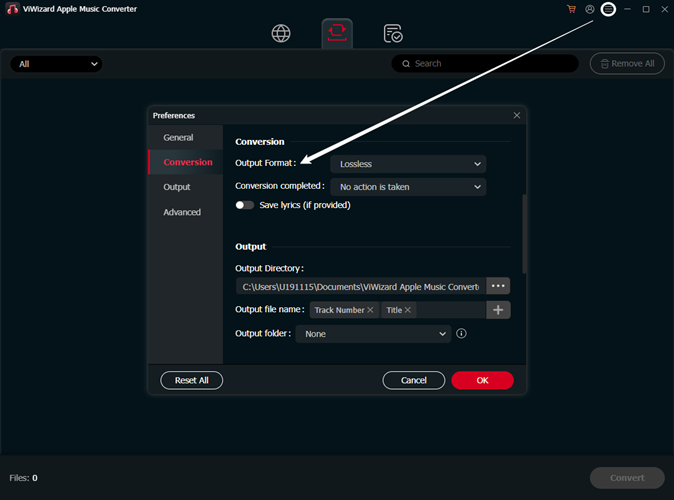
Step 2Set Output Formats as MP3
Use the Format option after importing the music into the software to select the appropriate output format for your purposes. MP3 is a great format for listening to Apple Music on other devices. In the format settings box, you may also alter the output audio properties such as sampling rate, bit rate, channel, and so on. Finally, press the OK button to save your choices.
Step 3Start to Free Your Apple Music to MP3
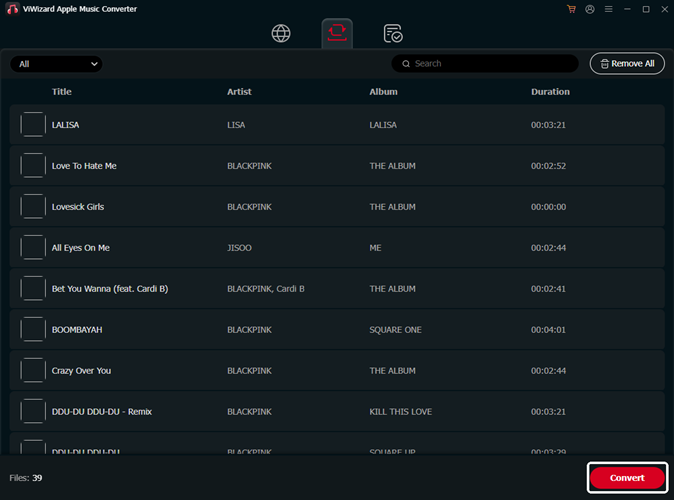
Then, to begin the conversion, choose Convert. ViWizard will begin ripping Apple Music to MP3 as soon as you configure it. Click the Converted button after a few seconds to identify and play all converted MP3 Apple Music files on any device.
Conclusion & Suggestion
Now you may know how to delete multiple songs on Apple Music. Your Apple Music library has the capacity to hold a large volume of data. However, it may at times become overcrowded with music that you no longer need. In such a case, you have the option to delete Apple Music songs. For one, is to save space so that you have room for other important data and the other reason is to do a cleanup of your library. Whatever your reason may be, it is important to back up your data before you carry on with the deletion process.
There are many third-party tools,like ViWizard Audio Converter that you can use for this purpose. Backing up of songs does not necessarily mean that you have to retrieve them back. You can back up with ViWizard at your computer and later decide to delete them if they are totally not needed. Otherwise, you will lose them completely if you cancel Apple Music subscription.


Leave a Comment (0)