What better way to schedule your organization than with the often-overlooked task of cleaning up your Apple Music library? You may have started with the best intentions, meticulously curating playlists and adding your favorite tracks, but over time, duplicates may have slipped through the cracks. Or maybe your library grew so sprawling that the clutter became unavoidable - split albums, identical songs in multiple playlists, or even duplicate tracks sprinkled throughout your collection.
If you take a little time to sort through and remove these duplicates, you'll not only tidy up your library but also make it easier to rediscover the music you love without distractions. So, let's roll up our sleeves and dive into the process of cleaning up your Apple Music library once and for all.
Part 1. Why Do Duplicates Appear in Apple Music?
Every track in Apple Music carries metadata that helps the service organize it - things like song title, artist name, album details, and even tags like version type or release year. How this metadata is handled often determines whether duplicates sneak into your library.
Reason 1: iCloud Music Library Syncing
Syncing your library through iCloud Music Library relies heavily on metadata to match tracks, but even small differences can cause confusion. A studio version of a song might be mistaken for a live version, or a remastered track could end up listed alongside the original.
Reason 2: Apple Music Catalog Variants
When syncing happens across multiple devices, the likelihood of duplicates increases. Tracks with inconsistent metadata - whether due to mislabeling or varying sources - can multiply as Apple Music tries to reconcile the differences. For instance, an album labeled as "Deluxe Edition" on one device might appear as a new addition on another.
Apple Music's extensive catalog can also contribute to the problem. The service often offers multiple versions of the same track, such as explicit versus clean edits or remixes versus originals. These are treated as unique entries but can easily find their way into your playlists or library if you're not careful about which versions you add.
Reason 3: Manual Import or Re-adding Tracks
Manual imports can be another culprit. If you've uploaded songs from your computer or external drives, duplicates may appear if Apple Music creates copies of the imported files. Similarly, adding the same tracks to your library when your media folder is offline can lead to Apple Music re-importing them later.
Part 2. How to Check Duplicates on Apple Music
The key to finding duplicates in your music library lies in a handy feature called "Show Duplicate Items," available in both Apple Music and iTunes software. This feature helps users identify duplicate tracks within playlists, albums, or even across the entire library. Whether you're trying to tidy up a playlist or streamline your collection, here's how to check for duplicates:
- Start by launching the app on your Mac or PC.
- From the sidebar, select Music to access your library.
- Tip: This feature also works for movies, TV shows, and audiobooks.
- Decide where you want to search for duplicates - whether it's a specific playlist or sections like Songs, Albums, or Genres under Library:
- For a broad search, select File > Library > Show Duplicate Items.
- To focus only on exact matches, hold down the Shift key and select File > Library > Show Exact Duplicate Items.
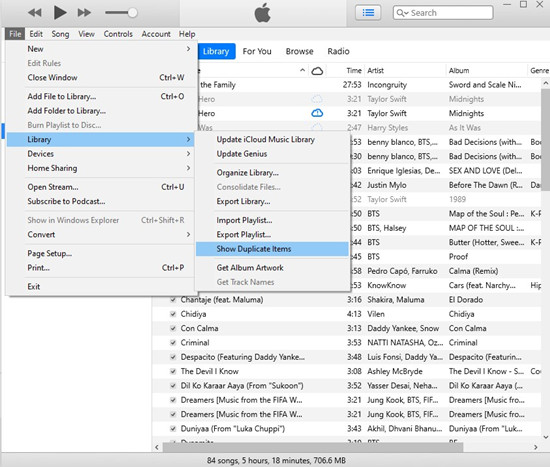
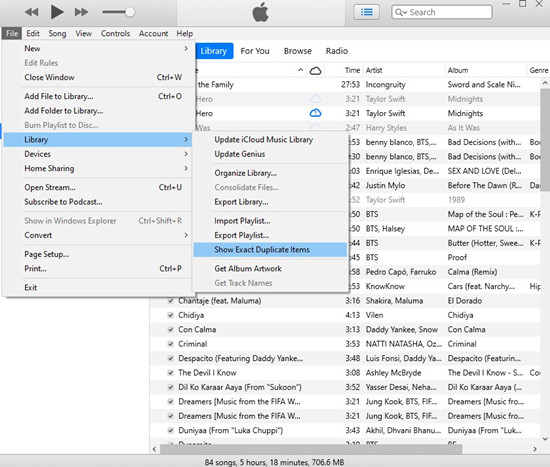
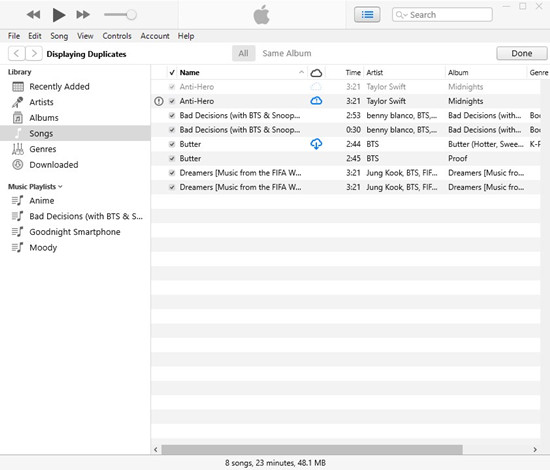
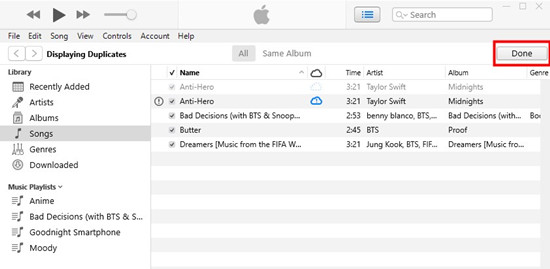
- iTunes will display a list of duplicates. You can choose to view all duplicates or narrow it down to tracks from the same album, helping you make informed decisions about what to keep or remove.
Part 3. How to Remove Duplicates on Apple Music
Finding duplicates is the first step, but the real task lies in removing them to keep your library organized. Once you've identified duplicates - tracks with similar names, artists, and album details - you have two options: manually removing them one by one or using specialized tools like DeDuper (for Windows) or Dupin (for Mac) for a faster, automated cleanup.
Option 1: Manually Remove Duplicates
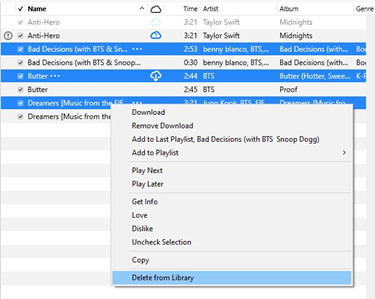
- Look through the list of duplicate items in iTunes or Apple Music.
- Hold the Shift key (on PC) or the Command key (on Mac) to select multiple duplicates at once.
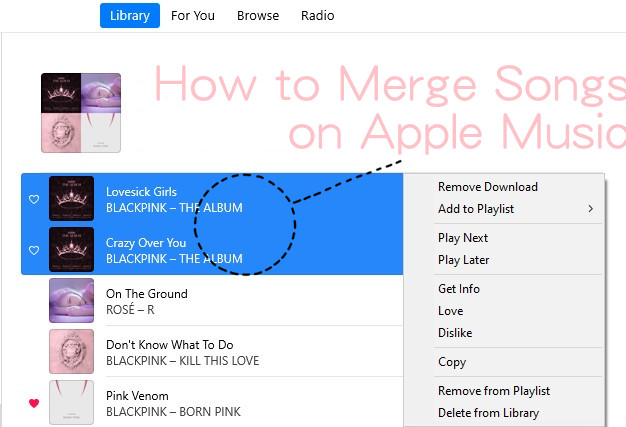
- Right-click on the selected tracks and choose Delete from Library.
- If prompted, confirm removal from iCloud Music Library by selecting Delete Songs.
- Once done, click Done to return to your full library.
- Tip: While manual removal gives you full control, it can be time-consuming, especially for larger libraries.
Option 2: Automatically Remove Duplicates
Here we use Dupin on macOS as an example, and these duplicates remover tools should work similarly:
- Download and install Dupin from its official website.
- Launch Dupin and let it sync with your Apple Music or iTunes library.
- Use smart filtering options to match duplicates by song title, artist, album, or other metadata.
- Review the generated list of duplicates and let Dupin remove them in bulk with a single click.
- Dupin ensures the changes are reflected in your Apple Music or iCloud Music Library for consistency across devices.
- Note: Automated tools are efficient but might not always align with user preferences, especially for unique metadata differences like live versus studio recordings.
Part 4. How to Add Duplicates on Apple Music
Adding duplicate songs to your music library or playlists can sometimes enhance your listening experience. For instance, if certain songs play less frequently when shuffle mode is enabled, duplicating them within a playlist can increase their chances of being played.
Here's how you can do it:
- If the songs aren't already in your iTunes library, you can:
- Add from Apple Music: Use the search bar, find the song, right-click, and choose Add to Library or Add to Playlist.
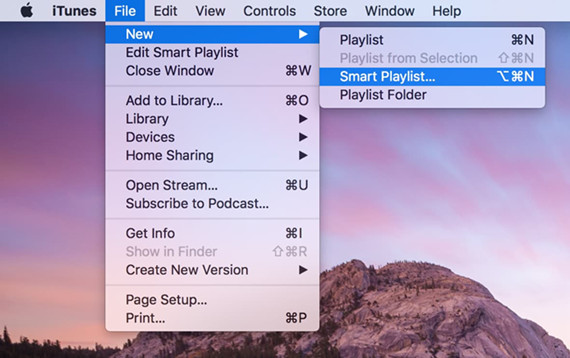
- Add from Local Files: Go to File > Library > Add File/Folder to Library, then select the files or folders containing the songs.
- Use the search bar in your Library to locate the tracks quickly.
- Select the desired tracks, right-click, and choose Add to Playlist, then select the playlist where you want to add them.
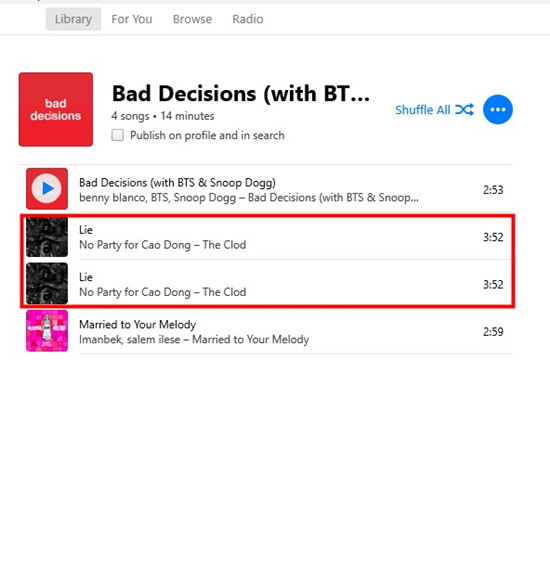
- Add the same songs to the same playlist again. When prompted, choose Add to confirm creating duplicates.
- You'll now see multiple instances of the same track listed as separate entries in the playlist.
- To distinguish duplicates from the originals, modify their metadata:
- Right-click a duplicate and choose Song Info > Details to update fields like title, artist, or album.
- Alternatively, go to Song Info > Options to adjust the start and stop times for a unique playback experience.
Part 5. How to Sync Updated Music Library Across Devices
Managing your music library on devices like iPhone, iPad, or iPod can sometimes feel less intuitive compared to desktop. However, syncing your updated music library ensures your playlists, songs, and changes remain consistent across all your devices.
- Here's how to seamlessly sync your updated library:
- On your desktop:
- Open iTunes or Apple Music on your Mac or PC.
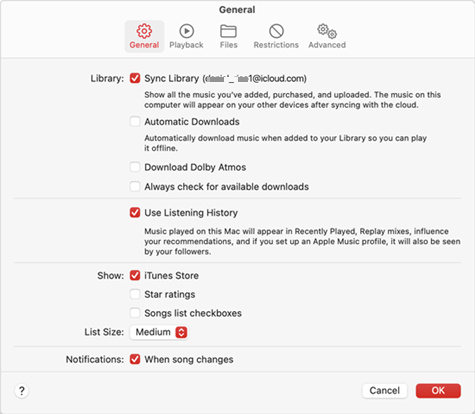
- Go to Preferences (Mac: iTunes > Preferences; PC: Edit > Preferences).
- Under the General tab, check the box for Sync Library and click OK.
- Ensure you're signed in with the same Apple ID across all devices.
- On your iPhone, iPad, or iPod:
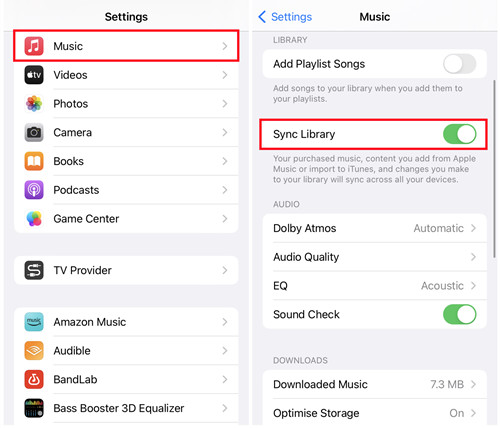
- Go to Settings > Music.
- Toggle Sync Library to ON. If prompted, confirm using your Apple ID.
- A reliable Wi-Fi connection is recommended to upload and sync changes efficiently.
- Update to the latest version of iOS, iPadOS, macOS, or iTunes to avoid compatibility issues.
- When you add or edit tracks in your library, these changes will automatically sync across devices.
- Example: If you add a new playlist on your Mac, it will appear in the Music app on your iPhone.
- If changes don't appear immediately:
- On your desktop: Go to File > Library > Update iCloud Music Library.
- On your iPhone or iPad: Close the Music app, reopen it, and ensure Sync Library is enabled.
- Open the Music app on any synced device and check if your updates, including playlists, song additions, or edits, appear as expected.
If you prefer a manual approach:
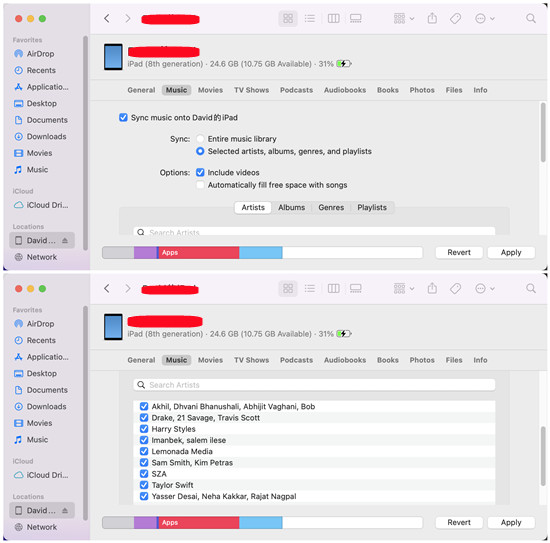
- Connect your iPhone, iPad, or iPod to your computer using a USB cable.
- Open iTunes, select your device, and choose Music from the sidebar.
- Select the playlists, artists, or albums to sync, then click Apply.
Bonus Tip: How to Convert and Download Apple Music to MP3
As iTunes converter also supports the in-app converter, Apple Music users can choose to convert their iTunes purchases to MP3 by selecting the purchased item and going to File > Convert > Create MP3 Version. Once converted, the MP3 version will be added to your music library as duplicates and displayed right under the original item.
However, items from Apple Music catalog are protected in Digital Rights Management (DRM) and are not supported by the in-app converter. If you want to convert your Apple Music songs to a commonly-used file format, such as MP3, WAV, AAC (unprotected), or FLAC, you'll need a conversion tool called ViWizard Apple Music Converter.
ViWizard Apple Music Converter is designed for iTunes users to convert and download any Apple Music songs, iTunes music, files, audiobooks, podcasts and Audible audiobooks for offline use. You just need to select Apple Music songs and adjust the output format, within one click the conversion will start and you'll get the files you want.
Key Features of ViWizard Apple Music Converter
Free Trial Free Trial* Security verified. 5, 481,347 people have downloaded it.
- Convert Apple Music songs, albums, playlists, and artists into MP3 for easy access
- Preserve lossless audio, high-resolution lossless, and Dolby Atmos quality
- Strip DRM from Apple Music for unrestricted offline listening
- Save converted audio files while retaining full ID3 tag details

Leave a Comment (0)