
Tesla drivers have always had plenty of options for music, but now there's an exciting new way to enjoy your favorite Apple Music playlists on the road. With the 2022.44.25 update, Tesla has introduced native Apple Music support, making it easier than ever to access your entire music library directly from your car's touchscreen.
This update allows Apple Music subscribers to stream their full library - albums, playlists, and more - seamlessly while driving. No more relying on third-party apps or complicated setups. Apple Music is now fully integrated into your Tesla, offering a smooth, straightforward way to enjoy your favorite tracks. The user interface is intuitive, making it simple and convenient to navigate, whether you're searching for a specific song or browsing playlists.
There are several ways to play Apple Music in your Tesla. Let's explore all the options for streaming Apple Music in your car, so you can make the most of every drive in your preferred way.
Part 1. Can You Play Apple Music in a Tesla?
With the latest update, Apple Music is now part of the Tesla media menu. Owners can simply log into their Apple Music accounts to stream directly through the car's interface. However, you'll need an Apple Music subscription and the Premium Connectivity package to fully enjoy this feature. Without these, Bluetooth will still be your go-to method for playing music.
The 2022.44.25 update has been highly anticipated, as it adds native Apple Music support, allowing drivers to stream their entire music library with ease. While this integration makes music access more seamless, it's worth noting that features like lossless audio and Dolby Atmos aren't supported yet. Some users have also reported issues with explicit content filtering.
Part 2. How to Add Apple Music to Tesla
Tesla has made Apple Music easier than ever to work alongside its built-in music player. Now, you can use Tesla's controls and voice commands while seamlessly streaming your favorite Apple Music tracks - without leaving the Tesla interface. This integration keeps things familiar and user-friendly.
While this Apple Music integration is a great addition to your Tesla, there are a few important things to keep in mind:
Lossless and Dolby Atmos are currently not supported in the Tesla Apple Music integration.
Explicit content is blocked by default, but this can be enabled in later versions (2023.6.8 or later).
Unlike some other streaming services like Tidal, Apple Music doesn't support downloading songs directly to your Tesla for offline use.
You need a Premium Connectivity subscription to stream Apple Music over a cellular connection.
Here's how to connect your Apple Music account to your Tesla:
- Ensure your Tesla is connected to the internet and that your software is up to date. This is essential for accessing the Apple Music integration. To update your Tesla software, go to the "Software" section in settings and tap on "Software Update" (if available).
- Tap the car icon at the bottom of the touchscreen to access the menu.
- Select the "Media" option, represented by the vertical three-dot icon. This is where you can manage your audio and media sources, including Apple Music.
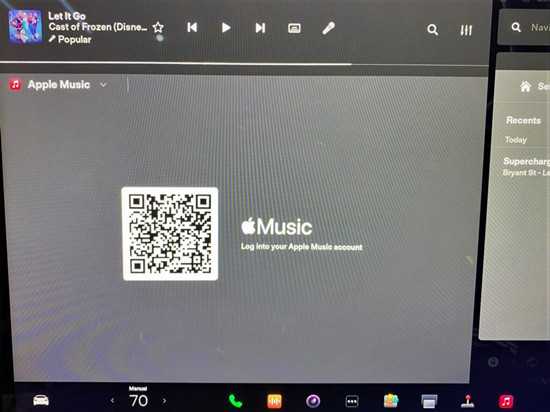
- In the Media menu, tap on Apple Music, and a QR code will appear on the screen.
- Open your iPhone's camera app and scan the QR code displayed on your Tesla screen.
- Sign in with your Apple ID and password when prompted.
- After signing in, the Apple Music app will refresh on the touchscreen, granting you full access to your Apple Music library. Now, you're ready to explore songs, albums, and playlists while driving.
Part 3. How to Use Apple Music on Tesla
You can access your entire library of songs, albums, and playlists directly from your car's touchscreen - no need for Bluetooth or external devices. For added flexibility, you can also use alternatives like Apple CarPlay. However, note that only newer Tesla models support Apple CarPlay, while Bluetooth is available across all Tesla models.
Additional Tip: Voice Control
Tesla owners appreciate the simplicity of voice commands to navigate Apple Music. For example, saying, "Play some rock music," will instantly play a playlist for you.
- Press the voice control button on the steering wheel or tap the microphone icon on the screen.
- Say something like, "Play [song name]" or "Play some rock music."
- Tesla will automatically search for the song or playlist and start playing it.
Option 1: Using Apple Music via Tesla's Bluetooth
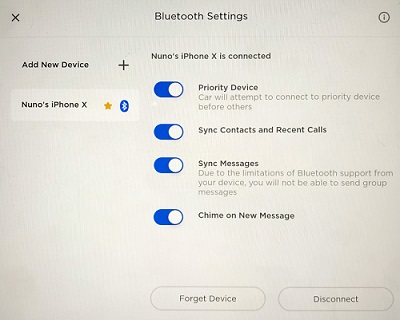
- Tap the Bluetooth icon in the status bar of your Tesla touchscreen:
- For iPhones: Go to Settings > Bluetooth, turn Bluetooth off for about 5 seconds, then turn it back on. Select your Tesla from the available devices list.
- For Android Phones: Swipe down from the top of your phone screen, ensure Bluetooth is on, then press and hold the Bluetooth icon to find your Tesla under Available Devices. Tap [Your car's name] to connect both devices.
- On the car's touchscreen, tap Start Search to scan for available devices.
- Tap your phone's name on the touchscreen to establish the connection. A confirmation number will appear on both your phone and Tesla screen.
- Ensure the number matches on both devices and confirm the pairing on your phone.
- Open the Apple Music app on your phone, choose a track or playlist, and enjoy the music through your Tesla's audio system.
Tip: This method is a quick and reliable option that works well for those who prefer using their phone's data connection to stream Apple Music. It also offers the flexibility of wireless connectivity, though remember that your phone will need to be connected and actively playing music.
Option 2: Using Apple CarPlay (For Newer Tesla Models)
- Plug your iPhone into the Tesla's USB port using a Lightning cable.
- If your Tesla supports CarPlay, the CarPlay interface should appear automatically on your screen.
- On the CarPlay screen, tap the Apple Music app icon to open it.
- Browse your Apple Music library, play playlists, albums, or search for specific tracks.
- Use the Tesla touchscreen, steering wheel controls, or Siri voice commands to navigate through your music.
Tip: Thanks to Michał Gapiński, Tesla owners can now use Apple CarPlay or Android Auto with a workaround. You'll need the latest Tesla Android Project release and follow a 15-step process to enable this feature. For more details, visit the Tesla Android website before Tesla's official Apple Music app integration is fully rolled out.
Read More: How to Add Apple Music to Android Auto
Option 3: Using the Tesla In-Built Browser
- Tap the Web Browser icon at the bottom of your Tesla's touchscreen.
- In the browser's address bar, type music.apple.com and press Enter.
- Log into your Apple Music account with your Apple ID and password.
- Once signed in, browse your library, search for songs, albums, or playlists, and play your favorite tracks directly from the browser.
- Use the touchscreen to pause, skip, or adjust the volume.
Option 4: Using the Tesla Media Player (Alternative Method)
If you prefer to play your Apple Music tracks through the Tesla Media Player, there's a way to do so, but it requires a bit of preparation. Apple Music files are encrypted with DRM technology, meaning they can only be played within the Apple Music app, even if you've downloaded them to your device. This can be an obstacle if you're trying to play your music directly on the Tesla Media Player. Fortunately, there's a solution: you can convert the music into a format that the Tesla Media Player can recognize.
Part 4. Best Alternative Way to Play Apple Music on Tesla
To get started, you'll need a tool like the ViWizard Apple Music Converter, which is designed to remove the DRM protection from Apple Music tracks. This allows you to convert your downloaded Apple Music songs into a format compatible with Tesla's media system, such as MP3. After converting the music, simply transfer the files to a USB drive or external storage device, and plug it into your Tesla's USB port. From there, you can access your library via the Tesla Media Player interface, playing your Apple Music tracks just like any other audio file.
Key Features of ViWizard Apple Music Converter
Free Trial Free Trial* Security verified. 5, 481,347 people have downloaded it.
- Convert Apple Music songs, albums, playlists, and artists into MP3 for easy access
- Preserve lossless audio, high-resolution lossless, and Dolby Atmos quality
- Strip DRM from Apple Music for unrestricted offline listening
- Save converted audio files while retaining full ID3 tag details
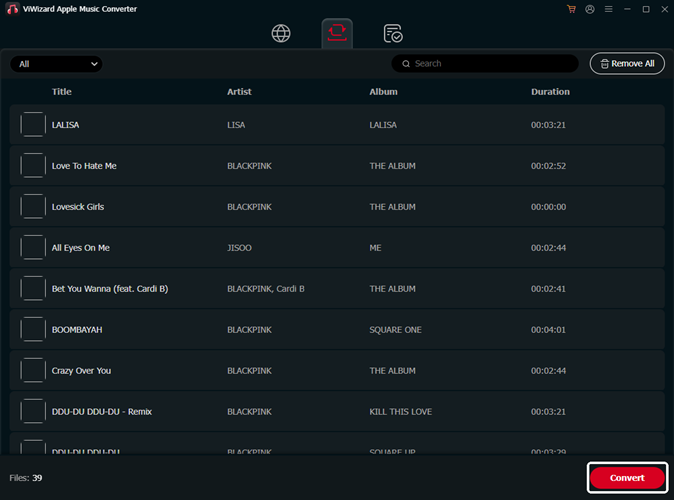
Step 1Upload Apple Music You Like to ViWizard
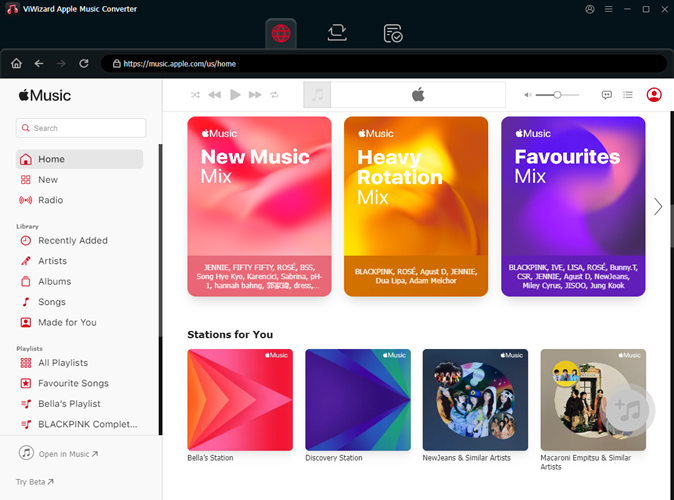
Open the ViWizard Apple Music Converter and sign in with your Apple ID. This will give you access to your Apple Music library, allowing you to browse and select the songs, albums, or playlists you want to convert into a compatible format for your Tesla.
Step 2Tune Parameters and Format
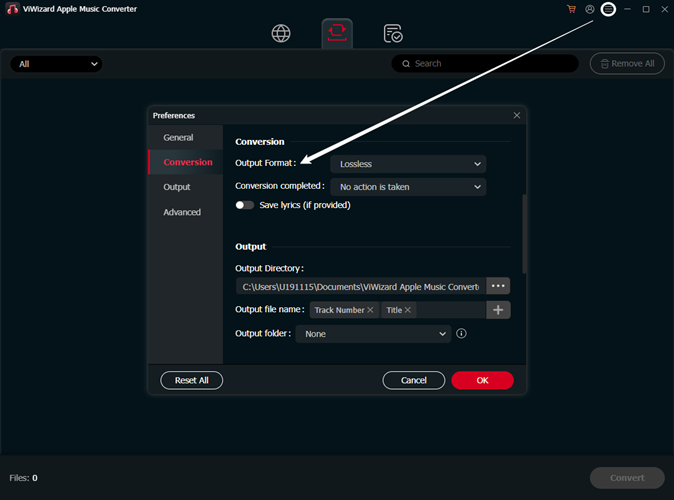
Click the three-line hamburger icon in the top-right corner and select Preferences. Choose your desired output format, such as MP3 (which is compatible with the Tesla Media Player). You can also adjust other settings like sample rate, bit rate, and channel. Once you're done, click OK to save your preferences.
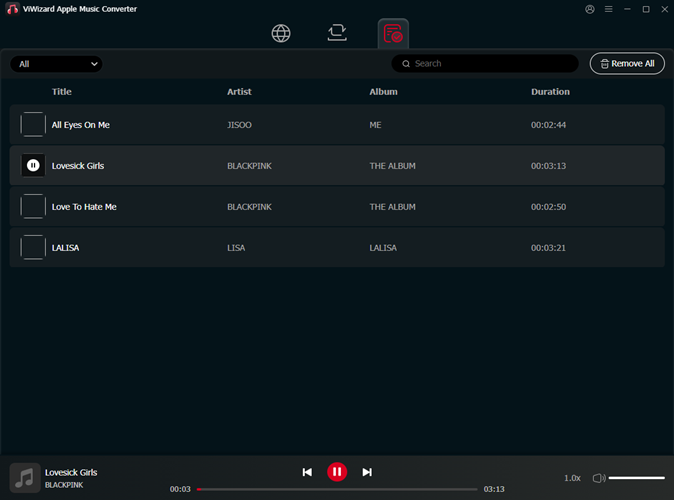
Step 3Free Apple Music with ViWizard
Once your music is in the conversion list, click Convert. ViWizard will download and convert your Apple Music tracks into MP3 (or your chosen format). After the conversion is complete, your converted music will be saved in the output folder you specified. To find your files, click the History button, and then click the Open Folder icon to navigate to the location where your converted songs are stored.
Step 4Transfer the Apple Music Files to Tesla
Once your music is in the conversion list, click Convert. ViWizard will download and convert your Apple Music tracks into MP3 (or your chosen format). After the conversion is complete, your converted music will be saved in the output folder you specified. To find your files, click the History button, and then click the Open Folder icon to navigate to the location where your converted songs are stored.
Step 5Transfer the Apple Music Files to Tesla
- After converting your Apple Music tracks to a Tesla-compatible format (like MP3), connect your computer to a USB drive and transfer the files. Organize them into folders by album, artist, or playlist for easy navigation.
- Insert the USB drive into one of the Tesla's USB ports, typically located in the center console or near the glove compartment.
- On the Tesla touchscreen, tap the Media icon (musical note) at the bottom of the screen to open the Media Player interface.
- Tap the USB option to view the music files on the drive. Browse through the folders and tap on a song, album, or playlist you want to play.
- Use the touchscreen or steering wheel controls to play, pause, skip tracks, and adjust the volume.
Tip: For easier access, consider creating a "Tesla Playlist" on your computer before transferring the files. This saves time when browsing your library on the road.
Part 5. How to Fix Apple Music Issues on Tesla (Can't Log Into the App)
If you're experiencing trouble logging into the Apple Music app on your Tesla, it's not uncommon. Issues like mismatched Apple IDs or connectivity problems can often prevent successful logins. Follow these steps to resolve the problem:
Step 1Verify Apple ID Consistency
Ensure that the Apple ID used on your Tesla matches the one associated with your Apple Music subscription. If there's any discrepancy between the Apple IDs, login issues can occur. Make sure the credentials are consistent across your devices.
Step 2Sign Out and Sign Back In
A simple sign-out and sign-in process can sometimes resolve login issues:
- Open the Apple Music app on your Tesla.
- Tap the profile icon in the top right corner.
- Select Sign Out.
- After signing out, sign back in using your Apple ID and password.
Step 3Reboot the Tesla Touchscreen
Rebooting the Tesla touchscreen can help resolve system glitches:
- Put your Tesla in Park mode.
- Press and hold both scroll buttons on the steering wheel simultaneously.
- Keep holding until the screen goes black, then release.
- Wait for the Tesla logo to appear, signaling the system reboot.
Step 4Check for Software Updates
Outdated software can sometimes lead to login problems. Ensure your Tesla's system is up to date:
- Tap Control on the Tesla touchscreen.
- Go to the Software tab.
- If an update is available, follow the prompts to install it.
Step 5Reset Network Settings
Issues with network connectivity can affect Apple Music logins. Resetting your network settings may help:
- Go to Control > Safety & Security.
- Tap on Reset Network Settings.
- This will reset your Wi-Fi and Bluetooth settings, potentially resolving any connectivity issues.
Step 6Contact Tesla Support
If none of the above solutions work, you can reach out to Tesla Support for further assistance. They may be able to provide more specific troubleshooting steps or help resolve the issue.
Summary
Now with Tesla's Apple Music integration, you can play Apple Music in Telsa's media player. Of course, you can use Bluetooth to connect your phone and the player to stream Apple Music online. If you don't want to use your phone data, ViWizard Audio Converter is a good choice. You can use it to download and transfer Apple Music to the Tesla Media Player without much effort. Click the download button below to learn more about ViWizard now.
You May Be Interested


Adam Gorden, the digital media specialist at ViWizard, is dedicated to providing the best solutions for digital media management, including audio and video conversion, file optimization, and media workflow enhancements.
Leave a Comment (0)