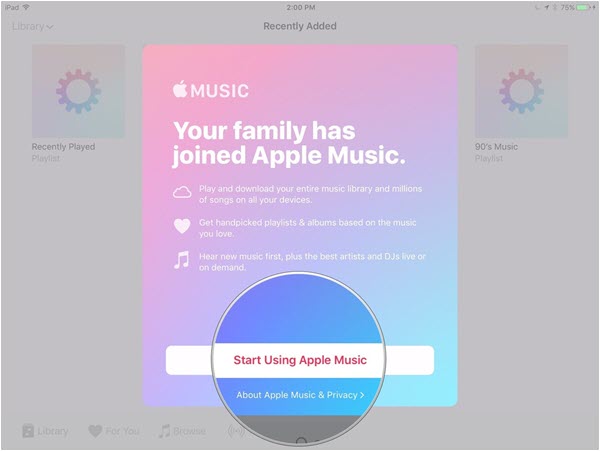
Apple Music is one of the top music streaming services in the world. Launched in 2015, the platform is one of the youngest music sharing services in the world, yet it has overtaken many older platforms in popularity and even the number of active users. Why is this the case? Because it has many great features that make it stand out from the crowd. One of its best features is the Apple Music family sharing which allows a family of up to six members to share music, audiobooks, iTunes and the iCloud storage plan. With the family sharing you save on your subscription while having access to all the great features that Apple Music offers. To use family sharing you need to firstly have an Apple Music family plan.
The Apple Music's family plan is one of the best family discount plans among music streaming services in the world. For only $14.99, a family of six can have full access to all features of Apple Music. This saves you $144.95 had you bought individual plans for each of the six family members at $9.99 per individual. With the family plan, you can share app store purchases, iTunes, ebooks and Apple Music playlists. This makes a lot of sense especially for a family with children and teenagers who don't have credit cards of their own for purchases.
Part 1. How Does Apple Music Family Sharing Work?
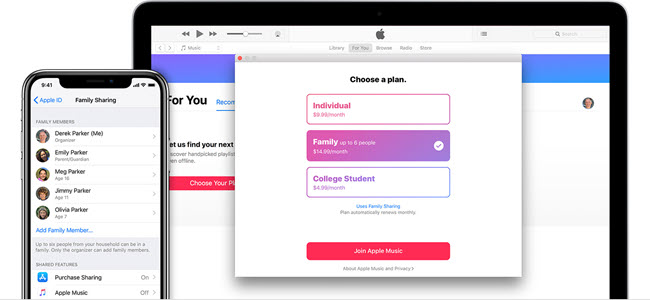
Apple Family Sharing allows you to share your favorite Apple services with your loved ones without needing multiple subscriptions. This feature creates a digital family network, giving up to six family members access to Apple Music, Apple TV+, Apple News+, Apple Arcade, and Apple Card. Each family member has their own Apple ID, so everyone's data remains private while enjoying the benefits of shared services.
To get started, you need an Apple ID and a compatible device such as an iPhone, iPad, Mac, or even Android. Each family member should also have their own Apple ID. Once you set up Family Sharing as the organizer, you can invite family members to join. This includes sharing apps, books, purchases, photo albums, and even iCloud storage. Plus, you can help locate each other's missing devices.
Family Sharing itself doesn't cost anything extra. However, some services, like additional iCloud storage or an Apple Music family plan, require a subscription. The basic Family Sharing setup is free, making it an easy and cost-effective way to ensure every family member enjoys their favorite Apple services. Gather your family, set up your devices, and start sharing the joy of Apple services today!
Part 2. How to Set Up Apple Family Sharing
Setting up Apple Family Sharing involves a few key steps. This guide will walk you through the process on different devices.
Note: Family Sharing setup must be done through Apple services on iOS devices or Mac. Android users must ensure their Apple Music app is set up with an Apple ID and Family Plan if they are part of a Family Sharing group.
Step 1Set Up iCloud
On iPhone or iPad:
- Tap the Settings app on your home screen.
- Tap your name at the top, then select iCloud.
- Ensure iCloud Drive is turned on. This is crucial for syncing Family Sharing settings and content across devices.
On Mac:
- Click the Apple menu in the top-left corner.
- Select System Settings (or System Preferences on macOS Mojave and earlier), then click Apple ID.
- Ensure you're signed in with your Apple ID and that iCloud is enabled. If you're on macOS Mojave or earlier, click iCloud and check the relevant options.
Step 2Set Up Family Sharing
On iPhone or iPad:
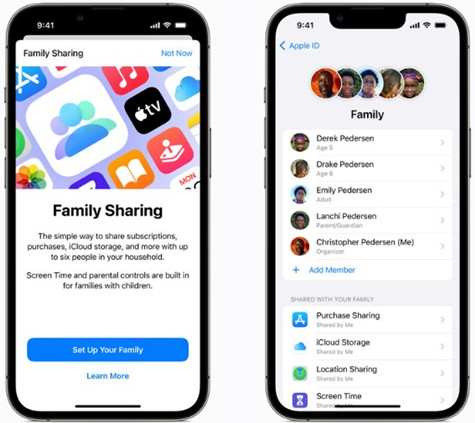
- Tap the Settings app.
- Tap your name, then select Family Sharing.
- Tap Set Up Your Family and follow the on-screen instructions.
- You can invite up to five family members by entering their Apple IDs. They will receive an invitation to join your Family Sharing group and must accept it.
On Mac:
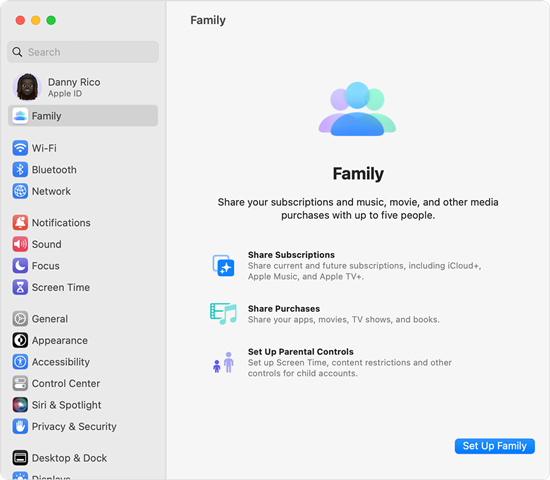
- Click the Apple menu and select System Settings (or System Preferences on older macOS versions).
- Click your name, then select Family Sharing.
- Click Set Up Family and follow the instructions.
- Enter their Apple IDs to send invitations. Family members must accept these invitations to join the group.
Step 3Use Family Sharing
On iPhone or iPad:
- Go to Settings > [your name] > Family Sharing.
- You can see and manage family members, shared subscriptions, and purchases.
- Use apps like Apple Music, Apple TV+, and Apple Arcade. Shared content should appear in these apps under the family account.
On Mac:
- Open System Settings (or System Preferences) and click on Family Sharing.
- Manage family members, subscriptions, and purchases.
- Open apps like Apple Music or Apple TV+ to access shared content.
On Android:
- Launch the Apple Music app.
- Go to Listen Now to see shared playlists and family plan features.
- Use your Apple Music app to enjoy content shared through Family Sharing.
Step 4Subscribe to Family Plan (Optional)
On iPhone or iPad:
- Tap Settings > [your name] > Subscriptions.
- Choose the subscription you want to upgrade (e.g., Apple Music).
- Tap Family Plan and follow the prompts to complete the purchase.
On Mac:
- Launch the App Store.
- Click your name or Sign In and go to View Information.
- Find the subscription service (e.g., Apple Music) and select Family Plan. Follow the instructions to purchase.
On Android:
- Launch the Apple Music app.
- Go to Listen Now > More (three dots) > Account.
- Select Family Plan and follow the on-screen instructions to complete the subscription.
Part 3. How to Use Apple Family Sharing
Apple Family Sharing offers a range of features that allow you and your family to make the most out of shared subscriptions and content. Here's how to fully utilize these features:
Access Shared Apple Music
With an Apple Music Family Plan, all family members can enjoy shared access to the service. Here's how to get started:
- Each family member must sign in to the Apple Music app using their own Apple ID. This ensures that everyone gets a personalized music experience.
- After signing in, each member will have access to the full Apple Music library, including playlists, albums, and exclusive releases.
Example: If you subscribe to Apple Music's Family Plan, your kids can listen to their favorite playlists while you enjoy yours. Each person gets their own personalized music experience.
Download iTunes Store Purchases
Family Sharing lets you download and enjoy purchases made by other family members from the iTunes Store. Here's how to do it:
On Mac:
- Launch the Music app from your Applications folder or dock.
- Go to Account in the menu bar and select Family Purchases.
- Click the name of the family member whose purchases you want to view.
- Find the items you want and click the Download button next to them.
On Windows PC:
- Launch iTunes from your desktop or start menu.
- Click Account in the menu and choose Family Purchases.
- Choose the name of the family member whose purchases you wish to view.
- Click the Download button next to the items you want to add to your device.
Example: If a family member has purchased a movie or album, you can download it to your device and enjoy it without making an additional purchase.
Hide iTunes Store Purchases
Family members can hide their own iTunes Store purchases from the view of other family members. Here's how:
On Mac and Windows PC:
- Open the Music app (Mac) or iTunes (Windows) and go to Account > Family Purchases.
- Click on your name to see your individual purchases.
- Find the items you want to hide, click the More button (three dots), and select Hide Purchase.
- Tip: To view or unhide hidden purchases, go to Account > View My Account (on Windows) or Account Settings (on Mac). Sign in and click Manage next to Hidden Purchases. Here, you can unhide items to make them visible again.
Example: If you've bought an album you prefer not to share with your family, you can hide it from view. Later, you can choose to unhide it if needed.
Part 4. How to Fix Apple Family Sharing Not Working
If you're having trouble with Apple Family Sharing, here's how to get things back on track:
First, make sure everyone is using the correct Apple ID. Family members need to sign in with the Apple ID that was used to invite them to the Family Sharing group. If someone has multiple accounts, they might be using the wrong one.
If everyone is using the right account but issues persist, try having the affected members log out of the Apple Music app and then log back in. Suppose your family members are unable to access Apple Music even though they're correctly signed in. This often fixes synchronization delays and other minor issues.
If the problem continues, as the Family Sharing organizer, remove all family members from the Family Sharing group. Then, log out of Apple Music, sign back in, and re-add each member.
By following these steps, you should be able to fix most problems with Apple Family Sharing and ensure everyone in your family can access the shared services.
Part 5. Best Alternatives to Share Apple Music with Friends/Family
In fact, if you want to share Apple Music with others without signing up for the Apple Music Family Plan, you can use a third-party Apple Music converting tool such as ViWizard Apple Music Converter. This tool allows you to remove the DRM lock from Apple Music songs and convert the music tracks to MP3 format. By doing this, you can share any Apple Music track with your family or friends without needing to join and set up Apple Music Family Sharing.
It's easy to convert DRM-protected Apple Music songs to MP3 with ViWizard Apple Music Converter. The whole process can be completed in just three steps. For a detailed guide on how to convert Apple Music to DRM-free formats, refer to How to Convert Apple Music to MP3.
Key Features of ViWizard Apple Music Converter
Free Trial Free Trial* Security verified. 5, 481,347 people have downloaded it.
- Convert Apple Music songs, albums, playlists, and artists into MP3 for easy access
- Preserve lossless audio, high-resolution lossless, and Dolby Atmos quality
- Strip DRM from Apple Music for unrestricted offline listening
- Save converted audio files while retaining full ID3 tag details



Leave a Comment (0)