Listening to music on Apple Music is a great experience, but sometimes the sound doesn't quite hit the way you want it to. Maybe the bass is too soft, or the vocals aren't as clear as they should be. That's where the Equalizer comes in.
The Equalizer, or EQ, lets you adjust different sound frequencies to get the perfect balance for your ears. Whether you're using headphones, speakers, or even your car stereo, Apple Music makes it easy to fine-tune the sound to your liking.
Not sure how it works? Don't worry, we've got you covered. In this guide, we'll walk you through how to use the Apple Music Equalizer to get the best sound possible, no matter what device you're listening on.
Part 1. Does Apple Music Have an Equalizer?
Before diving into how Apple Music's equalizer works, let's first cover the basics.
What's an Equalizer in Apple Music?
An equalizer (EQ) adjusts the balance of sound frequencies in your music - like bass, mids, and treble. These frequencies shape the way your music sounds: bass adds depth, mids highlight vocals and instruments, and treble enhances clarity.
How Does Apple Music's Equalizer Work?
Apple Music's EQ is simple and effective but limited to predefined presets. These presets let you adjust sound quickly without needing to fine-tune individual frequency ranges.
In comparison, Spotify offers more flexibility with both presets and a customizable equalizer, allowing users to manually tweak specific frequency bands. This level of control can be especially helpful for tailoring audio to different environments, like noisy spaces or high-end headphones.
For most listeners, Apple Music's equalizer works well for enhancing sound quality with minimal effort. However, if you're someone who prefers detailed audio adjustments, the lack of a custom EQ might feel restrictive.
At its core, Apple Music's equalizer provides an accessible way to improve your music playback. While it may not match the customization options of other services, it's a reliable tool for quick sound adjustments that suit everyday listening needs.
Part 2. How to Use Equalizer on Apple Music
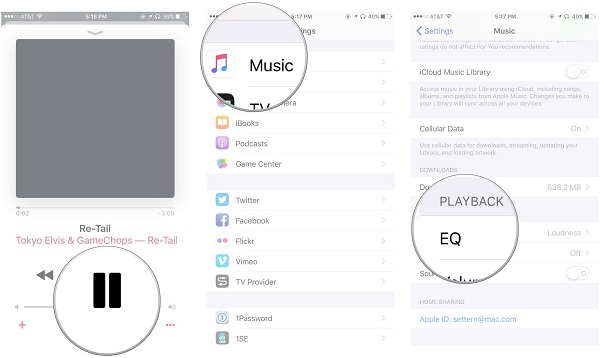
Apple Music includes a variety of EQ presets to enhance your listening experience. Whether you want to boost bass, enhance vocals, or adjust treble, presets like "Bass Booster" and "Vocal Booster" are easy to apply. On iOS, you'll find these options under Settings > Music > EQ, while Mac users can access them directly in the Apple Music app.
Note: If the equalizer is set to "Off," no adjustments are applied to the audio output. The music will play in its original, unaltered form.
How to Enable the Apple Music Equalizer
For iPhone/iPad
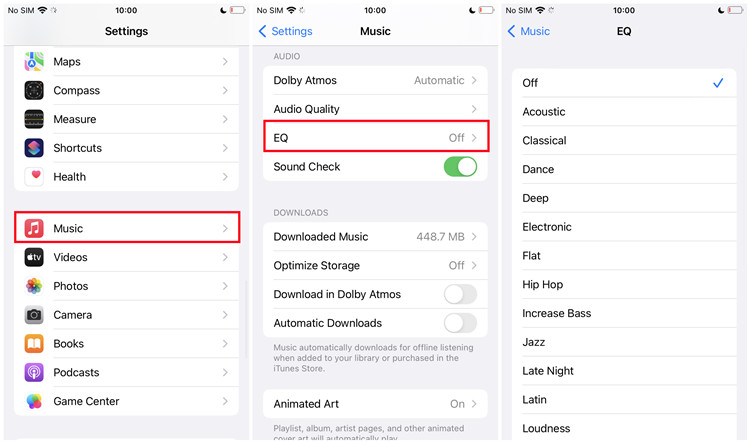
- Open the Settings app on your iPhone or iPad.
- Scroll down and select Music.
- Under the AUDIO section, tap EQ.
- Browse the list of presets, such as Pop, Rock, Electronic, and more.
- Select a preset to apply or choose Off to disable the equalizer.
For Android
Unlike iOS, the built-in equalizer settings for the Apple Music app are no longer available on Android. To customize the sound output for Apple Music, you can explore equalizer apps that adjust audio system-wide on your device. (More details on this in Part 4.)
For Mac
- Open the Music app.
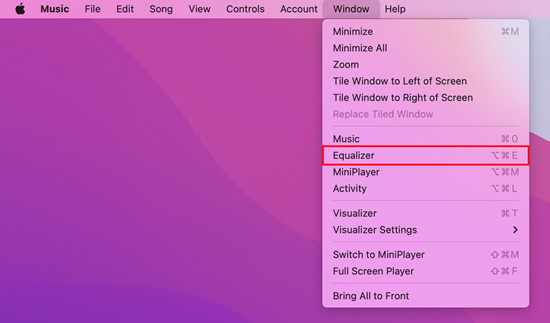
- In the Apple menu, click Window and select Equalizer.
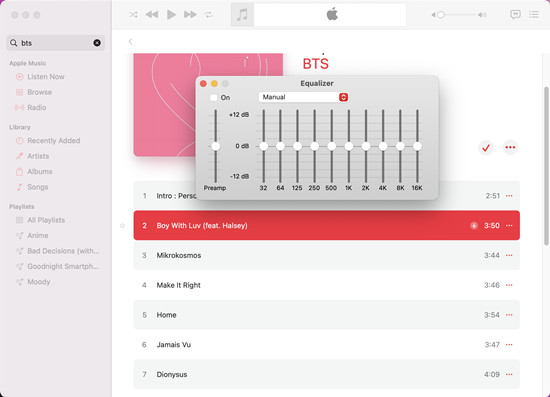
- The Equalizer settings window will appear.
- Click the dropdown menu next to "Manual" to access available presets.
- Select a preset from the menu.
- Check the box next to On to activate the equalizer.
For Windows/Mac (iTunes)
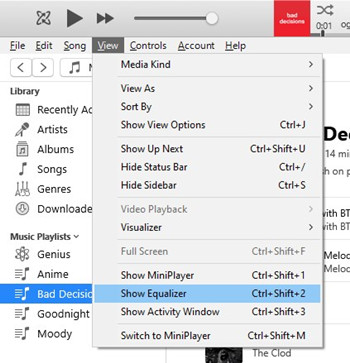
- Open the iTunes app.
- In the top menu bar, click View > Show Equalizer.
- The Equalizer window will open.
- Select a preset from the dropdown menu.
- Check On to activate the equalizer.
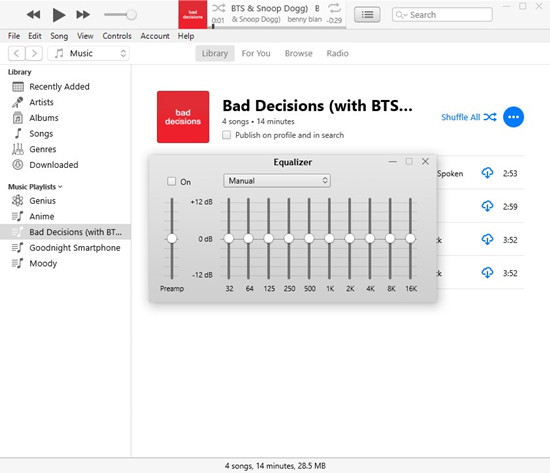
To disable the equalizer, follow the same steps and select Off (iOS) or uncheck On (Windows/macOS). Turning off the equalizer is a great option if you want to hear the music exactly as the artist intended.
Part 3. Best Apple Music Equalizer Settings
Optimizing your sound on Apple Music is about finding the right balance to suit your musical preferences. Here's a guide on how to adjust the EQ for various genres to enhance your listening experience:
Bass Booster: For deep, powerful bass, adjust the bass slider to give your tracks that thumping feel, especially for genres like hip-hop or EDM. Be cautious not to overdo it, as too much bass can cause distortion or drown out other elements in the song. Aim for a punchy, balanced sound that enhances the low end without overpowering the rest of the mix.
Hip-Hop: Hip-Hop combines powerful bass with clear highs. To optimize for this genre, boost the low frequencies for a deep punch and enhance the highs to keep the vocals and pop elements sharp. Avoid boosting too much treble, as this can introduce harshness. The goal is a smooth yet energetic sound with punchy bass and clear highs.
Rock: Rock, metal, and alternative genres benefit from boosting the mids, which emphasize guitar riffs and vocals. Be careful not to excessively boost the treble, as it can cause sharpness and harshness. Balance the bass and mids for clarity and energy without making the sound too muddy or overly bright.
Vocal Booster: This setting is ideal for acoustic or vocal-heavy tracks, helping to bring vocals to the forefront. Boost the mids slightly to make vocals stand out, but avoid overdoing it, as too much can result in a thin or piercing sound. The aim is clear, natural vocals that complement the rest of the track.
Electronic: For EDM, electronic, and dance tracks, the Electronic preset lifts the mids and highs to emphasize crisp beats and synths. Keep the treble in check to avoid harshness, and maintain a clean, energetic sound. This setting adds punch and energy without causing ear fatigue during extended listening.
Classical: The Classical preset enhances orchestral music by boosting low mids and highs, bringing out the depth of strings and woodwinds. Keep the bass moderate to preserve the clarity of orchestral instruments. This setting provides a balanced and immersive listening experience that highlights the intricacies of classical compositions.
Acoustic: The Acoustic preset is perfect for singer-songwriter genres, emphasizing warmth and clarity in guitars and vocals. It slightly boosts the low mids and reduces the treble to avoid sharpness. This setting is ideal for relaxed listening, offering a smooth and balanced sound that highlights the natural beauty of acoustic instruments.
Flat: The Flat setting provides a neutral sound with no boost or reduction in any frequency range. This is great if you want to experience music as it was mixed, without any alterations. It's ideal for those who prefer a natural, balanced sound without extra emphasis on any particular frequency.
Extra Tip: Create Your Own Equalizer Presets for Apple Music
By creating and saving custom equalizer presets, you can apply them whenever you want to fine-tune the sound for your unique music listening experience within the Apple Music app.
For Mac
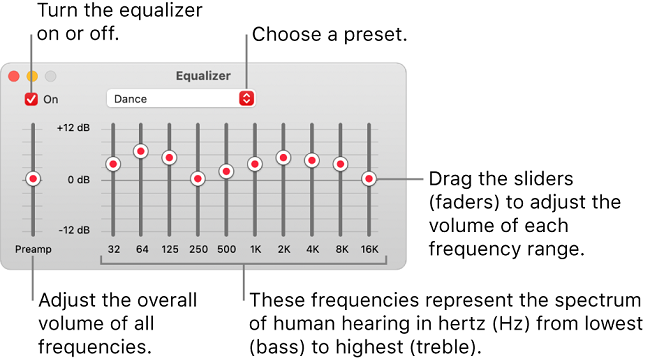
- In the Music app on Mac, choose Window > Equalizer.
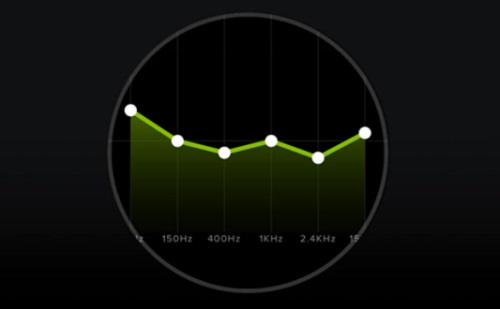
- Drag the frequency sliders to adjust the frequencies. To increase or decrease the volume of a frequency (in decibels), drag the sliders (faders) up or down.
- From the pop-up menu, choose Make Preset to save your custom settings.
- To manage your presets, select Edit List.
- Navigate to the song/album/playlist to set a particular equalizer preset for it.
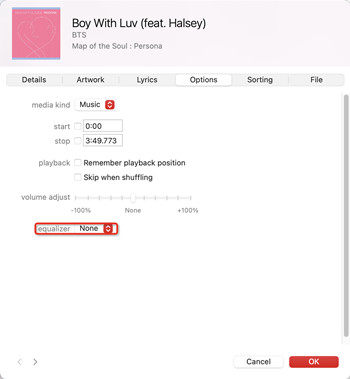
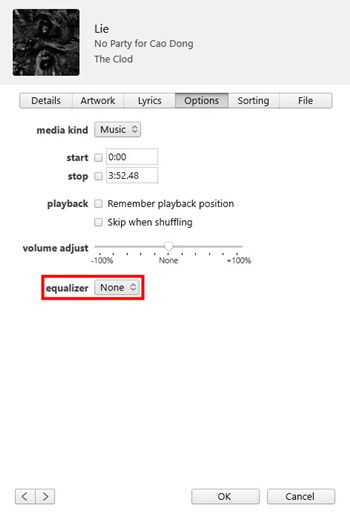
- Control-click on the selected song and choose "Get Info" from the context menu.
- Click Options, and choose a setting from the Equalizer Preset pop-up menu. You can only set it for one song at a time.
- To choose presets for other songs, click the Next or Previous buttons.
- Once done, click OK. The equalizer preset you choose applies to the songs whenever you play it.
For Windows/Mac (iTunes)

- In the iTunes app (on both Windows PC and Mac), choose View > Show Equalizer.
- Drag the frequency sliders to adjust the volume of each frequency.
- From the pop-up menu, choose Make Preset to save your custom settings.
- To rename or delete a preset, select Edit List from the pop-up menu.
- Navigate the song/album/playlist where you wish to set a particular preset.
- Right-click on the selected song and choose "Song info".
- Click Options, and choose a setting from the equalizer drop-down menu.
- To set it for other songs, use the Next or Previous buttons.
- Click OK to save these equalizer settings.
Pro Tip: Enable Sound Check on Apple Music
Enable Apple Music's Sound Check feature to normalize volume levels across all songs, providing a consistent listening experience. This is especially useful when switching between tracks that vary in loudness, reducing the need for manual volume adjustments.
Part 4. Best Alternatives Apple Music Equalizer Apps
When looking to improve your Apple Music experience, it's essential to consider the best options for your device. Windows and macOS offer systemwide equalizers, which enhance audio across all apps. Most Android phones also include built-in EQ settings. However, iOS only allows EQ adjustments within specific apps like Apple Music, rather than systemwide.
In addition to these options, many headphones come with companion apps that feature built-in equalizers. For example, Sony's XM series headphones pair with the Headphones Connect app, allowing you to fine-tune sound frequencies to your liking. If your headphones include such an app, it can be an excellent alternative for customizing systemwide sound on iOS, similar to the EQ functionality available on Android devices.
Here are some of the best EQ apps that work well with Apple Music to give you more control over your sound:
Boom: Music Player & Equalizer
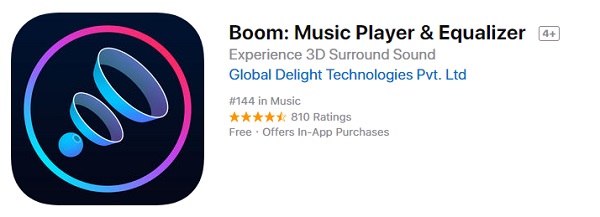
Boom is a customizable equalizer app for Apple Music. It offers 8-band or 16-band frequency control to enhance your sound. Boom also has 3D surround sound, making it perfect for a more immersive audio experience on any device.
Features:
- 8-band or 16-band customizable equalizer
- 3D surround sound for a richer experience
- Bass booster for stronger low frequencies
- Easy-to-use interface for quick adjustments
- Works with both headphones and speakers
Requirements:
- iOS device with Apple Music
- Download from the App Store
- No subscription needed for basic features
- Compatible with iPhone, iPad, and iPod touch
Boom is ideal for those who love deep bass and want fine control over their Apple Music sound.
Equalizer Fx: Bass Booster App
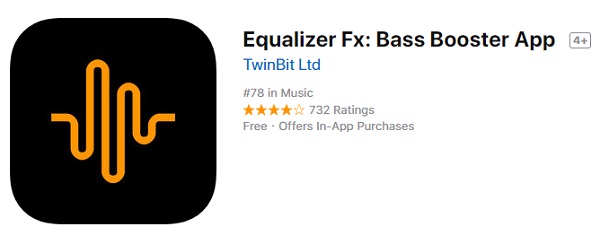
Equalizer Fx is a simple app that works well with Apple Music. It has a 7-band equalizer and bass booster. There's also a virtualizer to add spatial effects. It's great for casual listeners who want easy sound improvements.
Features:
- 7-band equalizer for adjusting frequencies
- Bass booster to enhance low-end sound
- Virtualizer for extra spatial effects
- Easy and intuitive interface
- Smooth Apple Music integration
Requirements:
- iOS or Android device
- Apple Music for integration
- Free with optional in-app purchases
- Compatible with iPhone, iPad, and Android smartphones
Equalizer Fx is perfect for users who want to quickly improve their audio, especially for bass-heavy music.
Equalizer+ Pro: HD Music Player

Equalizer+ Pro is a premium app with a 10-band equalizer, bass booster, and visualizer effects. It allows you to control your sound in detail. It also offers presets for easy adjustments.
Features:
- 10-band equalizer for precise control
- Bass booster to enhance low frequencies
- Visualizer effects for better sound experience
- 10 preset sound profiles for quick changes
- Works well with Apple Music
Requirements:
- iOS device with Apple Music
- Premium version costs $4.99 (or subscription-based)
- Download from the App Store
- Compatible with iPhone, iPad, and iPod touch
Equalizer+ Pro is best for audiophiles who want deep customization and are willing to pay for advanced features.
Boom 3D
Boom 3D is a powerful app that adds 3D surround sound to your music. It has customizable equalizer settings and a bass booster. This app is great for a dynamic audio experience with Apple Music.
Features:
- 3D surround sound for better audio depth
- Customizable equalizer for personalized sound
- Bass booster for stronger low frequencies
- Works with both headphones and speakers
- Smooth Apple Music integration
Requirements:
- iOS or macOS device
- Apple Music for full integration
- Available on the App Store (iOS) or as a macOS app
- Works with iPhone, iPad, iPod touch, and macOS devices
Boom 3D is perfect for those who want a more immersive listening experience with Apple Music.
Equalizer - Volume Booster EQ
Equalizer - Volume Booster EQ is a versatile app with a customizable equalizer and volume booster. It works well with Apple Music but may have some stability issues. Despite this, it's still popular for improving both sound quality and volume.
Features:
- Customizable equalizer for sound adjustments
- Volume booster for increased audio output
- Bass booster for deeper low frequencies
- Simple and easy-to-use interface
- Works with Apple Music
Requirements:
- iOS or Android device
- Apple Music or other music apps for integration
- Free with optional in-app purchases
- Compatible with iPhone, iPad, and Android smartphones
Equalizer - Volume Booster EQ is best for users who need a versatile app to improve both sound quality and volume.
Part 5. How to Play Apple Music on Other Platforms
The Apple Music Equalizer apps from above all work find, but there are problems surrounding the permission from Apple Music. In most cases, users will be warned that Apple Music songs are protected and the Boom effects can't be applied. To fix this error, a piece of software like ViWizard Audio Converter can help.
ViWizard Audio Converter: Apple Music Converter
ViWizard Apple Music Converter is a smart Apple Music converter that can help users unlock protection from Apple Music tracks and convert Apple Music to MP3. This tool also supports iTunes audios, Audible audiobooks as well as common audios. It runs at a 30X faster speed and will keep the ID3 tags.
You can follow this instruction to remove the protection from Apple Music with ViWizard Audio Converter for Mac or Windows.
Key Features of ViWizard Apple Music Converter
Free Trial Free Trial* Security verified. 5, 481,347 people have downloaded it.
- Convert Apple Music songs, albums, playlists, and artists into MP3 for easy access
- Preserve lossless audio, high-resolution lossless, and Dolby Atmos quality
- Strip DRM from Apple Music for unrestricted offline listening
- Save converted audio files while retaining full ID3 tag details
Step 1Add Apple Music/iTunes Music to ViWizard
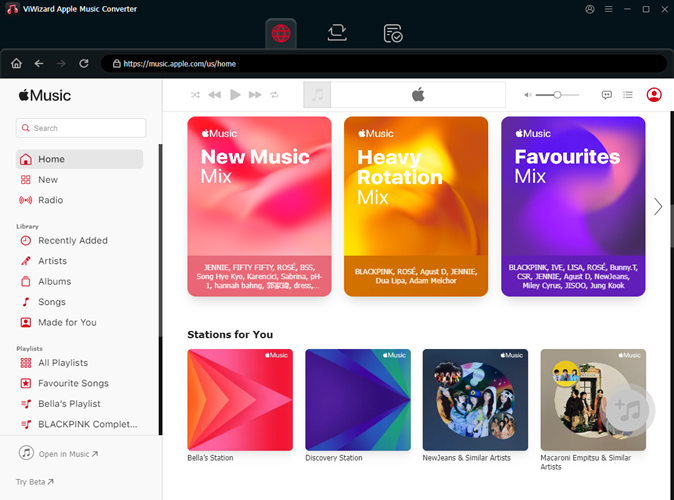
Launch ViWizard Audio Converter and agree to launch the iTunes software on the computer. This will ensure the direct access to your library. Alternatively, you can click the Add Music button at the top of the program to load your library there, including your music and audiobooks. Select and add music or audiobooks, and ViWizard will display a list for you.
Step 2Adjust Output Format
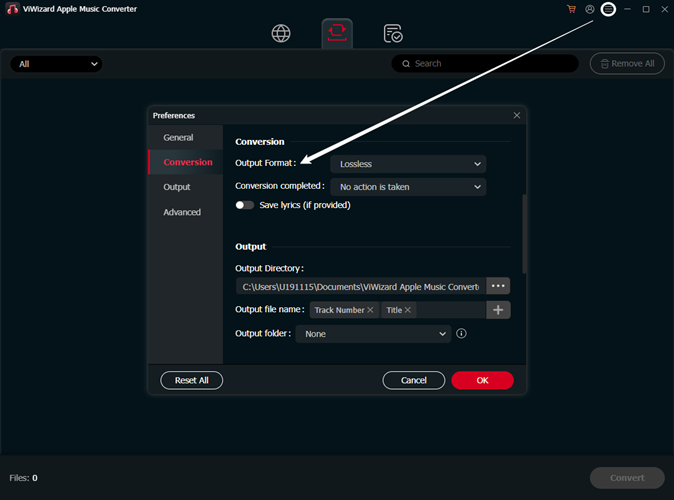
Then, you should adjust some related output formats for the selection. Click on the Format tab at bottom, and choose the desired format, such as MP3, AAC, or WAV. You can also adjust bit rate, sample rate, channel and more there. Once done, click OK to save.
Step 3Convert and Download Apple Music
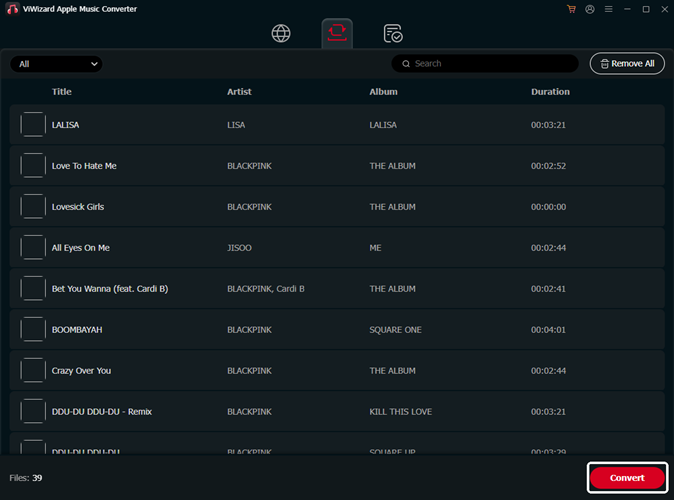
Back to the main interface of ViWizard Audio Converter and click on the Convert button, and the conversion will start and finish at a 30x super faster speed. You can then head over to the folder to check to see the downloaded music files.
Conclusion
You should have all the exclusives offered here. Remember to come back for our updates of what's new for Apple Music Equalizer!



Leave a Comment (0)