Most Apple Music users would like to access Apple Music contents and features on multiple devices at the same time. However, Apple Music does have devices limit just like other streaming music services like Spotify. And if you don't aware of the device limit, you may receive a message: "You've Reached Your Device Limit. You have started to play Apple Music content on your other devices."
When you receive this message, it means that you cannot connect any additional devices to your Apple Music account until you remove some of the existing devices or upgrade to a subscription plan that allows more devices to be connected.
In this post, we'll tell how you can resolve this issue. If you wish to bypass this device limit and play Apple Music on all your devices, you can also benefit from our exclusives.
Part 1. Understanding Apple Music Device Limit
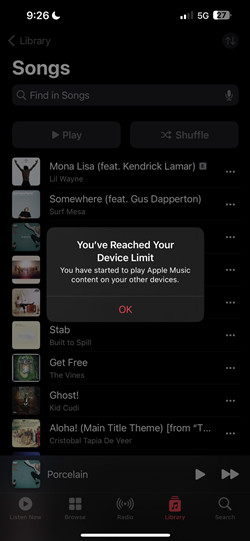
If you try to connect your Apple Music account on a new device, you may see a message saying, "You've Reached Your Device Limit." This can be one of the most frustrating moments for any Apple Music lover. So, what exactly is the Apple Music device limit? Simply put, it's a restriction on the number of devices that can be associated with a single Apple Music account at one time. Apple sets this limit to ensure fair usage and to prevent unauthorized sharing of accounts. With Apple Music, you can have up to 10 devices connected to your account, but no more than 5 of these can be computers.
To resolve this issue, you have a few options. You can remove some of the devices that you no longer use or sign out of Apple Music on unused devices to free up space for new ones. You may need to check your account settings, identify the devices you no longer need, and remove them from your account. Alternatively, you can upgrade your Apple Music subscription to a higher tier or turn to tools like ViWizard that allow for more connected devices.
By knowing about the device limit and how to manage it, you can ensure that your music is always ready to play, no matter which device you're using. Stay tuned for tips and tricks on managing your Apple Music devices effectively.
Part 2. How to Fix Device Limit Reached on Apple Music
If you've reached the device limit on your Apple Music account, don't worry! There are several ways to fix this issue. Here are a few options to get you started:
Option 1: Remove Devices Linked with Your Apple ID
Removing devices you no longer use can help free up space for new ones. Here's how to do it:
Way 1: Using Your Apple Devices
For iPhone and iPad:
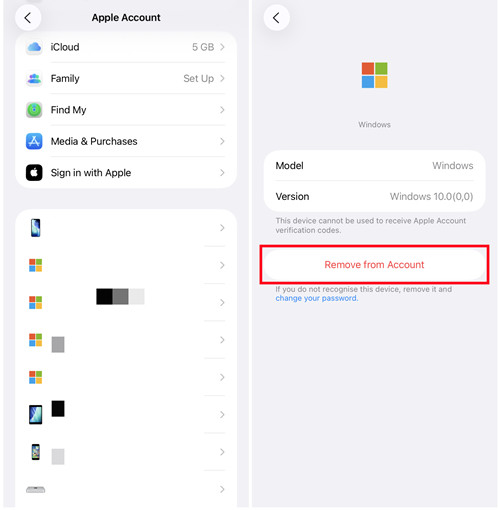
- Open the Settings app.
- Tap your name at the top of the screen to open your Apple ID settings.
- Scroll down to see a list of devices linked to your Apple ID.
- Tap on the device you want to remove.
- Tap Remove from Account and confirm your choice by tapping Remove again in the pop-up window.
For Mac:
- Click the Apple menu in the top-left corner of the screen and select System Settings.
- Click your name (Apple ID) in the sidebar.
- Scroll down to see the list of devices linked to your Apple ID.
- Select the device you want to remove.
- Click Remove from Account, then click Remove again in the confirmation dialog.
Alternatively, using the Music app on your iPhone or iPad:
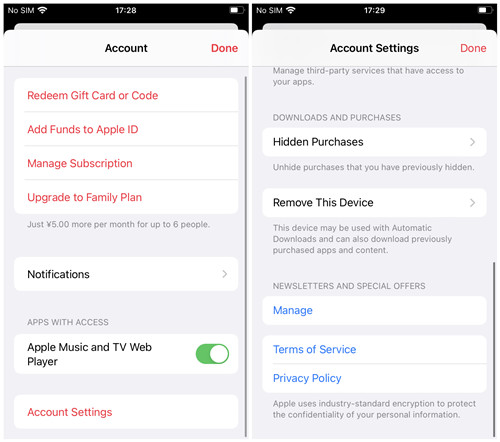
- Open the Music app.
- Tap on the Profile button (usually your photo or initials) in the upper-right corner.
- Tap Account Settings.
- Tap Remove This Device and confirm your choice.
Way 2: Using iTunes or Music App on Your Computer
For Windows PC and Mac:
- Open the iTunes or Music app.
- Click Account in the menu bar and select View My Account.
- Sign in with your Apple ID if prompted.
- In the Account Information page, scroll down to the iTunes in the Cloud section.
- Click Manage Devices to see all devices linked to your account.
- Click Remove next to the devices you want to remove and confirm your choice.
Option 2: Sign Out of Apple Music on Unused Devices
If you no longer use a device that is signed in with your Apple Music account, sign out of Apple Music on that device to free up space.
For Android:
- Open the Apple Music app on your Android smartphone.
- Tap the More button (three vertical dots) in the upper-right corner.
- Tap Account.
- Tap Sign Out and confirm your choice.
For Windows PC:
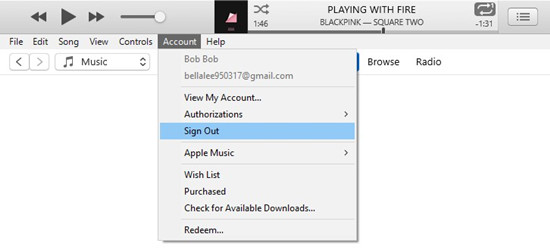
- Open the iTunes app.
- Click Account in the menu bar.
- Select Sign Out and confirm your choice.
For Mac:
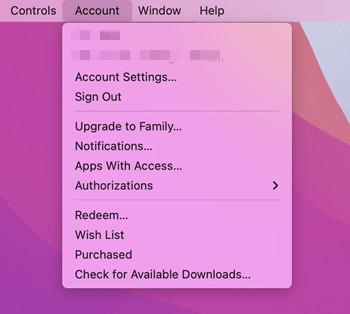
- Open the Music app.
- Click the Account menu in the top menu bar.
- Select Sign Out and confirm your choice.
For iPhone and iPad:
- Open the Settings app.
- Tap your name at the top of the screen.
- Scroll down and tap Sign Out.
- Enter your Apple ID password and tap Turn Off.
- Confirm that you want to sign out by tapping Sign Out again in the pop-up window.
Option 3: Upgrade Your Apple Music Subscription
Apple Music has different subscription tiers that allow you to connect more devices. If you have reached your device limit on an individual plan, consider upgrading to a Family plan.
For iPhone and iPad:
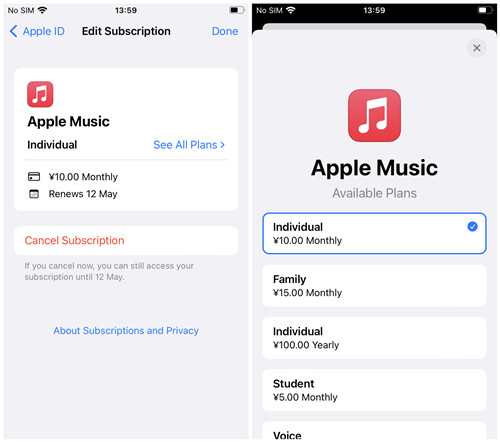
- Open the Settings app.
- Tap your name and then tap Subscriptions.
- Tap Apple Music.
- Tap See All Plans.
- Tap Family.
- Follow the on-screen instructions to complete your purchase. This typically involves confirming your payment information and agreeing to the new subscription terms.
For Mac:
- Open the App Store app on your Mac.
- Click your name at the bottom of the sidebar.
- Click Account Settings at the top of the window. You may be asked to sign in.
- Scroll to Subscriptions and click Manage.
- Click Edit next to the Apple Music subscription.
- Choose a Family subscription and follow the on-screen instructions to complete the upgrade.
For Windows PC:
- Open the iTunes app on your PC.
- Click Account in the menu bar and select View My Account.
- Scroll to the Settings section.
- Click Manage next to Subscriptions.
- Click Edit next to Apple Music subscription.
- Choose a Family subscription and follow the on-screen instructions to complete the upgrade.
Upgrading to a Family plan allows you to share your subscription with family members or simply connect more devices for yourself. You can also turn off Share with Family if you prefer to use the extra connections just for yourself.
Part 3. Best Alternatives to Fix Apple Music Device Limit [Multiple Devices]
Once you have made the necessary changes, you should be able to connect to Apple Music without receiving the "You've Reached Your Device Limit" message. However, you may want to bypass this device limit so as to access your favorite Apple Music on as many devices as you have. You're highly recommended to download Apple Music as music files and transfer them to your devices. This way, you can play Apple Music even on the most common media players on your devices without the device limit.
As you may know, Apple Music has DRM protection. If you want to download Apple Music to multiple devices for offline use, you need to use an Apple Music downloader called ViWizard Apple Music Converter. ViWizard Apple Music Converter is one of the best Apple Music downloaders that helps users download any music tracks — even the entire music library — to a compatible format. For output formats, you can choose MP3, M4A, M4B, WAV, AAC, or FLAC. If you wish to download other contents beyond Apple Music songs, iTunes files, music, podcasts, and audiobooks can also be downloaded using this tool. The best part is that full metadata and lossless audio will be preserved with the downloaded music files.
Key Features of ViWizard Apple Music Converter
Free Trial Free Trial* Security verified. 5, 481,347 people have downloaded it.
- Convert Apple Music songs, albums, playlists, and artists into MP3 for easy access
- Preserve lossless audio, high-resolution lossless, and Dolby Atmos quality
- Strip DRM from Apple Music for unrestricted offline listening
- Save converted audio files while retaining full ID3 tag details
Step 1 Add Apple Music Songs
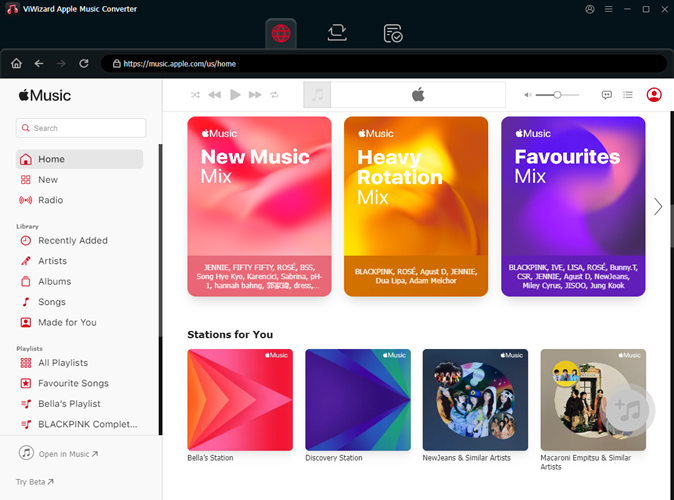
Launch the ViWizard Audio Converter on your PC or Mac, and choose to launch or relaunch the iTunes app. In the iTunes app, go to what you want to download to your devices and add it to ViWizard. The traditional drag-and-drop method should work. Alternatively, you can click the Add Music button from the top to load your music library.
Step 2 Adjust Output Format
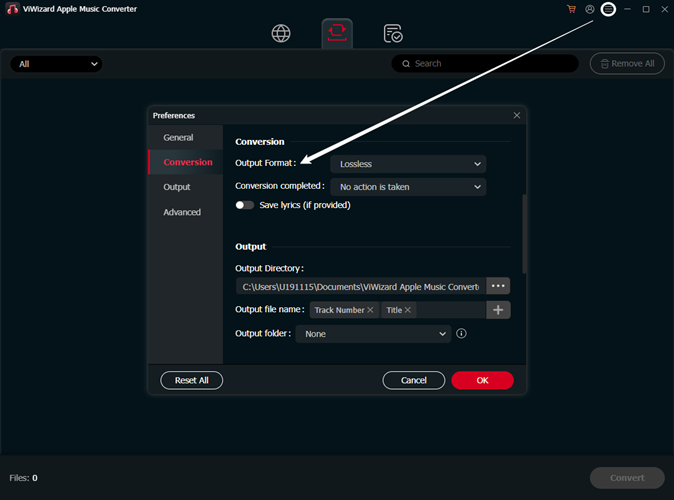
Click the Format tab at the bottom of the screen. You can choose one of the formats that's compatible with your devices, such as MP3, WAV, or FLAC. You can also adjust the codec, channel, sample rate, or bit rate. Click OK to save your changes.
Step 3 Download Apple Music Songs
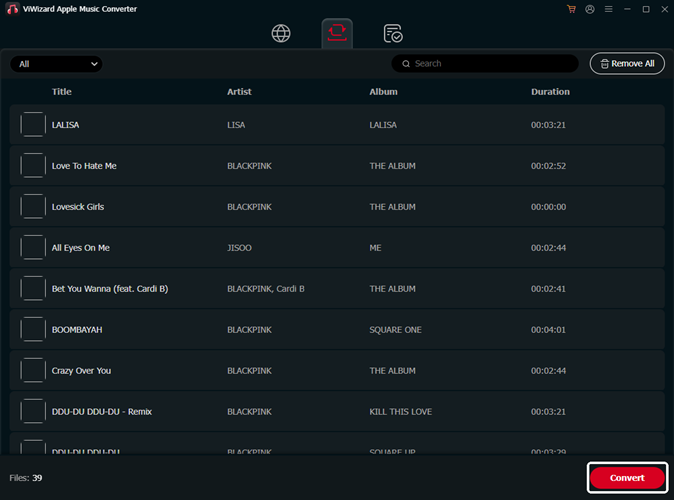
Return to the main interface of ViWizard Audio Converter. To start the conversion, click the Convert button in the lower-right corner. The conversion should be completed at a 30x faster speed. All the music files will be exported to the output location. To find those music files, click the Open button next to the output path at the bottom.
Step 4 Transfer Apple Music Songs to Other Devices
Connect the device you want to transfer to the computer via a USB cable. To transfer your Apple Music downloads to the device, simply drag and drop or copy and paste the folder or files there.

Leave a Comment (0)