
Apple Music Crossfade is a feature that allows for a smooth transition between songs by overlapping the end of one track with the beginning of the next. It can create a seamless listening experience without any abrupt pauses between songs. After years of asking for the Crossfade feature, Apple Music users can now enjoy the seamless listening experience with it enabled across devices, - now including iPhone.
The crossfade may be a few years old, but several months ago Apple at last gave the iOS an update users have long requested: Crossfade. This new update means the Ios Music app users will no longer have to use an alternative app, such as Mixonset to enable the songs transition. You can enable it under the Music section in the Settings app, where Apple also offers other settings together with crossfade, such as Sound Check.
Part 1. How to Crossfade Apple Music on iPhone
Before Apple rolls out the crossfade feature as part of the iOS 17 update, users on Windows, Mac, and Android can already access this feature effortlessly. Additionally, third-party tools offer a similar experience. If you prefer the crossfade feature found in other music services, such as Spotify, you can utilize the ViWizard Apple Music Converter to achieve the same effect. This can be particularly useful as using the crossfade feature on the beta version of iOS 17 may have limitations that could be bothersome to some users.
1.1: Using iOS Update
If you've been waiting for the crossfade feature on your iPhone, rejoice! Apple Music has introduced it with the iOS 17 update. Follow these simple steps to enable crossfade on your iPhone:
How to Turn on Crossfade on Apple Music (iPhone):
- Open the Settings app on your iPhone.
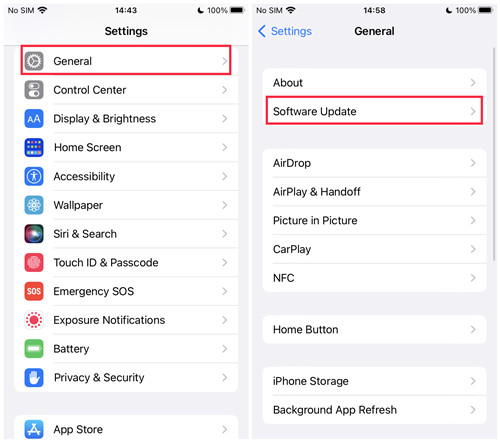
- Scroll down and tap on General.
- Select Software Update.
- If iOS 17 is available, tap Download and Install.
- After the update, go back to Settings.
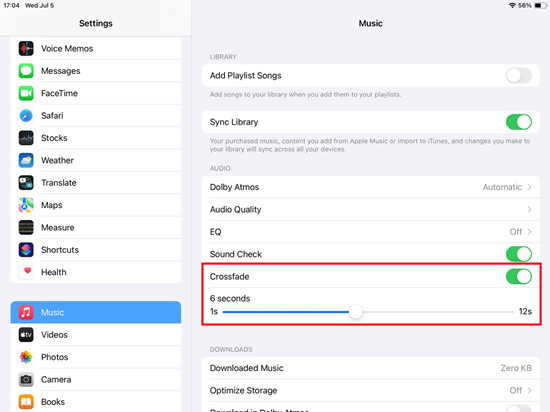
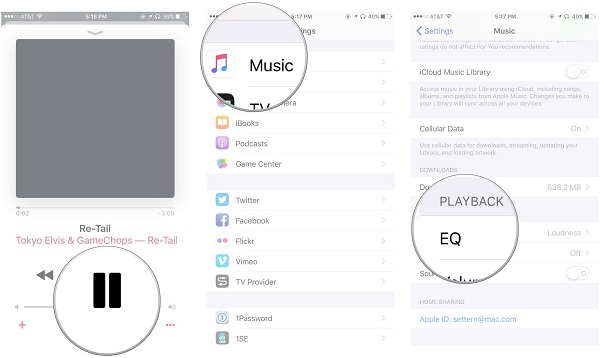
- Scroll down to Music.
- Toggle the switch next to Crossfade under the AUDIO section.
- Choose a crossfade duration between 1s to 12s according to your preference.
1.2: Using Mixonset
For a more personalized crossfade experience, you can use the Mixonset app. It's free, Apple Music-compatible, and uses AI to create smooth transitions between your favorite tracks. Here's how to use Mixonset for crossfading:
How to Turn on Crossfade on Mixonset (iPhone/Android):
- Connect your iPhone to your computer using a USB cable.
- Use Finder (Mac) or File Explorer (Windows) to transfer converted Apple Music files to your mobile.
- Open Google Play (Android) or the App Store (iPhone).
- Search for "Mixonset" and download the latest version.
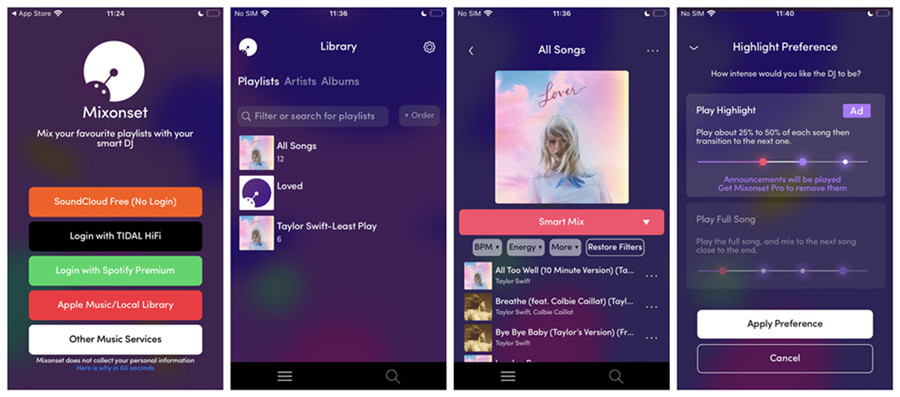
- Open the Mixonset app.
- Tap on "Apple Music/Local Library."
- Allow Mixonset to access your Apple Music Library.
- Mixonset will load your Apple Music Library or iTunes Library.
- Navigate to your preferred category (Playlists, Artists, Albums).
- Tap on "Smart Mix" to let Mixonset automatically mix your selected track from Apple Music.
- Optionally, customize more settings based on your preferences.
Now you can enjoy seamlessly crossfaded tracks on your iPhone using Mixonset. Happy listening!
Part 2. How to Crossfade Apple Music on Android
Apple Music has finally brought this much-requested feature to iOS. Interestingly, Android users have been enjoying this functionality for a while. Here's how you can set up crossfade on your Android device:
How to Turn on Crossfade on Apple Music (Android):
- Launch the Apple Music app on your Android device.
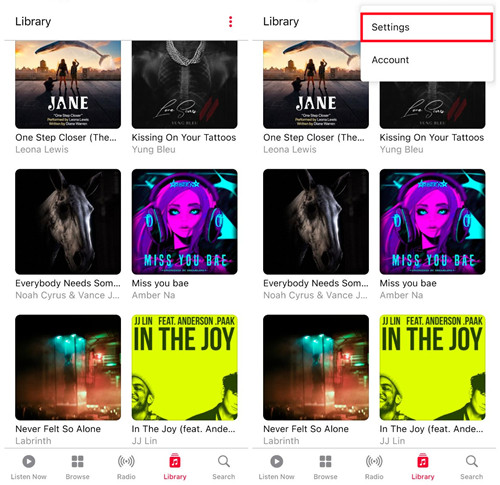
- Tap on the vertical three dots icon located at the top-right corner of the screen.
- Select "Settings."
- Scroll down to "Audio" and then to "Crossfade."
- If Crossfade is set to Off, switch it to either Automatic or Manual.
- Automatic: This option sets the crossfade length automatically based on what's playing.
- Manual: For more control, choose Manual and adjust the crossfade duration. You can set it anywhere from 1 to 12 seconds. The higher the value, the longer the crossfade effect.
- Return to the home page of the Apple Music app.
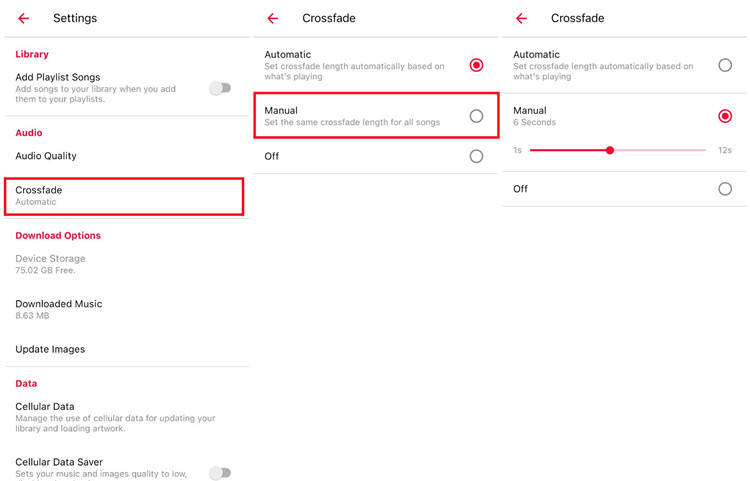
Start playing Apple Music and notice the seamless transitions between songs with the newly enabled crossfade feature.
Part 3. How to Crossfade Apple Music on PC
Apple Music introduced the crossfade feature several years ago, catering to both Windows and Mac users. To enable crossfade on your Windows PC, follow these straightforward steps:
How to Turn on Crossfade on iTunes (PC & Mac):
- Launch the iTunes app on your Windows PC.
- Click on the "Edit" button located at the top of the iTunes window.
- From the context menu, select "Preferences."
- Within the Preferences window, go to the "Playback" tab.
- Check the box next to "Crossfade Songs."
- Move the crossfade slider to your desired duration, ranging from 1 to 12 seconds.
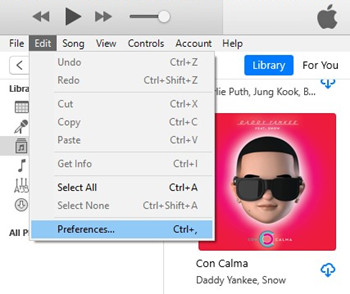
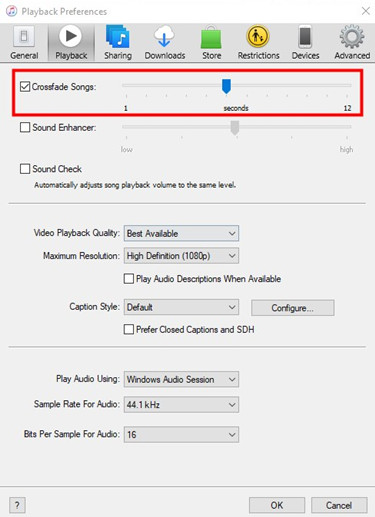
Now you've successfully activated the crossfade feature on your Windows PC. The next time you play Apple Music, enjoy the seamless transitions between tracks. Experiment with different crossfade durations to find the perfect setting for your musical taste.
Part 4. How to Crossfade Apple Music on Mac
Enabling the crossfade feature on your Mac is a breeze. Follow these simple steps to seamlessly transition between your favorite Apple Music tracks:
How to Turn on Crossfade on Apple Music (Mac):
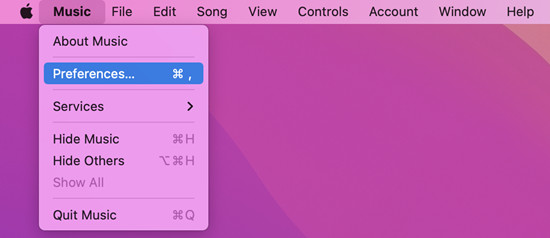
- Launch the Music app on your Mac.
- Click on "Music" in the Apple menu at the top of your screen.
- From the dropdown menu, select "Preferences."
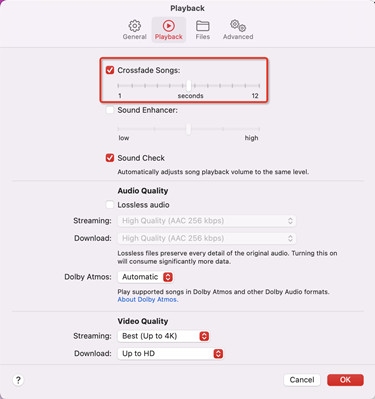
- Inside the Preferences window, click on the "Playback" tab.
- Check the box next to "Crossfade Songs."
- Set the crossfade length to your liking, ranging from 1 to 12 seconds.
Part 5. Alternatives to Apple Music Crossfade Not Working
While the crossfade feature on Apple Music enhances the listening experience, there can be instances where users encounter issues. One common problem is that the crossfade feature may not work as expected, especially when dealing with albums on Mac. Some users have reported issues with the crossfade feature not functioning correctly, particularly when playing albums on Mac. If you've experienced this inconvenience, don't worry - there's a workaround that involves using a sophisticated audio converter.
Apple Music files are encrypted, which means they can only be recognized and played within the Apple Music app. To overcome this limitation and potentially fix the crossfade issue, you can use a powerful audio converter like ViWizard. Here's how ViWizard can help:
ViWizard Apple Music Converter is a great tool to convert Apple Music to MP3. You can play your Apple Music playlists on the device you like when you get Apple Music MP3 files. You can follow the following detailed steps to free your Apple Music. Ensure you have downloaded and installed iTunes and ViWizard on your desktop.
Key Features of ViWizard Apple Music Converter
Free Trial Free Trial* Security verified. 5, 481,347 people have downloaded it.
- Convert Apple Music songs, albums, playlists, and artists into MP3 for easy access
- Preserve lossless audio, high-resolution lossless, and Dolby Atmos quality
- Strip DRM from Apple Music for unrestricted offline listening
- Save converted audio files while retaining full ID3 tag details
Step 1Import Apple Music Files for Converting Them
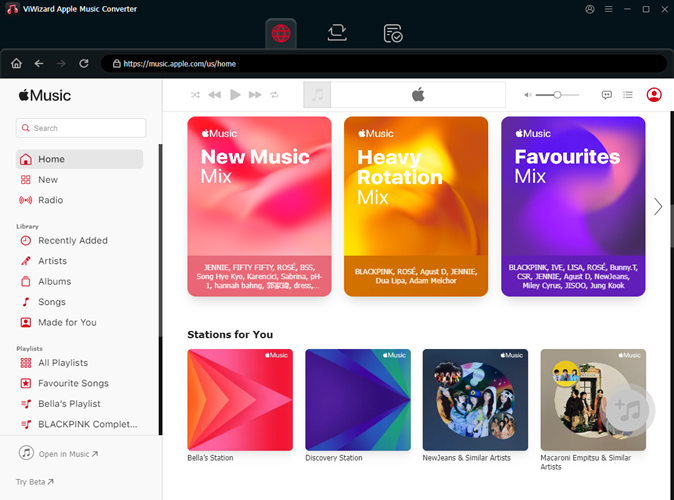
Launch ViWizard Audio Converter on your computer. The iTunes app will be launched in a second. To import your Apple Music playlists to ViWizard for conversion, click the Load iTunes Library option. You may also import the local Apple Music files by selecting Add Files. It's available to drag and drop the files into the converter.
Step 2Configure the Output Format and Audio Parameters
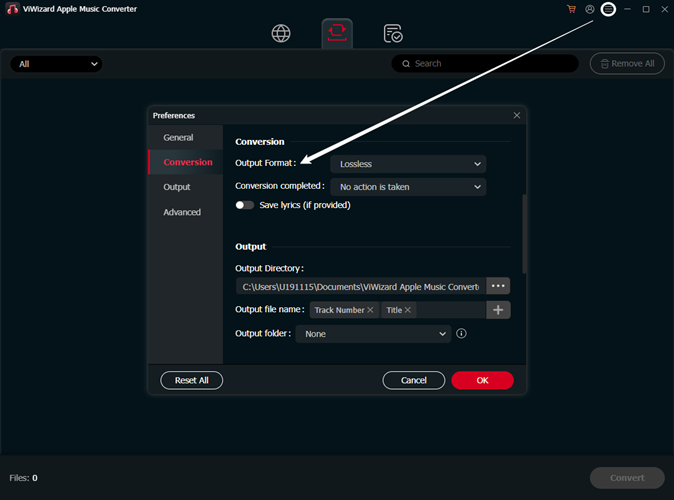
You may now change the output audio specs of your Apple Music by selecting the Format tab. We recommend that you choose MP3 as the output audio format so that it will play well on other devices. To fit your individual needs, you may also adjust the audio quality by altering the codec, channel, sample rate, and bit rate.
Step 3Free Apple Music Playlists within A Click
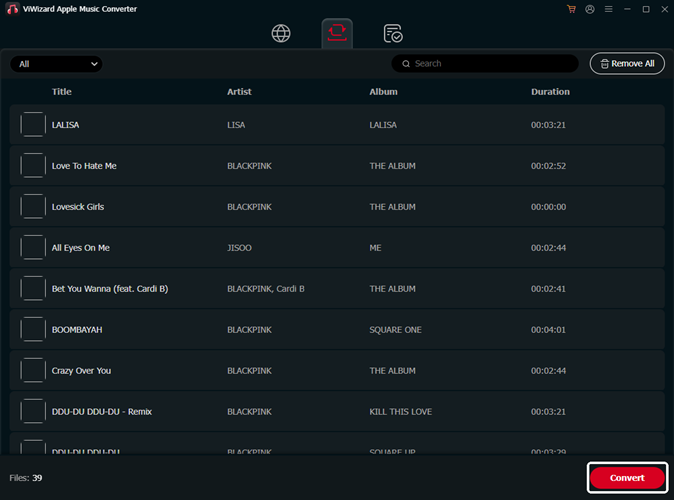
When you've selected all of the criteria, click the Convert button in the lower right corner to make ViWizard convert Apple Music right away. After the conversion is complete, click the Converted button at the top to navigate to the converted history and browse all of the converted Apple Music recordings.
Step 4Crossfade Apple Music Songs with other Apps
You're now able to crossfade these converted Apple Music files with the crossfade settings from other applications, such as the Spotify Music app or the Mixonset for free. Go to your preferences.
How to Turn on Crossfade on Spotify (PC/Mac):
If you want to enjoy seamless transitions between songs on Spotify, follow these steps to enable the crossfade feature on your PC or Mac:
- Open the Spotify app on your computer.
- Upon opening Spotify, go to Settings:
- For Windows: Click the Profile icon, and select Settings.
- For Mac: From the Apple menu, click Spotify > Edit > Preferences.
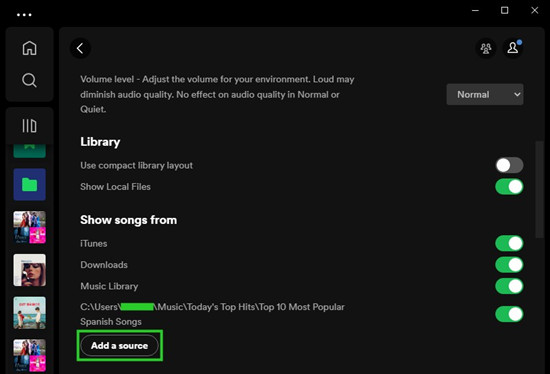
- Scroll to Local Files and enable "Show Local Files."
- Under "Show songs from," click "Add a source."
- In the Finder or Files Explorer pop-up, navigate to the folder where your converted Apple Music files (e.g., .mp3, .mp4, .m4a) are stored, such as the "Music" folder.
- Click Open to add the selected folder. Spotify will display the added source under existing options.
- On the desktop, go to Your Library in the side menu.
- Under "Playlists," access Local Files. Now, Spotify's crossfade feature is available for both Apple Music files and Spotify music.
- Return to Settings.
- Scroll to Playback > Crossfade songs and enable the toggle.
- Once enabled, adjust the crossfade duration to your preference, ranging from 1 to 12 seconds.
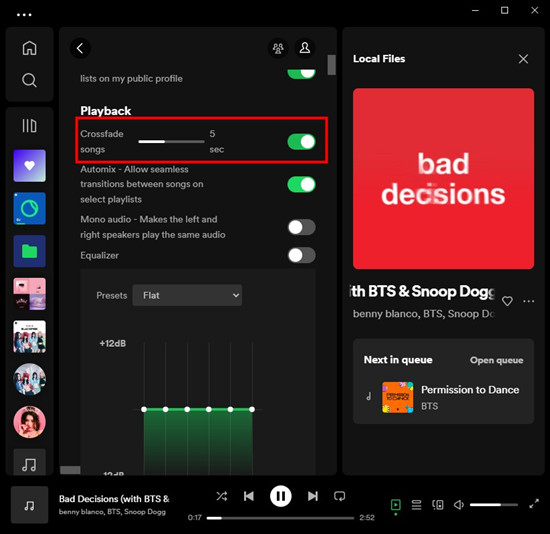
Now, return to Your Library, play your Apple Music playlist, and enjoy the smooth transition between songs. The crossfade feature enhances your Spotify experience by seamlessly blending Apple Music files and Spotify tracks. Adjust the crossfade duration to suit your musical taste and preferences.
Conclusion
After reading this post, you may know how to crossfade on Apple Music. If you are an iPhone/Android/Windows/Mac user, you can find the crossfade under the playback setting in the app with the guides above. To play Apple Music on other devices you like, you can use ViWizard Audio Converter to convert Apple Music to MP3 or other open formats. Then you can transfer the converted Apple Music to other devices without restriction. Why not click the downloading button below to have a try now? You won't be disappointed.



Leave a Comment (0)