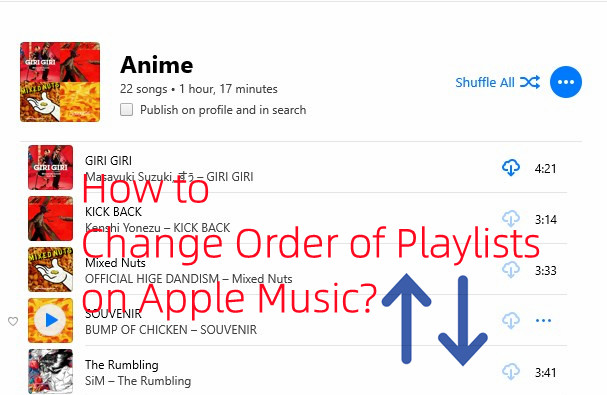
I'll be the first to admit, my playlists are rarely as organized as I'd like them to be. Sometimes, I just throw songs together, not thinking much about the order. But then, when I hit play, I realize it's all out of whack. That one upbeat track right next to a slow ballad? It just doesn't work. That's when I know it's time to take a moment and reorder things.
Getting your playlists organized isn't as complicated as it sounds. Once you get the hang of it, it's easy to make sure your tracks are in the right order, whether you're getting pumped for a workout or just setting the mood for a chill evening.
In this post, I'll show you exactly how to sort your Apple Music playlists and customize the song order so that everything flows just right. Whether you're using your iPhone, iPad, Mac, or PC, I'll walk you through it step by step. Let's get started and make your playlists sound as good as they should!

Here we offer instruction to sort or customize to change order of songs on Spotify playlists on desktop and mobile. Come here to check!
Part 1. Why Does the Apple Music Playlist Order Keep Changing?
If you've ever spent time carefully organizing your Apple Music playlist, only to find that the order changes later on, you know how frustrating it can be. It can throw off the whole vibe of your playlist, especially if you've spent time making sure everything flows perfectly. So, what's going on? Why does your playlist order keep changing?
There are a few common reasons this happens, but the good news is, it's usually an easy fix.
1. Syncing Issues
One of the most common reasons playlists get rearranged is syncing issues. If you're syncing your playlists across multiple devices, sometimes the song order doesn't transfer correctly. You might add or change songs on one device, and when it syncs to another, the order can get messed up.
To make sure your playlist order stays the same across all your devices, double-check the sorting settings. On your iPhone or iPad, open your playlist, tap the three dots at the top right, choose "Sort By," and select "Playlist Order." This ensures your playlist stays organized the way you want it, no matter which device you're using.
2. Smart Playlist Settings
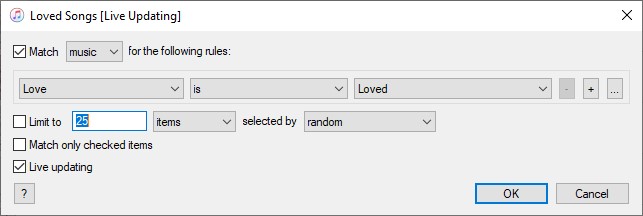
Smart Playlists are handy because they update automatically based on certain rules you set. However, sometimes they reset to a default order when you reopen the Music app. If this is happening, head into your Smart Playlist, click "More" > "Edit Rules," and turn off the "Live Updating" feature. Now your custom song order won't change, even after you close and reopen the app.
3. Manual Sorting Not Retained
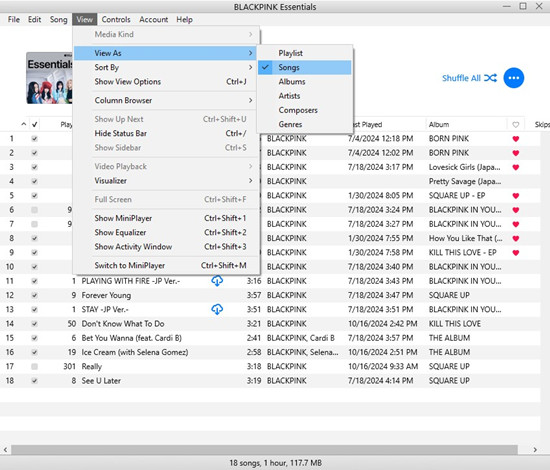
If you manually change the order of your songs but they don't stay the way you arranged them, it might be because your playlist view isn't set to "Songs" mode. On your PC or Mac, go to your playlist, click "View" > "View As" > "Songs," and make sure the leftmost column with the numbers is set to sort by your manual order. This will lock in your changes and keep the playlist just the way you want it.
4. Playlist Sorting Preferences
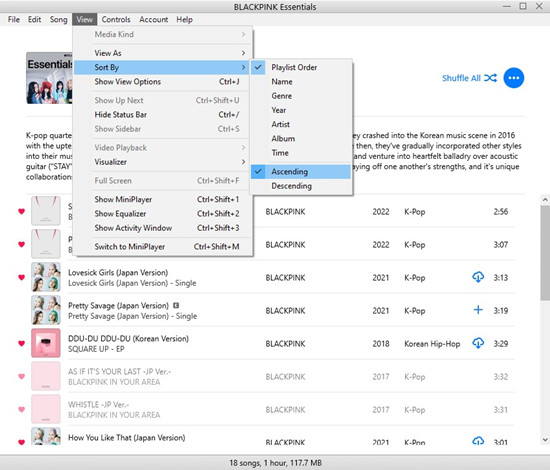
When you add new songs to a playlist, they often get added to the bottom of the list - sometimes not where you want them to go. To fix this, open your playlist, tap "View" > "Sort By" and change the sorting order to "Ascending." This way, new songs will always show up at the top of the playlist, keeping things nice and neat.
Additional Tips:
- Update Your Software: Make sure your device is running the latest version of iOS or macOS.
- Restart the Music App: If your playlist still feels off, try closing and reopening the Music app.
Part 2. How to Sort Apple Music Playlist View
You have the ability to organize your playlists within your Apple Music library to suit your preferences. Sorting your playlists helps you easily access your favorite or most recent ones.
Note: You cannot customize or sort playlists in iTunes. In the iTunes "Playlists" section, all playlists are displayed alphabetically by default.
For iPhone/iPad/Android:
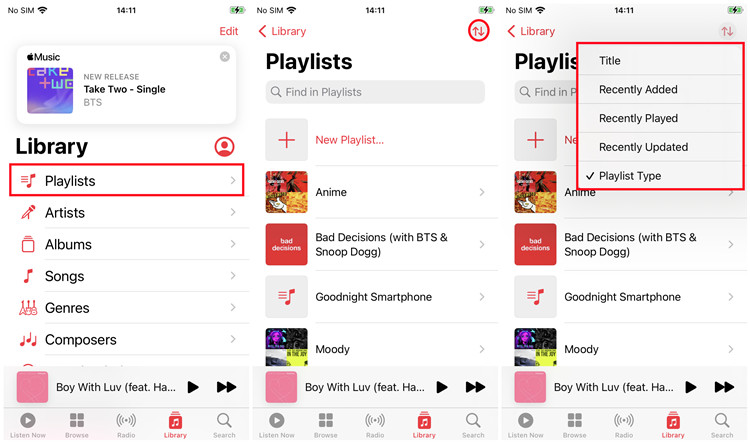
- On your iOS or Android device, open the Music app.
- Tap the Library tab.
- Select the Playlists section.
- In the Playlists view, tap the ↓↑ (Arrow up/down) icon to open the "Sort By" context menu.
- Choose how you want to view your playlists:
- Recently Added
- Recently Played
- Recently Updated
- Playlist Type
- Title (Alphabetically)
- Once you select your preferred sort order, the playlists will be rearranged accordingly. You can then start playing the playlist, and the new order will apply.
Part 3. How to Sort Songs Within an Apple Music Playlist
Apple Music allows you to sort the songs in your playlist with a few simple options.
For Windows/Mac:
- On your Windows PC or Mac, open the iTunes or Music app.
- Navigate to the Playlists section in the sidebar and select the playlist you want to adjust.
- With the playlist open, go to the top menu and select View > Sort By, then choose one of the following options:
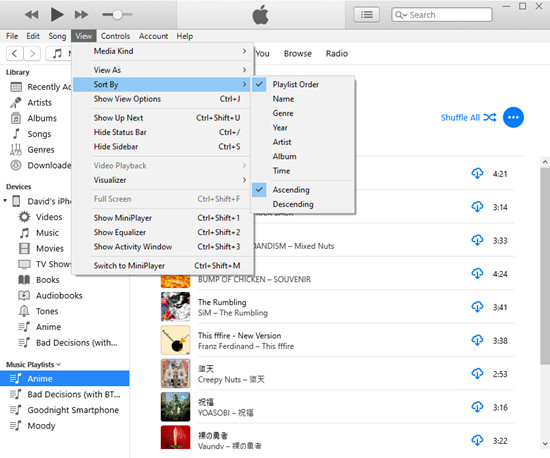
- Playlist Order
- Name
- Genre
- Year
- Artist
- Album
- Time
- You can also choose to apply ascending or descending order to the songs in the playlist.
To speed things up when applying changes to multiple playlists:
- In iTunes or Music, select View > Show View Options to open the view options menu.
- Use the "Sort By" context menu to sort any playlist from the pop-up menu.
- To apply the sorting settings to other playlists, select them from the sidebar.
For iPhone/iPad/Android:
- Open the Apple Music app on your Android or iOS device.
- Tap the Library tab, then go to the Playlists section and select the playlist where you want to adjust the song order.
- Once the playlist is open, tap the ↓↑ (Arrow up/down) icon to open the "Sort By" context menu.
- Choose how you want to sort your songs:
- Playlist Order
- Title
- Artist
- Album
- Release Date
Example: For instance, to sort songs alphabetically, choose Title. If you want to maintain the order in which songs were added, select Playlist Order.
Part 4. How to Customize the Song Order in an Apple Music Playlist
If you want to customize the order of songs within your playlist, the traditional drag-and-drop method works seamlessly.
For Windows/Mac:
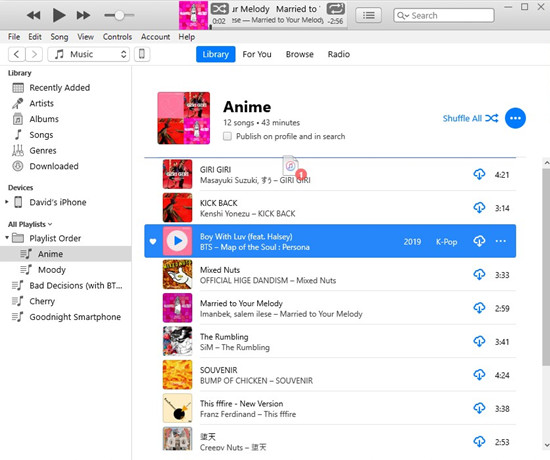
- Open the iTunes or Music app on your Windows PC or Mac.
- Navigate to the Playlists section in the sidebar, then select the playlist you want to customize.
- To customize the order of your playlist, make sure that Playlist Order is enabled as the sorting option from the "Sort By" menu. You can verify this by going to View > Sort By and checking that Playlist Order is selected.
- Return to your playlist and drag individual songs (or multiple songs) to reorder them. To select multiple songs, press Ctrl (Windows) or Cmd (Mac) while clicking the songs you want to move.
- Once the songs are selected, simply drag and drop them into the desired position within the playlist. A line will appear to indicate where the song(s) will be placed.
Part 5. How to Backup Apple Music Playlists with MP3
Backing up your Apple Music playlists can be tricky due to Apple's DRM protection, which restricts the ability to save and transfer your playlists freely. However, with the help of third-party tools like ViWizard Apple Music Converter, you can easily convert and download your Apple Music playlists into MP3 files.
ViWizard Apple Music Converter allows you to convert your playlists into MP3, M4A, WAV, and other formats. This lets you store your music offline and transfer it to any device without needing an active Apple Music subscription. Simply download ViWizard, sign in with your Apple ID, and start converting your favorite playlists into downloadable files that are yours to keep.
If you're looking for a way to back up your music or make your playlists more portable, using ViWizard ensures your collection is accessible anytime, even without an Apple Music subscription.
Key Features of ViWizard Apple Music Converter
Free Trial Free Trial* Security verified. 5, 481,347 people have downloaded it.
- Convert Apple Music songs, albums, playlists, and artists into MP3 for easy access
- Preserve lossless audio, high-resolution lossless, and Dolby Atmos quality
- Strip DRM from Apple Music for unrestricted offline listening
- Save converted audio files while retaining full ID3 tag details
Conclusion
Whether it's optimizing playlist flow, creating a customized sequence for a special event, or simply satisfying one's sense of organization, the ability to sort and customize playlists on Apple Music empowers you to create a music library that reflects your individual taste and style. Feel free to come back to check any updated news.
You May Be Interested


Adam Gorden, the digital media specialist at ViWizard, is dedicated to providing the best solutions for digital media management, including audio and video conversion, file optimization, and media workflow enhancements.
Leave a Comment (0)