Added with Autoplay feature, Apple Music has improved the listening experience with more songs for users to discover their music tastes. Once the Apple Music Autoplay is on, more songs will kick in after the final songs in the music queue, which means the music never stops until this feature is turned off.
Part 1. How to Turn on/off AutoPlay on Apple Music
Autoplay is a convenient option that automatically queues up music similar to your current playlist. Whether you're an iPhone or Android user, gaining control over Autoplay is easy. However, there are times when you might prefer to take the reins, especially if you have a specific playlist in mind or want to avoid unexpected transitions between genres.
For iPhone/Android Users:
- From your device's home screen, locate and open the Apple Music app.
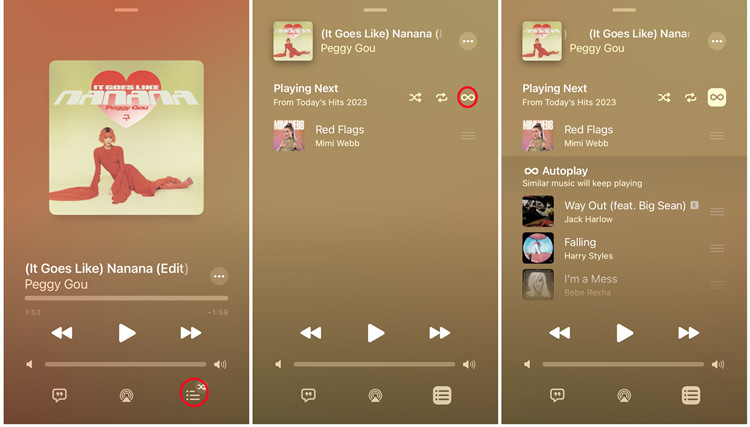
- Tap the Now Playing bar at the bottom of the screen, displaying details of the currently playing song.
- Look for the hamburger icon (three horizontal lines) in the bottom-right corner of the screen.
- Within the options, find the Autoplay icon, recognizable by an infinity loop symbol. It may be placed alongside the "Shuffle" or "Loop" icons.
-
Turn On Autoplay on Apple Music:
Simply tap the Autoplay icon, ensuring it becomes highlighted. Once activated, your "Playing Next" playlist will populate with similar music, creating a continuous listening experience. -
Turn Off Autoplay on Apple Music:
If Autoplay is currently active, the icon will be highlighted. To deactivate Autoplay, tap the icon again to dim it. Your "Playing Next" playlist will return to its normal state, allowing you to have more control over your music selection.
Part 2. How to Turn on/off Apple Music AutoPlay for Mac
As Apple Music enthusiasts, we understand the importance of customizing your music playback experience. Autoplay is a valuable addition to the Apple Music ecosystem and used to encompass Mac computers. However, not Autoplay is no longer accessible on PC and Mac computers. Here's how it used to work:
For Mac Users:
- Begin by launching the Apple Music app on your Mac computer.
- Locate the Playing Next button positioned next to the volume slider within the app interface.
- Click the Up Next icon situated in the top-right corner to unveil the Playing Next playlist.
- Within the Playing Next playlist, spot the Autoplay icon represented by an infinity loop. It is typically found in the top-right corner of the interface.
-
Turn On Autoplay on Apple Music for Mac:
To activate Autoplay, click on the Autoplay icon. Ensure it is highlighted, and Apple Music will automatically add similar songs to your "Playing Next" queue, creating a continuous listening experience. -
Turn Off Autoplay on Apple Music for Mac:
If Autoplay is currently active, click on the Autoplay icon again to dim it. This action will remove all similar songs from your "Playing Next" queue, giving you more control over your playlist.
Part 3. Why Does Apple Music Automatically Playing?
Apple Music's Autoplay feature can be a double-edged sword for users seeking a personalized listening experience. While it offers the convenience of continuous playback, some users might find it overwhelming, especially when they prefer more control over their playlist.
Apple Music is designed to seamlessly transition between songs, playlists, albums, and similar indefinitely after a song is played. Why does Apple Music automatically playing? The culprit behind this automatic playback is the Autoplay feature, which comes enabled by default. The app selects and queues up songs similar to the one you just played, keeping the music flowing seamlessly.
If the Autoplay feature bugs you and you don't want Apple Music to continue playing music automatically after a song or an album is finished, you have the option to disable this feature. Follow the steps outlined earlier in Part 1 or Part 2 for your respective device (iPhone, Android, or Mac) to turn off the Autoplay feature. If the issues still persist, follow another post to fix the automatic playback:
How to stop Apple Music from playing automatically? In this article, you'll find several methods to disable Apple Music from playing automatically.
Part 4. How to Get More Control of Apple Music
While Apple Music's Autoplay feature offers an exciting way to discover similar songs seamlessly, it comes with a caveat – this feature is exclusive to Apple Music subscriptions. Once your subscription expires or is canceled, the unique listening experience provided by Autoplay is no longer accessible. To address this limitation and gain more control over your Apple Music songs, we recommend using ViWizard Audio Converter.
Why Consider ViWizard Audio Converter?
ViWizard Audio Converter is a powerful tool designed for Apple Music users who want to retain control over their music library even after their subscription ends. This converter provides a supported tier for Apple Music users to download songs from the Apple Music catalog, ensuring you can keep your favorite tracks as part of your personal music collection.
ViWizard supports the conversion of Apple Music songs into six popular formats, including MP3, AAC, M4A, M4B, WAV, and FLAC. This versatility allows you to choose the format that best suits your preferences and devices. The converter retains essential metadata such as artist names, album titles, and track numbers, ensuring your music collection remains organized and easily navigable. Once converted, the songs can be stored locally on your device, enabling offline listening without the need for an active Apple Music subscription.
Key Features of ViWizard Apple Music Converter
Free Trial Free Trial* Security verified. 5, 481,347 people have downloaded it.
- Convert Apple Music songs, albums, playlists, and artists into MP3 for easy access
- Preserve lossless audio, high-resolution lossless, and Dolby Atmos quality
- Strip DRM from Apple Music for unrestricted offline listening
- Save converted audio files while retaining full ID3 tag details
Step 1Add Apple Music to Download
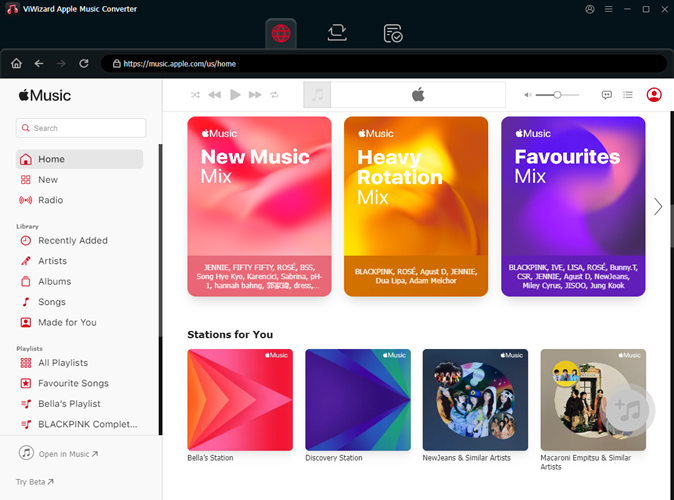
Once the ViWizard software is open, wait until it launches or relaunches the iTunes app for a safe conversion. From iTunes to ViWizard, add music songs via drags or drops. Or in ViWizard, load the music in iTunes using the Add Music button at the top menu.
Step 2Set Output Format as MP3
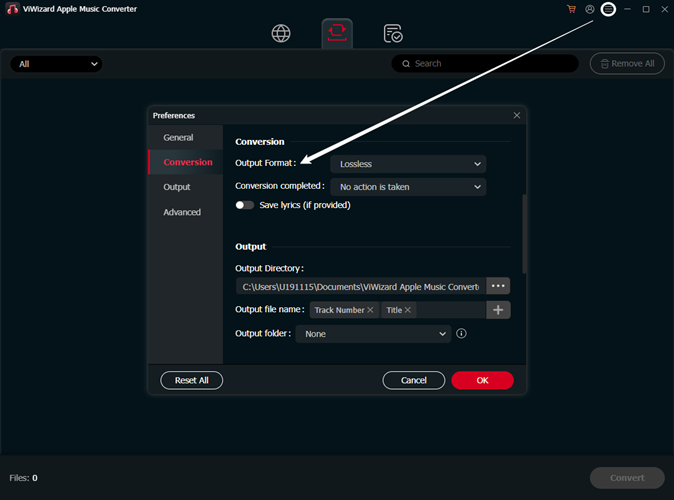
Once there're songs on the screen, click the Format tab at the bottom to go to Format setting. You can set the output format as MP3 or other supported formats. With format setting done, click OK to save this change.
Step 3Convert Apple Music
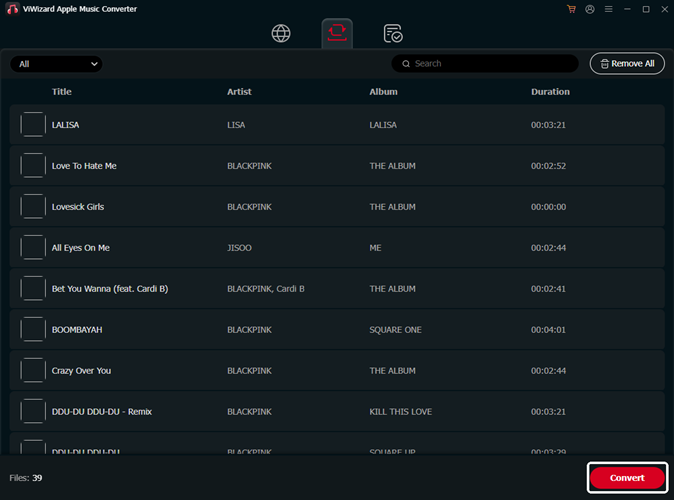
Back on the ViWizard software's screen, click the Convert button. Wait while ViWizard is converting all the added songs into MP3. Once the conversion completes, a click on the Converted menu can browse all the converted Apple Music songs.
Conclusion
ViWizard Audio Converter empowers Apple Music users to take control of their music library, ensuring the preservation of their favorite songs beyond the constraints of a subscription. By converting Apple Music tracks into various formats, you can create a personal music collection that suits your preferences and enables offline listening. Explore the possibilities offered by ViWizard Audio Converter to enhance your Apple Music experience. Stay tuned for more insightful tips in the next sections!



Leave a Comment (0)