Apple Music has been rolled out to the market for quite a few years, but before that, many music lovers had already had their own music library lying on their computer or other streaming platforms. If they switch to Apple Music, how can they play songs that provided by the platform as well as songs they've been long collecting? The solution is to upload music to Apple Music and play them in the Apple Music app.
Thankfully, it's pretty easy to add songs that you already owned on your device to Apple Music. In the following parts, I'm going to show you how to add songs to Apple Music and a tip to help you seamlessly play your own songs and Apple Music songs on any device.
Part 1. How to Add Music to Apple Music
When you add music to your Apple Music library, you're essentially creating a personalized collection of songs and albums that you love. This collection is stored in the cloud, allowing you to access it seamlessly across all your Apple devices, such as iPhone, iPad, Mac, and even Android smartphones, as well as Windows PCs with iTunes. Here's how you can add music:
"Add to Library" or "Add to Playlist":
- Add to Library: This option saves the song or album directly to your personal music library, making it easier to find and listen to your favorite tracks without the need to search for them again.
- Add to Playlist: Adding to a playlist allows you to curate lists of songs around specific themes or moods. Create multiple playlists for various occasions, such as workout sessions, road trips, or relaxing moments.
Using iTunes or Music App (Windows/Mac):
- Open iTunes on your Windows PC or the Music app on your Mac computer. Sign in using your Apple ID and password if prompted.
- Navigate to your library:
- In iTunes, click on the "Library" tab at the top, then select "Music."
- In the Music app, click on the "Library" tab to view your existing music collection.
- Find and add the music you want:
- To add a single song:
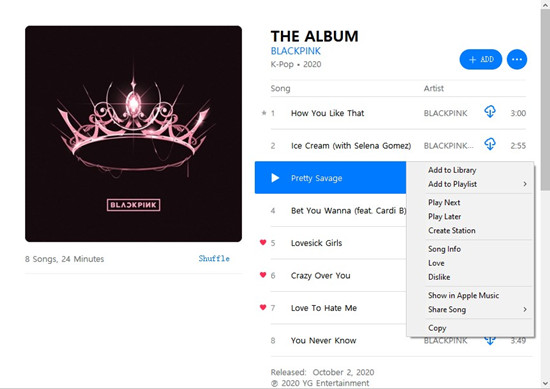
- Click on the three dots (...) next to the song.
- In the dropdown menu, select "Add to Library" or "Add to Playlist," and choose a suitable playlist if necessary.
- To add an entire album:
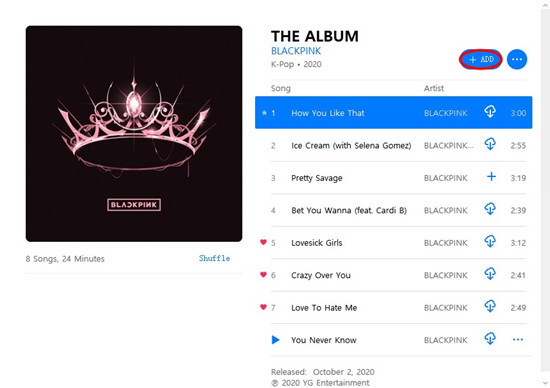
- Click on the album cover.
- Look for the "Add" button near the top-right corner of the window.
- To add a single song:
- Once added, the song or album will be available in your Apple Music library on all synced devices.
Using Apple Music App (iPhone/Android):
- Open the Apple Music app on your iPhone or Android device.
- Sign in with your Apple account:
- On Apple devices, you should already be signed in to Apple Music.
- On Android smartphones, tap "Settings," select "Account," then tap "Sign in" to enter your Apple ID and password.
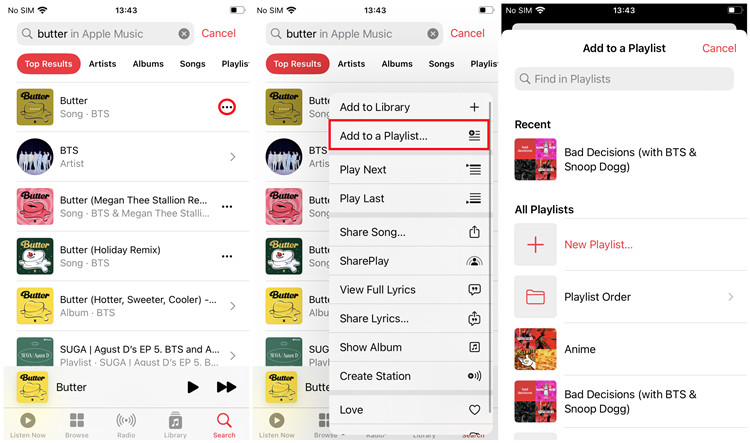
- Tap on the "Search" tab at the bottom, then enter the name of the song or album.
- To add a single song:
- Tap the three dots (...) next to the song.
- Select "Add to Library" or "Add to Playlist," choosing a playlist if desired.
- To add an entire album:
- Tap on the album cover.
- Look for the "Add" button.
- A confirmation message will indicate that the song or album has been added to your library or playlist.
- The added music is now accessible across all your devices logged in with the same Apple ID.
Part 2. How to Add Your Own Music to Apple Music
The iCloud Music Library feature in Apple Music allows you to add your personal music collection to your Apple Music library, combining your existing music with the vast Apple Music catalog. Here's how:
Enable iCloud Music Library or Not:
- Enable iCloud Music Library: When enabled, Apple attempts to match your songs with tracks in the Apple Music catalog. If a match is found, your song is replaced with a high-quality version from the catalog, improving accessibility even for low-quality files.
- Disable iCloud Music Library: If you prefer to keep your original files untouched, disabling iCloud Music Library ensures your songs are not matched or altered.
Step 1Add Your Music to Apple Music on Desktop Devices
- Launch iTunes on your Windows PC or the Music app on your Mac.
- Click on the "Library" tab and select "Music" to view your music collection.
- Make sure your files are in .mp3, .aac, or .wav format before importing:
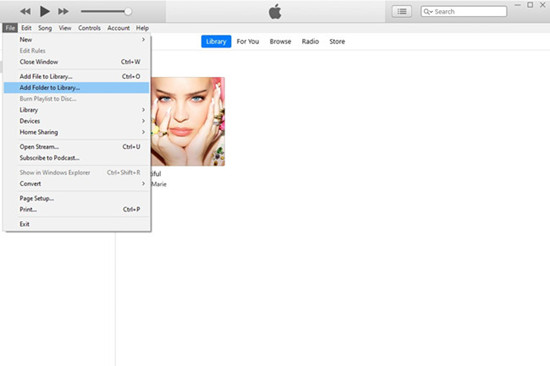
- To add individual songs:
- Click on "File" in the menu bar, then select "Add File to Library."
- Browse to the location of your music files, select the songs, and click "Open."
- To add an entire folder or album:
- Follow the same steps, but choose "Add Folder to Library."
- Select the folder containing your music or the album folder.
- To add individual songs:
- Your newly added songs or albums will appear in your iTunes or Music app library.
Step 2Match Your Music with Apple Music (Optional)
-
Enable iCloud Music Library (If Desired):
- In iTunes, go to "Edit" (or "File" on Windows) > "Preferences" > "General." Check the box next to "iCloud Music Library" to enable it.
- In the Music app on Mac, go to "Music" > "Preferences" > "General," then check "Sync Library."
Once enabled, iTunes or Music will start matching your uploaded songs with tracks from the Apple Music catalog. Matched songs will have a cloud icon next to them.
-
Keep Original Files (If Preferred):
Ensure "Uploaded" is selected instead of "Matched" in the iCloud Status column to keep your original files.
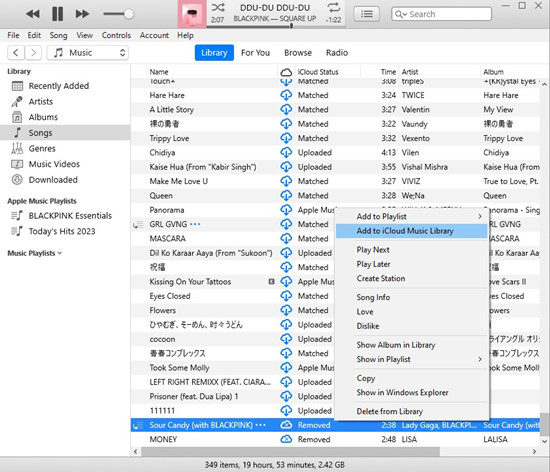
Step 3Sync Your Music to Mobile Devices
- Connect your iPhone or iPad to your computer using a USB cable.
- In iTunes, click on the device icon in the upper-left corner of the window. In the Music app, click on "Devices" in the sidebar.
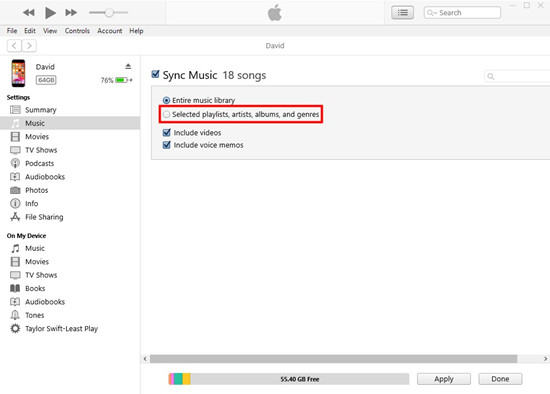
- In the "Summary" tab (iTunes) or "General" tab (Music app), check the box next to "Sync Music."
- Choose to sync your entire music library or selected playlists, artists, albums, and genres.
- Click "Apply" or "Sync" to start the syncing process.
- Once syncing is complete, disconnect your device.
- Open the Apple Music app on your iPhone or iPad.
- Your added and matched music will now be available for streaming or offline listening on your mobile device.
- Remember to regularly back up your music library to avoid accidental loss of files.
- If you prefer not to use iCloud Music Library, you can manually manage your music library on each device.
Part 3. How to Convert Apple Music to MP3
After syncing your own collection to Apple Music, you can only stream them on Apple Music or iTunes app. If you want to play the whole library or playlist mixing with your songs and Apple Music songs elsewhere, it's technically not accessible. However, with ViWizard Apple Music Converter, you can download all your iTunes Library to MP3 and save them to your computer, allowing you to play songs from Apple Music and your own collection together everywhere.
Key Features of ViWizard Audio Converter
Free Trial Free Trial* Security verified. 5, 481,347 people have downloaded it.
- Converts protected iTunes, Apple Music songs, and radio shows into MP3, M4A, AAC, FLAC, and other common formats.
- Boosts conversion speed up to 30X faster with high output quality preserved.
- Remove the protection of all songs from your iTunes Library for playback anywhere.
Step 1 Launch ViWizard and Import iTunes Library Files
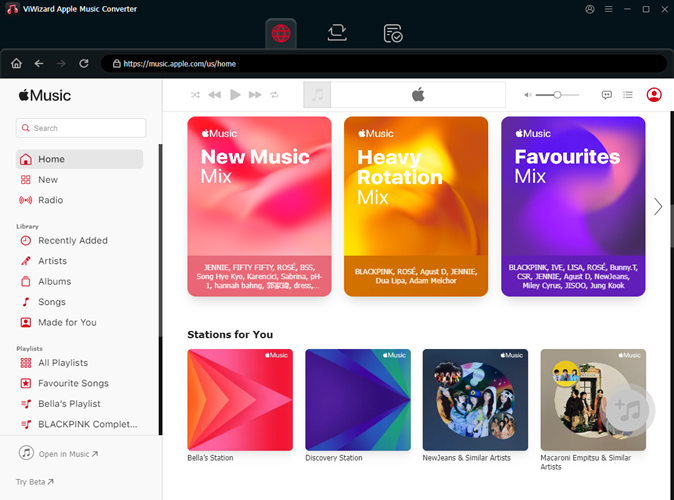
- Launch ViWizard Audio Converter.
- Click the music note "+" button to import songs from your iTunes Library, or add AAC files from your iTunes Library folder.
Step 2 Setting Output Format and Parameters
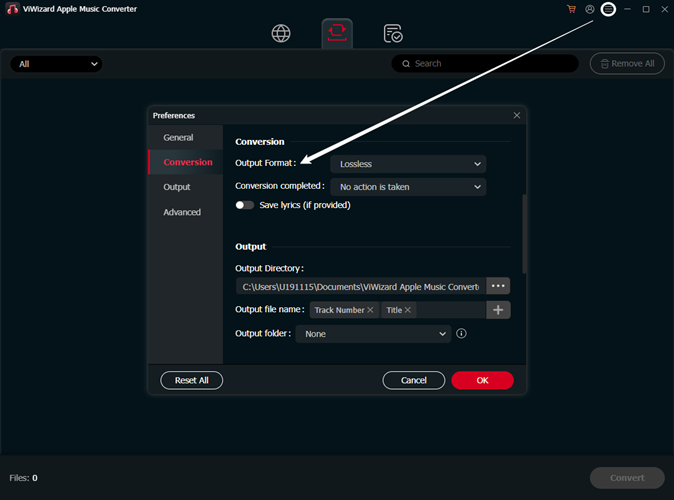
- After loading input files, click the "Format" button in the bottom left.
- Choose the output format among MP3, AAC, FLAC, WAV, M4A, and M4B.
- Click the "Output" button to choose the output location.
Step 3 Start Converting
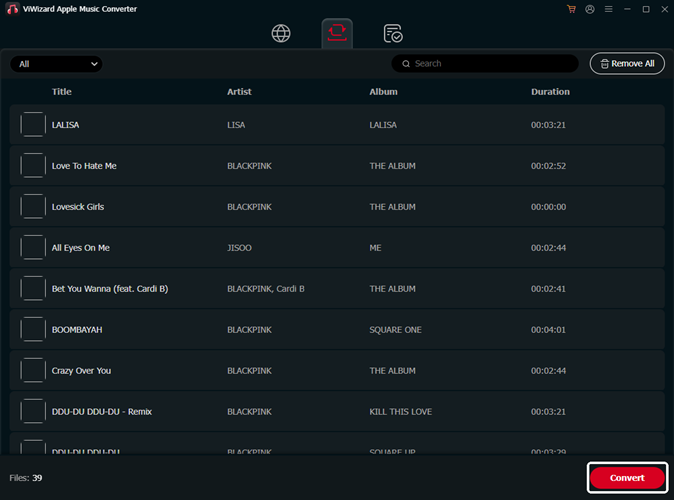
With format settings done, press the "Convert" button to start the conversion process.
After the conversion is complete, find all your converted songs by clicking the "Converted" button. Now you can enjoy all your downloaded songs from the iTunes Library along with your own collection on any media player without iTunes and Apple Music app. You can also move these files to any device.

Leave a Comment (0)