Ever spent hours perfecting a PowerPoint, only to realize the background music is as bland as the default tracks everyone's heard a million times? It's time to change that.
If you're an Apple Music subscriber, you've got access to a whole library of tracks that can set the perfect tone for your presentation - that's an upbeat tune or something more calming. The only catch? DRM restrictions can make it a bit tricky to add those Apple Music songs to PowerPoint.
But don't worry—I've found an easy way to get around that. In this post, I'll show you how to add your favorite Apple Music tracks to your PowerPoint slides, so your presentation sounds just as great as it looks.
Let's dive in!

If you've wondered how to add iTunes Music with your favorite Apple Music songs included on Google Slides, now you are going to learn about two ways to do it effectively.
Part 1: Can I Add Apple Music to PowerPoint?
If you've ever tried adding an Apple Music track to a PowerPoint presentation, you've probably encountered the same issue I did. At first, I was inspired to set the perfect background music for my slides, but then I ran into file format limitations. As I dug deeper into the problem, I learned about something called DRM protection—and that was the real culprit. The music I had downloaded from Apple Music was in M4P or M4A formats, and unfortunately, PowerPoint doesn't support these file types.
The real headache, though, was the DRM protection. Even if I managed to find the M4P files and try to add them to PowerPoint, they wouldn't play due to the restrictions Apple Music places on its downloads. I was left with a great song that I couldn't use.
What You Need to Use Apple Music with PowerPoint: Supported Audio Formats
So, what can you do about it? Well, where there's a will, there's a way! PowerPoint actually supports several audio formats, including MP3, WAV, WMA (Windows Media Audio), AU (UX Audio), MIDI, and AIFF (Audio Interchange File Format). To make Apple Music work, all we need to do is convert the tracks into one of these compatible formats. Once that's done, it's smooth sailing from there. And the best part? Thanks to a tool called ViWizard Apple Music Converter, it won't cost much to try out this trick! Keep reading!
Part 2: How to Download Music from Apple Music to PowerPoint
Now that we know PowerPoint doesn't support Apple Music's DRM-protected tracks, how do you actually get those songs into your presentation? The key is to remove the DRM protection and convert the Apple Music files into formats that PowerPoint will recognize, like MP3 or WAV. And here's where ViWizard Apple Music Converter comes to the rescue.
Getting Started with Apple Music for PowerPoint: ViWizard Apple Music Converter
If you're like me, you want a solution that's both easy to use and gets the job done without losing audio quality. That's exactly what ViWizard Apple Music Converter offers. This tool is specifically designed to tackle DRM restrictions and convert Apple Music files into the perfect formats for PowerPoint. ViWizard Apple Music Converter is super user-friendly and does both the DRM removal and format conversion in one seamless process. It's all possible to convert Apple Music into MP3, WAV, or other supported formats within just a few clicks.
Key Features of ViWizard Apple Music Converter
Free Trial Free Trial* Security verified. 5, 481,347 people have downloaded it.
- Convert Apple Music songs, albums, playlists, and artists into MP3 for easy access
- Preserve lossless audio, high-resolution lossless, and Dolby Atmos quality
- Strip DRM from Apple Music for unrestricted offline listening
- Save converted audio files while retaining full ID3 tag details
Step 1Download and Install ViWizard Apple Music Converter
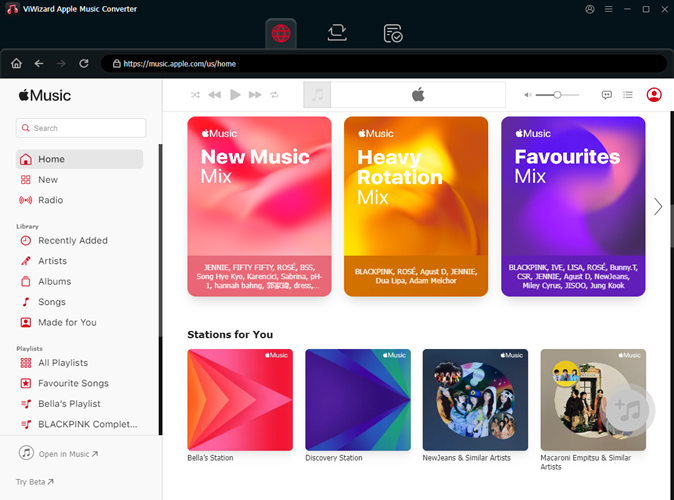
To get started, download and install the ViWizard Apple Music Converter on your computer. This tool will help you convert Apple Music tracks into formats compatible with PowerPoint, such as MP3. Once installed, open the application and log in with your Apple Music account using your Apple ID. This will give you access to your entire music library, allowing you to pick the perfect track for your presentation. To add music, simply click the "+" button at the bottom-right corner, and the app will automatically load your selected tracks for conversion.
Step 2Choose the Right Output Format
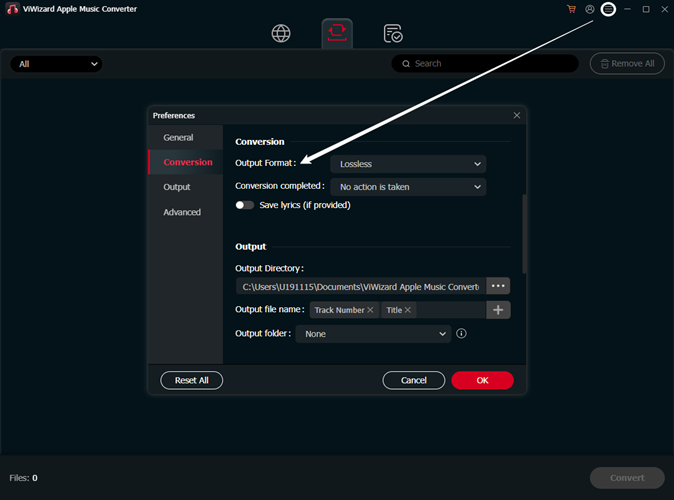
To ensure the music works with PowerPoint, select a format that's widely supported, such as MP3. You can adjust this setting by clicking on the settings icon (usually in the top-right corner). From there, you can choose the output format and customize other options like sample rate, bit rate, and channel. Once everything is set, click "OK" to save your preferences and get ready for the conversion.
Step 3Add Your Music and Start the Conversion
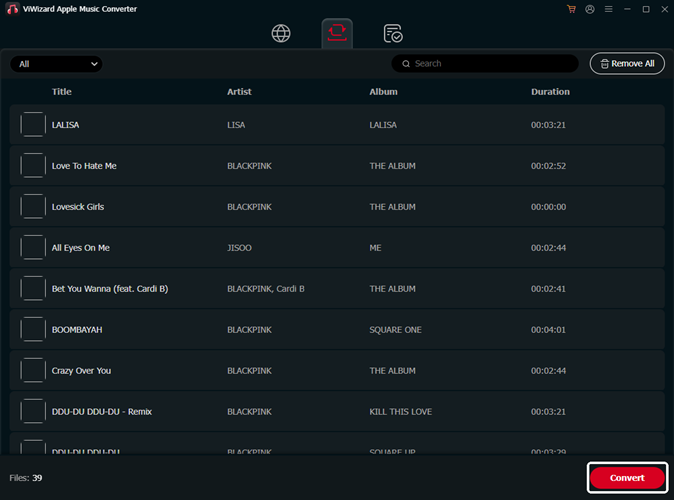
Next, search for your favorite Apple Music songs, albums, or playlists. You can either browse your library or paste the URL of a specific album or playlist into the ViWizard interface. Once you've found the music you want, click "Add to Conversion List" to add it to the queue. Afterward, hit the "Convert" button, and ViWizard will start downloading and converting the music into the selected format.
Step 4Access Your Converted Files
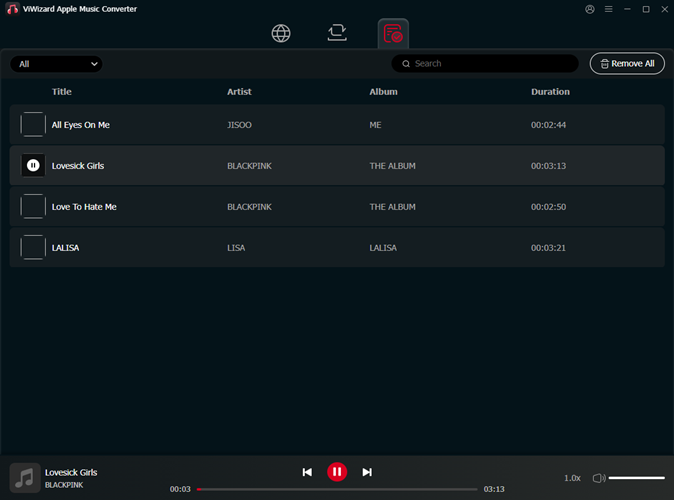
Once the conversion process is complete, you can find your new music files easily. Simply click on the "History" button, and then the folder icon to open the location where your converted tracks are saved. From there, you can transfer them to your computer, ready to be added to your PowerPoint presentation, and enjoy them without any subscription required.
Part 3. How to Record and Add Music to PowerPoint from Apple Music
While the ViWizard Audio Converter provides a comprehensive solution for adding Apple Music to PowerPoint, another method involves recording the music directly within PowerPoint using microphone support. This method is useful when you prefer a straightforward approach without dealing with file conversions. Here's how you can record and add Apple Music to your PowerPoint slide:
Step 1Set Up Microphone with PowerPoint

- On your computer device, open or create a PowerPoint presentation.
- Select "Insert" from the top menu.
- Choose "Audio" and then select "Record Audio."
- Enter a name for the recorded sound. This will help you identify it later.
Step 2Record Apple Music
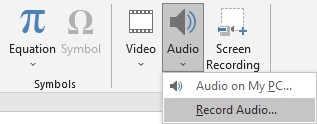
- Have the Apple Music song you wish to add ready on either your mobile device or computer.
- Click the Record button and start playing the Apple Music song.
- When the song is finished, click the Stop button.
- Click the Play button to listen to the recorded Apple Music.
- If needed, you can rerecord the Apple Music song by repeating the steps until you're satisfied.
Step 3Insert Apple Music Recording to PowerPoint
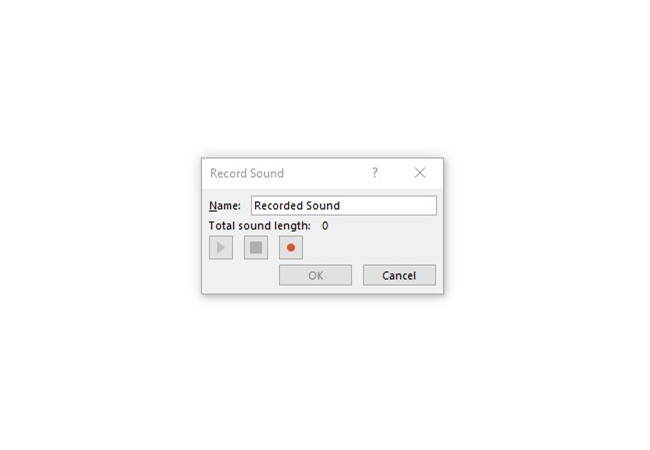
- Click the OK button to insert the recording into the slide.
- Considering adjust these playback settings:
- PowerPoint offers various playback options such as play/pause, move back/forward by 0.25 seconds, and mute.
- The added Apple Music recordings will play automatically when the slide show is presented.
Part 4: How to Add Apple Music to All Slides on PowerPoint
Once you've added Apple Music to a single slide, you might want to extend the audio across all slides to maintain a consistent background throughout your presentation. Here's a handy tip on adjusting playback settings and making your Apple Music play seamlessly across all slides in PowerPoint.
How to Adjust Playback Settings:
- After inserting the audio, click on the Audio icon that appears on the slide.
- This will reveal the Audio Tools at the top of the PowerPoint interface.
- Use the available options to customize the playback of your Apple Music:
- Trim Audio: Adjust the length of the audio clip using the "Trim Audio" option if needed.
- Fade Duration: Change how your audio fades in or out by utilizing the "Fade Duration" option.
- Audio Options: Alter when your audio starts during your presentation by going to "Audio Options" > "Start" and choose from "In Click Sequence," "Automatically," or "When Clicked On."
- Play in Background: To make your audio play during every slide, select the "Play in Background" option.
How to Add Apple Music to All Slides:
If you want your Apple Music to play across all slides, follow these additional steps:
- In the left sidebar, click on the first slide.
- Hold down the Shift key and click on the last slide to select all slides.
- With all slides selected, go to the "Playback" tab.
- Check the box that says "Play in Background."
By following these steps, you can seamlessly integrate your Apple Music across all slides, ensuring a continuous and engaging background soundtrack for your entire presentation.
Extra Tip: Apple Music PowerPoint Templates Resources
Once you've selected the perfect template for your presentation, it's time to apply and customize it to match your content. Follow these simple steps to easily integrate your chosen design and make your presentation shine:
How to Use Apple Music PowerPoint Templates:
- Visit any of the template websites mentioned earlier.
- Select the template that fits your presentation theme.
- Download the template to your computer. Many are free, but some premium ones may require a purchase.
- Launch Microsoft PowerPoint on your device.
- Create a new presentation by selecting "Blank Presentation" or open an existing one.
- Go to the "Design" tab at the top of the screen.
- Click on "Browse for Themes."
- Choose the downloaded template file from your computer and click "Apply."
- After applying the template, you can start customizing the slides with your own content.
- To add your Apple Music track, follow the steps from Part 2 to convert and insert the audio file.
- Once you're satisfied with your slides, save your presentation.
- Now, you're all set to present your slideshow with the perfect music background.
Apple Music PowerPoint Templates Resources
SlidesCarnival: A great place to grab free, customizable templates inspired by Apple Music. One standout template features a white and pink color palette that channels the Apple Music vibe. Perfect for music-themed presentations or creative portfolios.
SlideChef: Offers an Apple Music-inspired template that's free and works with both PowerPoint and Google Slides. Clean layouts, stunning visuals—this one's a solid option if you're looking to add a fresh, creative touch.
Slidesgo: If you're after a variety of music-themed templates, Slidesgo has you covered. You'll find templates designed around classical music, instruments, and more. Fully customizable to fit any music-related presentation.
GraphicRiver: Need a more polished, professional touch? GraphicRiver offers premium Apple Music-inspired templates. These templates feature sleek, modern designs and are available for purchase.
Templates for PowerPoint: PowerPoint templates on the Mac App Store offer a variety of designs, including music-themed ones. iFunia Templates for PowerPoint is a solid option, offering over 130 pre-designed templates that are perfect for Mac users.
Conclusion
Now you may know how to get Apple Music on Powerpoint. It's not a rocket science, so don't be afraid. With the help of ViWizard Audio Converter, you can convert Apple Music for PPT without much effort. It can convert Apple Music-protected files into an open format in a fast speed and high quality. Just click the download link to give it a shot right now!



Leave a Comment (0)