Amazon Music has rapidly become a go-to streaming service for millions, offering an extensive catalog of music spanning every imaginable genre. If you're a dedicated Amazon Music user, you know how much time you spend within the app. Therefore, setting it as your default music player on your computer can significantly streamline your listening experience.

However, to make Amazon Music your default player isn't always straightforward. Many users face challenges in making Amazon Music their default player due to system restrictions and missing options. This guide will walk you through the steps to set Amazon Music as the default music player on Windows and Mac, discuss its limitations, and introduce a way to play Amazon Music without restrictions.
Part 1. How to Set Amazon Music as Default Music Player on Windows
Setting Amazon Music as the default music player for a Windows computer is not that complex as many imagine. You can complete it by following these steps:
Steps to Make Amazon Music Your Default Player on Windows
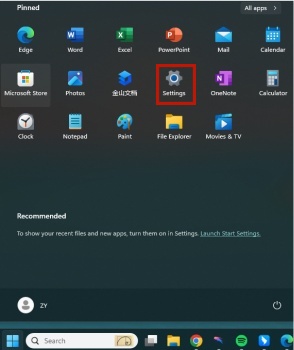
Step 1. Click the 'Start' menu on your computer screen to open the main navigation panel, then select 'Settings' to access system preferences.
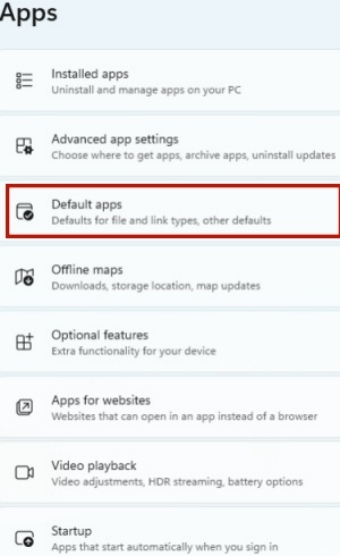
Step 2. Locate and click on 'Apps' to manage installed applications and their settings.
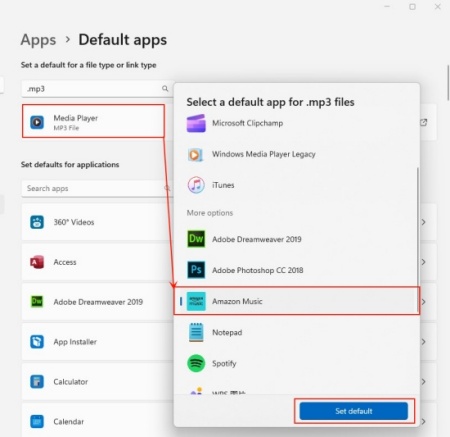
Step 3. Choose the option of 'Default apps'. On this page, you can view and modify the default applications for various file types and link types. To set Amazon Music as the default music player, search for common music file formats such as MP3, WAV, or M4A, and assign a preferred player for them.
Step 4. Click on the current 'Default Media Player' to change it. Then, select the option 'Choose an application from the computer' to browse manually.
step 5. Find and open Amazon Music from the list of installed applications, then confirm your selection to set it as the default music player for Windows.
Common Issues & Fixes
- Amazon Music Not Listed
Try reinstalling the app or updating Windows. - Changes Not Saved
Run Windows Troubleshooter from Settings, to Update & Security, to Troubleshoot. - File Associations Not Working
Manually set Amazon Music for each audio file type in Choose default apps by file type.
Part 2. How to Set Amazon Music as Default Music Player on Mac
Setting Amazon Music as the default player on the Mac is also as easy as on the Windows, and once set, it'll last for long. Following are the specific steps:
Steps to Make Amazon Music Your Default Player on Mac
Step 1. Locate the music file you want to play using Amazon Music in the Finder on your Mac.
Step 2. Right-click the music file, then select 'Get Info' from the drop-down menu to open the file's details.
Step 3. Click the arrow icon next to 'Open with' to expand the selection menu.
Step 4. Click on the currently listed default music player to view a list of compatible applications for that file type.
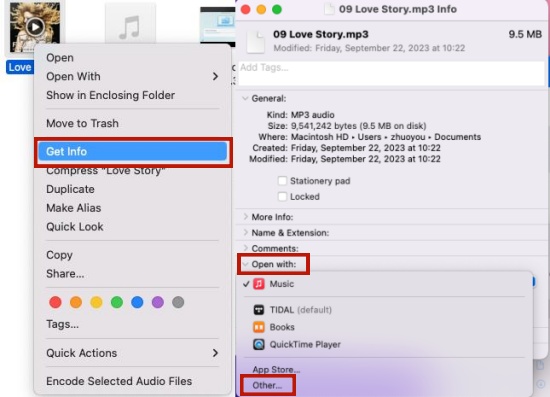
step 5. Select 'Other' from the options, then browse and choose Amazon Music to set it as the default player for that file format.

Common Issues & Fixes
- Amazon Music Not Showing
Ensure the app is installed and open at least once. - Changes Not Saved
Try restarting the Mac or updating the operating system. - File Associations Not Working
Some MacOS updates may reset default apps, requiring reconfiguration.
Part 3. Limitations of Amazon Music as Default Player
While setting Amazon Music as your default player facilitates your listening experience, there are notable limitations:
- Requires an Active Subscription: You must have an active Amazon Music subscription to access most features.
- Limited Offline Playback: Even if you download songs, they can only be played within the Amazon Music app.
- Cannot Play Local Files: Unlike other media players, Amazon Music does not support playing non-Amazon MP3s.
- Platform Restrictions: Some devices or OS versions may not fully support Amazon Music as a default player.
These must have been upsetting you for long, huh? But, don't worry, we're here not only to bring up troubles, but also troubleshoot them.
Part 4. How to Play Amazon Music Without Limitations
To overcome these restrictions, the best solution recommended here is to convert Amazon Music to some standard audio formats. And you have to use a handy tool to help you with converting. It's time to call ViWizard Amazon Music Converter for help.
Key Features of ViWizard Amazon Music Converter
Free Trial Free Trial* Security verified. 5, 481,347 people have downloaded it.
- Download songs from Amazon Music Prime, Unlimited, and HD Music
- Convert Amazon Music songs to MP3, AAC, M4A, M4B, FLAC, and WAV
- Retain the original ID3 tags and lossless audio quality of Amazon Music
- Support customizing the output audio parameters for Amazon Music
This tool can benefit you in many terms. Whether to download Amazon Music tracks, albums, and playlists directly to your device, or to convert them into formats like MP3, AIFF, FLAC, and WAV, making them playable on any device. It also preserves ID3 tags and high-quality sound, making your listening experience just as neat as on Amazon Music app while in offline circumstances. How sweet it is!
How to Download Amazon Music into Other Formats
Step 1Select Amazon Songs to download
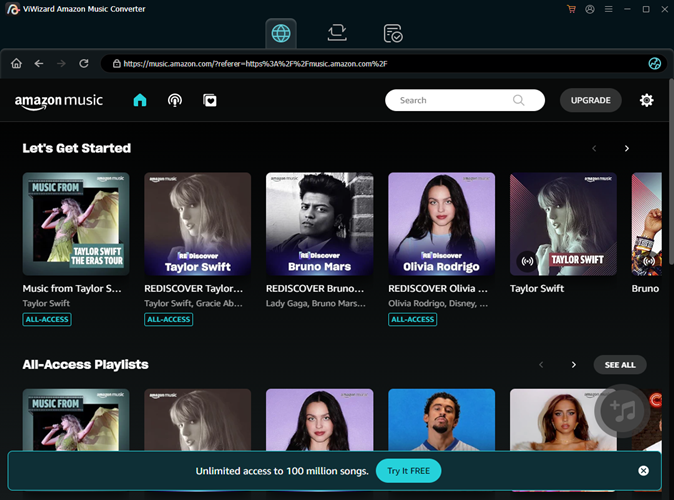
Download and install ViWizard Amazon Music Converter, then launch the app after installation. It will automatically open the Amazon Music app on your computer. Next, go to your music library, choose the songs you want, and copy their links. Finally, paste the links into the converter's search bar to proceed.
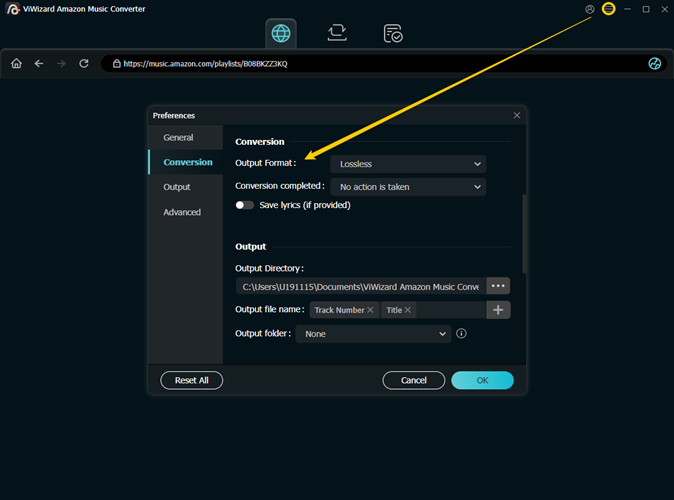
Step 2Choose Your Output Format
After adding songs to the converter, you may customize the output settings for Amazon Music. Click the menu bar and select "Preferences" to open a new window. Under the "Convert" tab, choose your preferred output format and adjust settings such as bit rate, sample rate, and audio channel.
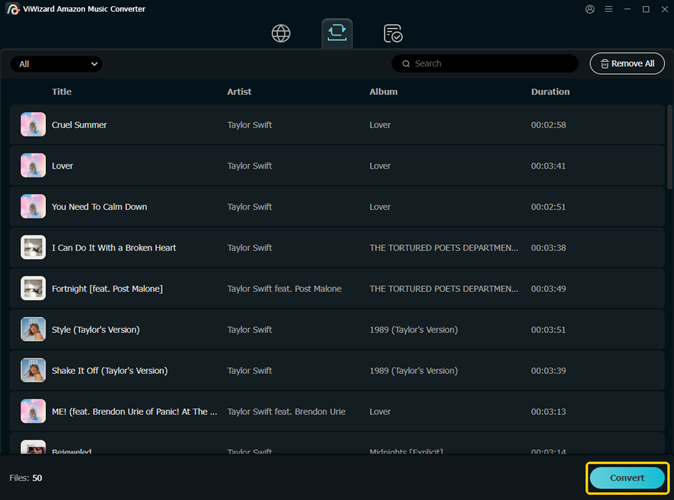
Step 3Convert Your Amazon Music
Once you've configured the settings, just click "Convert" button to start. ViWizard Amazon Music Converter will then download the songs from Amazon Music and save them in your selected format while also removing copyright protection. After the conversion is complete, click thew "Converted" icon to access all your converted Amazon Music tracks in the history list.
Conclusion
Setting Amazon Music as your default music player is not that tricky. Take a bit patience and follow the steps, you can easily get it. But I think the ViWizard Amazon Music Converter could also be your perfect choice. It enables you to play Amazon music on any default player. For a higher level of music experience, you'd better give it a try.
You May Be Interested


Adam Gorden, the digital media specialist at ViWizard, is dedicated to providing the best solutions for digital media management, including audio and video conversion, file optimization, and media workflow enhancements.
Leave a Comment (0)