According to the reports from Android users, there're various issues with the Amazon Music app for Android such as the app keeps crashing, especially after an app update. We confirm these serious problems come with the app itself instead of the Android device, which is frustrating for Android users.
During our exploration, we've set out to find and collect some feasible methods to fix Amazon Music not working on android issue. You can try to pick up your device to follow this step-by-step guide to fix the Amazon Music app. As a bonus tip, we also provide an ultimate method to enjoy Amazon Music songs without the app so that you won't encounter any technological problems.
Part 1. Some Checks Before Fixing the Issue
Before diving into the exact steps to fix Amazon Music not working on android, let's make some quick checks which may solve the problem earlier.
Check Your Phone's Internet Connection
A common issue is that your phone may not have a stable network or might be connected to a slow one. If you're trying to play music in the Amazon Music app and it doesn't respond, check your device's network connection. If you're experiencing a slow connection, consider switching to a different WiFi network or enabling cellular data. Besides, ensure you are not using VPN.
To enjoy HD and Ultra HD music with Amazon Music Unlimited, a strong Internet connection is essential. To resolve streaming issues:
- Ensure that your device is capable of playing audio at 16-bit/44.1kHz or higher.
- If your device cannot support HD and Ultra HD playback, consider using an external DAC that can handle a bit depth of 16-bit and a sample rate of at least 44.1 kHz.
- Open the Amazon Music app to verify the audio quality of the song you are listening to. The Now Playing page will display HD or Ultra HD badges if the song is available in that quality.
Check for Software Updates on Your Phone
Some app glitches can stem from the device's operating system. Android will regularly release updates to fix bugs. If the Amazon Music app is not functioning properly on your phone, check your device's operating system and update it to the latest version if necessary.
Check the Background Activity settings for Amazon Music
If you switch to other apps while using the Amazon Music app, you may notice that it stops functioning even though it remains open. This is often due to settings like battery management on your device, which may close inactive apps running in the background. To resolve this issue, adjust the settings accordingly.
Part 2. 5 Fixes to Amazon Music Not Working on Android
If Amazon Music still fails to work on your android with the above check, then you can try the following 5 feasible fixes.
Method 1: Force Stop Amazon Music App
The truth is, a force stop of the Amazon Music app is efficient to fix issue like the app keeps crashing. You can choose to force stop the app from the Home screen or go to phone settings of the app to force stop it.
Option 1: force stop the app from Home screen
- Swipe from the bottom of the Home screen of the Android device. This will open the apps' preview.
- Swiple left or right and pause on the preview of the Amazon Music app.
- Swipe up the Amazon Music app's preview. This should force stop the Amazon Music app.
Option 2: force stop the app in Settings
- From the Home screen of the Android device, go to Settings.
- Scroll to Apps & Notifications > App info > Amazon Music.
- In the app setting of Amazon Music, choose Force Stop.
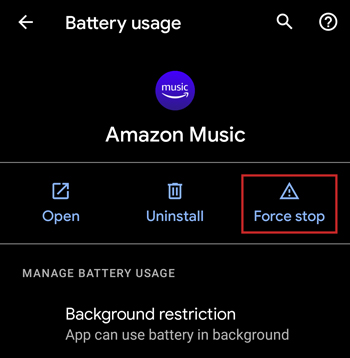
You're also recommended to close or force stop all the apps for Android to make it work for your device. After that, restart the Amazon Music app. You may also need to restart the device for a better performance.
Method 2: Turn Off Battery Optimization
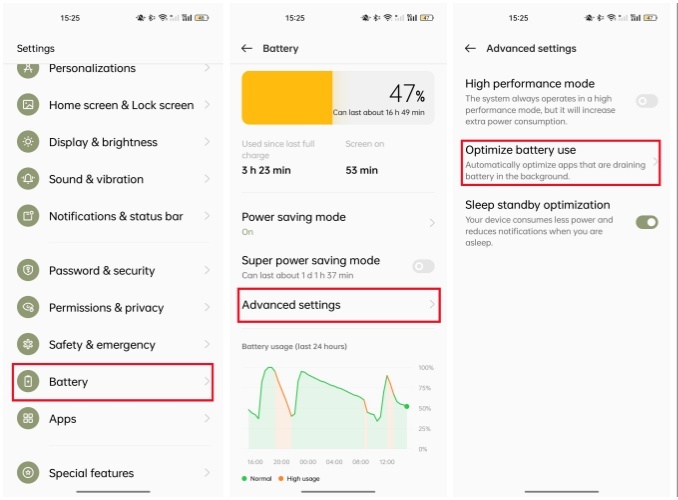
Sometimes, Amazon Music cannot work well if you open the battery optimization on your phone.
- From the Home screen of the Android device, open the Settings menu.
- Go to Device Maintenance > Battery > Battery Usage.
- From the top right corner of the action bar, tap the More button > Optimize Battery Usage.
- On the Optimize Battery Usage screen, switch to the All Apps list from the drop-down to see all the apps on your device.
- Turn off to exclude Onfleet from the battery restrictions.
Method 3: Switch to Another Network
If you are on a slow internet connection, you can choose to reestablish it or switch to another network that works fine with other Android applications.
Option 1. reestablish the network connection
- Swipe down from the top of the Home screen to reveal the device's control panel.
- Tap "Mobile data" or "Wi-Fi" to switch it off for about 30 seconds.
- Tap "Mobile data" or "Wi-Fi" to switch it on to reestablish the network for the Amazon Music app for Android.
Option 2. switch to another network connection
- Swipe down from the top of the Home screen to open the control panel of the device.
- If you wish to switch to "Wi-Fi" from the "Mobile data", switch off the "Mobile data" and then switch on "Wi-Fi". You may be required to select your Wi-Fi connection form the list and enter the password to connect to it.
- If you wish to switch to "Mobile data" from "Wi-Fi", switch on "mobile data" and then switch off "Wi-Fi". You may also need to open the Amazon Music app to confirm the "Settings" allows for "Cellular".
Method 4: Clear Amazon Music Cache
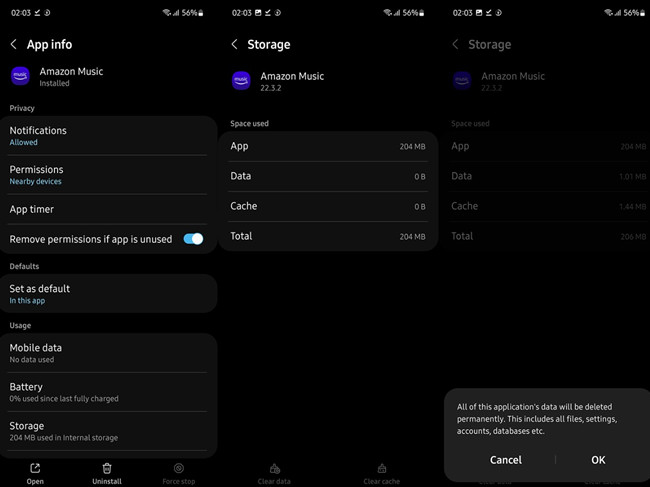
You may also need to clear the cache of the Amazon Music app.
Option 1: clear Amazon Music cache from app Settings
- Open the Amazon Music app.
- Tap the Settings icon in the upper right corner.
- Go to Settings > Storage > Clear Cache.
Option 2: clear Amazon Music cache from device Settings
- From the Home screen of the Android device, go to Settings.
- Scroll to Apps & Notifications > App info > Amazon Music.
- In the app setting of Amazon Music, choose Clear Cache.
Method 5: Uninstall the Amazon Music App
If all the methods won't work for you, you must uninstall the Amazon Music app from the Home screen or Google Play Store app, then reinstall the latest version of it to your device.
Option 1. Delete the Amazon Music app from Home screen
- From the Home screen of the device, long-press on the Amazon Music app icon > Delete.
- Confirm the uninstallation.
Option 2. Delete the Amazon Music app from Google Play Store
- Open the Google Play Store app.
- At the top right, tap the Profile icon > Manage apps & devices > Manage.
- Scroll to the Amazon Music app > Uninstall.
You'll also need to reinstall the Amazon Music app to your Android device. This will reinstall the latest version of the app.
- Open the Google Play Store app.
- Use the Search tool > Amazon Music app for Android > Install.
- You can open the Amazon Music app to log in with your Amazon credentials to check if the issue persists.
Part 3. Best Fix to Amazon Music Not Working on Android [100% Workable]
In these above parts, we provide you with 5 methods to solve the Amazon Music app android problems. However, there are still some users cannot address this issue and some users may want to find an ultimate way to avoid amazon music app crashing android issue. Fortunately, you have another solution to play Amazon songs without the Amazon Music app-- downloading the actual files of the desired Amazon Music contents for your Android device. All you need is a powerful Amazon Music downloader.
ViWizard Amazon Music Converter is the best Amazon Music downloader for all Amazon Music user to download DRM-free files in MP3, M4A, M4B, AAC, WAV and FLAC from Amazon Music catalog. This means you can take the actual files to more places with your Android device. The best part of this ViWIzard software is that the lossless quality and full ID3 tags will be kept. You can use your computer device to downlaod either Windows or Mac version of this software, then you can transfer the files to your Android device.
Key Features of ViWizard Amazon Music Converter
Free Trial Free Trial* Security verified. 5, 481,347 people have downloaded it.
- Download songs from Amazon Music Prime, Unlimited, and HD Music
- Convert Amazon Music songs to MP3, AAC, M4A, M4B, FLAC, and WAV
- Retain the original ID3 tags and lossless audio quality of Amazon Music
- Support customizing the output audio parameters for Amazon Music
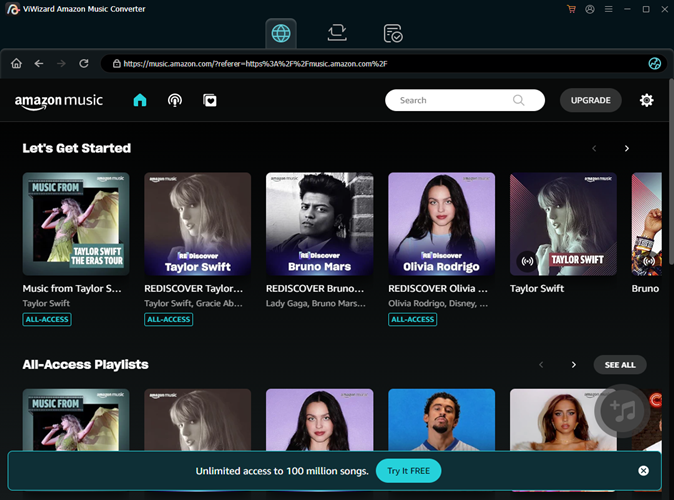
Step 1Add the Amazon Music tracks to ViWizard
Launch the ViWizard Amazon Music Converter and wait until it opens the Amazon Music desktop app. Now you can go to the desired contents to add to ViWizard via drags-and-drops.
Step 2Customize the Format Settings of ViWizard
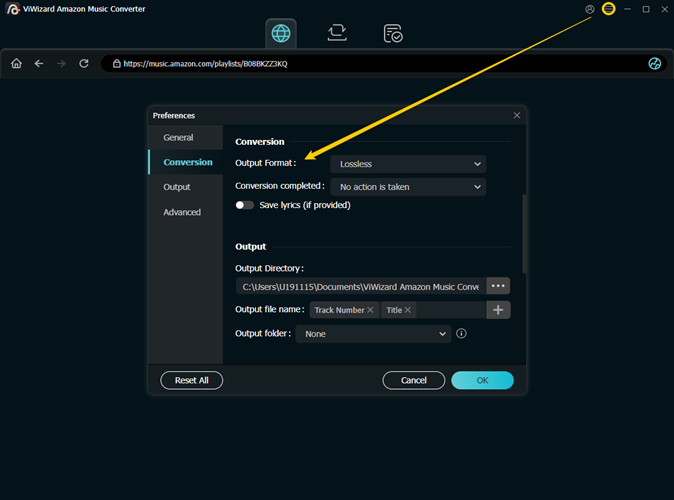
You can now customize the format settings to download the DRM-free files. Click the menu icon > Preferences > Convert > Output format, and select the MP3 or other formats from the drop-down list. Click the OK button to save this change.
Step 3Download the Amazon Music tracks with ViWizard
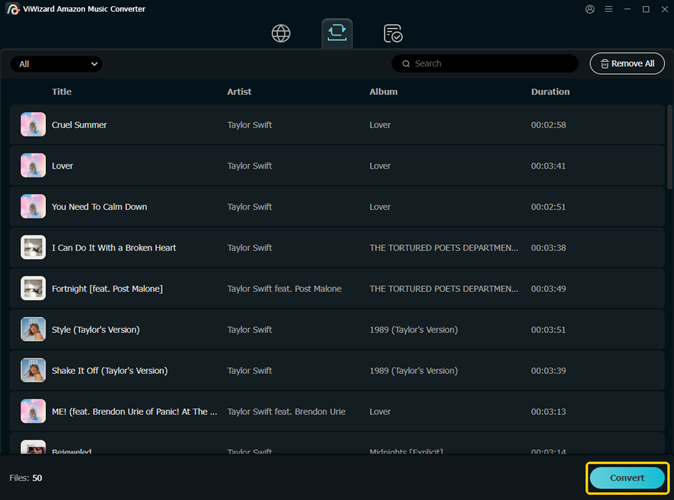
Back to the ViWizard screen, click the Convert button and ViWizard will take care of the rest. You can click the Converted button to open the history menu to check for some specific files. Or an output folder will pop up when all the added files are downloaded.
Step 4Transfer the Amazon Music files to Android
Connect the Android device to your computer by using a USB cable. You should also choose File Transfer on the screen of your android device. When you are viewing the file transfer window, drag and drop the file or folder to it. When the transfer is complete, disconnect the device and open the Files app to check the files.
BonusPlay Amazon Music Files with Poweramp
Since the most difficult part has been solved with the ViWiard Amazon Music Converter, you can have the benefits to some best alternative apps, such as the Poweramp Media Player for Android phone. Here we'd like to share how to import Amazon Music files to Poweramp Media Player for Android.
- Open the Google Play Store app to search for "Poweramp Media Player".
- Install the Poweramp Media Player to your Android device and launch it.
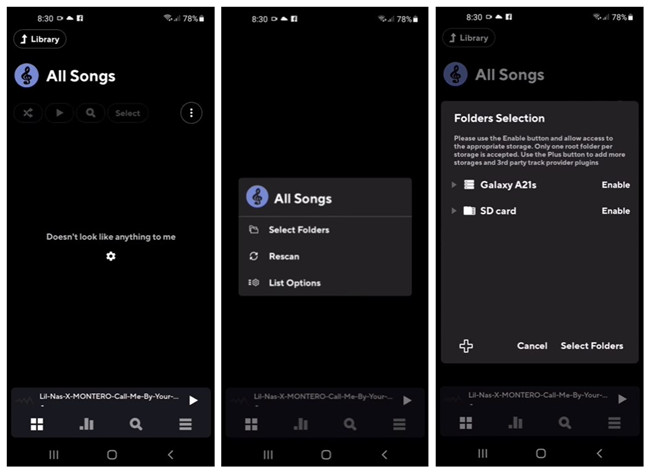
- Go to Library > All Songs.
- Tap on the More button > Select Folders.
- Under the "Folders Selection", tap on the Enable button next to the storage you want to select as the source.
- Locate the folder where the transferred Amazon Music files are stored under. Tap on USE THIS Folder.
- Poweramp will display all the Amazon Music files. You can start to play these files with Poweramp with various features.
Read More : Import Amazon Music Files to Poweramp
Conclusion
With 6 ultimate ways in this post, you can definitely stream your Amazon Music tracks on your android device seamlessly. Among all the fixes, ViWizard Amazon Music Converter performs best because it avoids using Amazon Music app.



Leave a Comment (0)